Save as PNG or GIF.machanzz View attachment 11969 me graphic eken white kali deka witharak kapala anith pink kalla ithiru karaganne kohomada,, magic eraser n background eraser use kala.but etakota photoshop eke nam ee e places empty wenawa..but save kalama ewa white color..meka karaganne kohomada
Latest ads
-
Singapore V2Ray VPN for Tunneling
- hu KANNA
- Updated:
-
 Dating Website & Online Chat Room
- hotvideo
- Updated:
-
 DJI Mini 4 Pro Drone Combo Plus
- Hawaka
- Updated:
-
USA Linux OpenVZ VPS අඩු මිලකට
- Nadun26
- Updated:
-
Shared Hosting වාර්ෂිකව රු 2200 සිට!
- Nadun26
- Updated:
.::ElaKiri - PhotoShop Support Thread::.
- Thread starter fazaal24
- Start date
You are using an out of date browser. It may not display this or other websites correctly.
You should upgrade or use an alternative browser.
You should upgrade or use an alternative browser.
Hi guys,
I am new member of this forum. I show you thread. Its provide nice photo shop. I use some photos from its.
I am new member of this forum. I show you thread. Its provide nice photo shop. I use some photos from its.
Hi guys,
I am new member of this forum. I show you thread. Its provide nice photo shop. I use some photos from its.
mm welcome to Elakiri...

yeah u can learn PS here...any Problems..plz ask..
we can help as we can..
")
mm welcome to Elakiri...
yeah u can learn PS here...any Problems..plz ask..
we can help as we can..
Aniwa, Nice ta see ya guys still on the game
")
How to Make the Coners of an Image Round
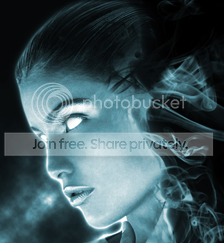
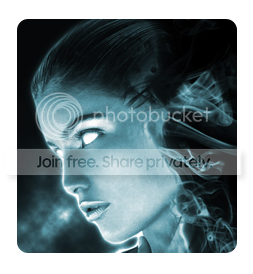
I am Going to Use this Picture to Illustrate the Technique
First of All We have to make a work Space in Photoshop.For that Just Go to
File--->New
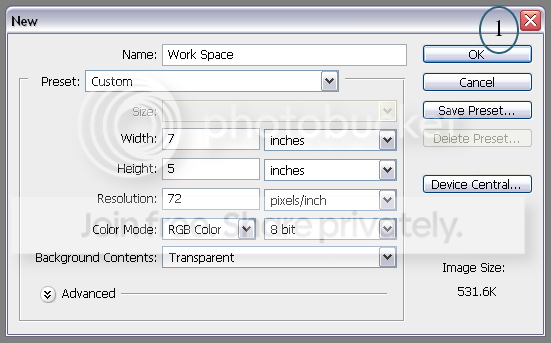
(You can use a Smaller one than this.but this Space is good for common work.But make sure that you have chosen transparent for the background content)
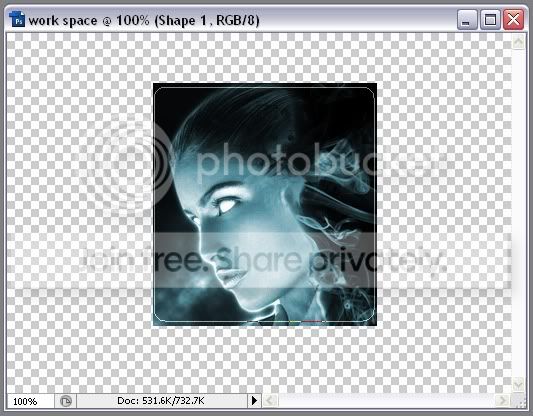
Then Open the Picture that you are going to make it's corners round.And by using the Move tool,drag the image on to the work space
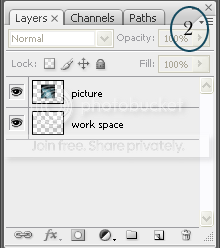
Then Select the Rounded rectangle tool from the tool bar (or just use the shortcut key "u")
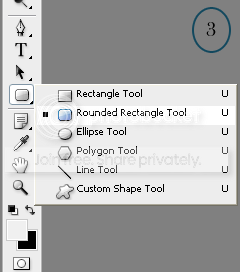
You can Specify the Radius of the Circular Corner here.I used this value for this one

Then Draw the Rounded rectangle on the Picture.
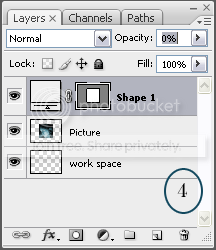
The Opacity must be reduced to zero to see the shape Correctly.
And now what you have to do is,Click on the Shape1 layer in the layer palette with the Ctrl key Pressed.Then You'll See that the Shape is Selected in Dotted Lines.
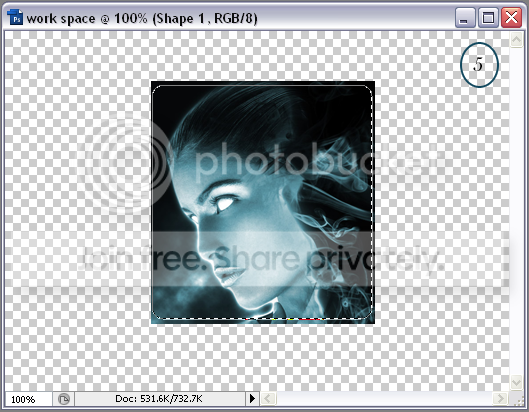
Now Go to Select--->Inverse
Then Click on the Picture layer and Press the Delete Button.Done..Deselect all and your Picture is ready.
Ok.Many Friends Asked about this problem.
So this is the Solution.Go through this simple Tutorial.It's Very Easy..!!
So this is the Solution.Go through this simple Tutorial.It's Very Easy..!!
I am Going to Use this Picture to Illustrate the Technique

First of All We have to make a work Space in Photoshop.For that Just Go to
File--->New

(You can use a Smaller one than this.but this Space is good for common work.But make sure that you have chosen transparent for the background content)
Then Open the Picture that you are going to make it's corners round.And by using the Move tool,drag the image on to the work space

Then Select the Rounded rectangle tool from the tool bar (or just use the shortcut key "u")

You can Specify the Radius of the Circular Corner here.I used this value for this one

Then Draw the Rounded rectangle on the Picture.

The Opacity must be reduced to zero to see the shape Correctly.

And now what you have to do is,Click on the Shape1 layer in the layer palette with the Ctrl key Pressed.Then You'll See that the Shape is Selected in Dotted Lines.

Now Go to Select--->Inverse
Then Click on the Picture layer and Press the Delete Button.Done..Deselect all and your Picture is ready.


All the Tutorials That were Posted in this thread.Well I don't know how to Organize.Anyway Collected All .that's all..
Part I
Cut a Picture with the Coners Rounded-For Beginners
How to install actions in Photoshop
Planet Photoshop-Tutorial Site
changing the background
Adobe Photoshop Lightroom 2.1 RC1 Build 508271(Multilang - 32 bit/64 bit) - 66.9 Mb
Shining Stars Brush Set
Tigers 69's PSD Pack 1&2
glow brushes
Tigers 69's PSD Pack 3&4
Best Photoshop Brushes 2008
Add a Dreamy or Misty Effect To Your Photos
Separating Images From it's Background (Advanced)
Obsidian Dawn-Photoshop Tutorials
ANY FONTS FOR UR Photoshop work
Fonts
Making an Avatar
How to Change a Color of an image of Black and White
Photoshop Top Secret
Animation
How to Make the Coners of an Image Round
Separating Images From it's Background (Advanced)
Examples..Photoshop Projects.
fazzal24-1
fazzal24-2
dilrasan
harshafx
All the Tutorials That were Posted in this thread.Well I don't know how to Organize.Anyway Collected All .that's all..
Thanks machao!
adooo meke video tutorials thiyana thenak nedda???mama photoshop melooo deyak dan nehe
Apo thiyenawa banzz..
If you believe believe me...I was Like you....I learned Whole I know about PS From this thread..Part I
Cut a Picture with the Coners Rounded-For Beginners
How to install actions in Photoshop
Planet Photoshop-Tutorial Site
changing the background
Adobe Photoshop Lightroom 2.1 RC1 Build 508271(Multilang - 32 bit/64 bit) - 66.9 Mb
Shining Stars Brush Set
Tigers 69's PSD Pack 1&2
glow brushes
Tigers 69's PSD Pack 3&4
Best Photoshop Brushes 2008
Add a Dreamy or Misty Effect To Your Photos
Separating Images From it's Background (Advanced)
Obsidian Dawn-Photoshop Tutorials
ANY FONTS FOR UR Photoshop work
Fonts
Making an Avatar
How to Change a Color of an image of Black and White
Photoshop Top Secret
Animation
How to Make the Coners of an Image Round
Separating Images From it's Background (Advanced)
Examples..Photoshop Projects.
fazzal24-1
fazzal24-2
dilrasan
harshafx
A Fantastic Brush collection!
 Collection of brushes for Photoshop

Collection of brushes for Photoshop (Jan/2010) | 1.50 GB
Brushes for Photoshop - sets a variety of the best brushes for Photoshop, allowing very easy and fast, with a few strokes to make a complete original form any work ... Among them, the brush, which can draw water effects, snow, birds, grunge, smoke, plants, paint stains, fingerprints, foam, cracks, abstraction, butterflies, letters, dolls, skulls, scrolls and much more ...
Title: Collection of brushes for Photosho
Developer: Adobe
Permit File: 1280x800
File type:. Jpg .. abr. Png
Size: 1.5 GB
System requirements:
Operating system: Windows All
Processor: Pentium III 1 GHz
Memory: 512 MB
Video card: 16 bit, 1280x800
Available at Railway: 1 GB Download from Hotfile
Mirror from Rapidshare


Collection of brushes for Photoshop (Jan/2010) | 1.50 GB
Brushes for Photoshop - sets a variety of the best brushes for Photoshop, allowing very easy and fast, with a few strokes to make a complete original form any work ... Among them, the brush, which can draw water effects, snow, birds, grunge, smoke, plants, paint stains, fingerprints, foam, cracks, abstraction, butterflies, letters, dolls, skulls, scrolls and much more ...
Title: Collection of brushes for Photosho
Developer: Adobe
Permit File: 1280x800
File type:. Jpg .. abr. Png
Size: 1.5 GB
System requirements:
Operating system: Windows All
Processor: Pentium III 1 GHz
Memory: 512 MB
Video card: 16 bit, 1280x800
Available at Railway: 1 GB Download from Hotfile
Code:
http://hotfile.com/dl/23229994/e33252d/Brushes.ollection.part01.rar.html
http://hotfile.com/dl/23229998/ace6470/Brushes.ollection.part02.rar.html
http://hotfile.com/dl/23229999/6ed186c/Brushes.ollection.part03.rar.html
http://hotfile.com/dl/23230001/b847ec6/Brushes.ollection.part04.rar.html
http://hotfile.com/dl/23229995/6868126/Brushes.ollection.part05.rar.html
http://hotfile.com/dl/23230003/6c85c55/Brushes.ollection.part06.rar.html
http://hotfile.com/dl/23229996/9ed7c72/Brushes.ollection.part07.rar.html
http://hotfile.com/dl/23229997/389f4ab/Brushes.ollection.part08.rar.html
http://hotfile.com/dl/23230000/b056e71/Brushes.ollection.part09.rar.html
http://hotfile.com/dl/23230002/8d431f2/Brushes.ollection.part10.rar.html
http://hotfile.com/dl/23230104/ff6a357/Brushes.ollection.part11.rar.html
http://hotfile.com/dl/23230111/c56bdaf/Brushes.ollection.part12.rar.html
http://hotfile.com/dl/23230139/add1f13/Brushes.ollection.part13.rar.html
http://hotfile.com/dl/23230146/3a0de5d/Brushes.ollection.part14.rar.html
http://hotfile.com/dl/23230154/27597d1/Brushes.ollection.part15.rar.html
http://hotfile.com/dl/23230155/ad3325f/Brushes.ollection.part16.rar.html
Mirror from Rapidshare
Code:
http://rapidshare.com/files/331616629/Brushes.__ollection.part01.rar
http://rapidshare.com/files/331617878/Brushes.__ollection.part02.rar
http://rapidshare.com/files/331619911/Brushes.__ollection.part03.rar
http://rapidshare.com/files/331621748/Brushes.__ollection.part04.rar
http://rapidshare.com/files/331624671/Brushes.__ollection.part05.rar
http://rapidshare.com/files/331626789/Brushes.__ollection.part06.rar
http://rapidshare.com/files/331629362/Brushes.__ollection.part07.rar
http://rapidshare.com/files/331630802/Brushes.__ollection.part08.rar
http://rapidshare.com/files/331636706/Brushes.__ollection.part09.rar
http://rapidshare.com/files/331637252/Brushes.__ollection.part10.rar
http://rapidshare.com/files/331639308/Brushes.__ollection.part11.rar
http://rapidshare.com/files/331639455/Brushes.__ollection.part12.rar
http://rapidshare.com/files/331641253/Brushes.__ollection.part13.rar
http://rapidshare.com/files/331641308/Brushes.__ollection.part14.rarCreate a Retro-Futuristic 2010 Poster in Photoshop
by Ben Rama

To start off 2010 I wanted to create a slightly grungy, retro futuristic sci-fi poster. I basically wanted an image that could represent the feeling 2010 seems like the future to some of us. If you know what I mean, good, I’m sure this poster will be plenty of fun.
To create an image like this I like to look through some stock and brainstorm. A really excellent place to help with this is a site called Compfight. It’s a search engine for flickr photos that allows you to search for creative commons images.
Once I have a few images in Photoshop Ill come back to the project 2 or three times with new ideas and get them down. If I’m stuck for ideas looking through the art magazines and websites which usually gets the creative juices flowing again.
As usual the PSD file is available for download free at the end.
Time to complete 2 hrs .
Note:
Create the doc according to the dimensions of your screen if you want to use this as desktop wallpaper.
Resources used :Sea by visualpanic /Moon by luc.viatour/ Infinity font
Thank you to the artists who provided the materials ,please remember to follow these artists rules and credit them where appropriate.
Step 1
Create a document at 800 x 950 at 72 DPI Then bring in this image of the sea , press C do get the crop tool and select only the sea portion ignoring the people.

Step 2
Select the gradient tool, choose the radial gradient (second from the top) Draw a radial gradient using this red colour ff0000 halfway down the left hand side. Then change the blend mode to multiply and reduce the opacity to 79%.

Step 3
With the background setup we can bring in this image of the moon resize and position the moon like this image, and then reduce the layer’s opacity to 76%.
 Step 7
 Step 8
 Step 9
 Step 10
 This is what you should end up with :

Step 11
Now find a quote you like or a group of words you think will work well in this graphic. Go to Wordle paste in your favourite quote and select go. This is a brilliant little website that puts the words you enter into a new layout font and colour. After hitting randomise play around with the font layout and colour. Once you are happy with the image if on windows: hold down Alt and then the print screen (Prt Sc) button, hit Ctrl + V to paste into Photoshop. On a Mac press command and shift then press 3 to capture to your desktop.
Step 12
Once the image you like is in Photoshop crop any extra bits away then resize and position the text like in the following image. I set the image to screen which gets rid of the dark area. Depending on the colour of your background and text you may need to choose overlay or multiply, just have a scroll through the blend modes until your happy.
 Step 13
Download these brilliant cloud brushes .After loading them create a new layer then brush some clouds in like the following image.
Step 14
Duplicate the cloud layer add a colour overly layer style with colour set to 83b2e7. Then lower the opacity to 83%.
 Step 15
Download the infinity font from here and once installed type out the words ‘TWENTY TEN’. Now position this at the top use the align buttons to get it in the middle.
 Step 16
Rasterize the type and add a gradient overlay layer style, with default settings from black to white.
 Step 17
Download these Kinetic brushes and brush with white behind the Twenty ten letters ( so in a layer below them ) . When done we’ll add a gradient overlay from7fe0f8 to cef8ff. Finally lower the opacity to 39 %.

 Step 18
Finally create a layer below the cloud brushes and Wordle letters but above the white rectangle shapes. Then fill it with white and go to filter, render lighting effects and choose ‘RGB lights’, leave all the other settings as default.
Then use a Gaussian blur at 31.7 image.
 For the final steps change the blend mode to soft light and reduce the opacity to 60 %

Conclusion
That’s a wrap for now having gone through the tutorial you will now know how to use layer masks a neat little way of putting words together with different layouts and how to create a rounded retro futuristic poster . Hopefully you had fun and learnt something new.
Free PSD
The PSD file is available for download free from here.
Rapidshare Download (6.49 mb Zip File)
Mediafire Download (6.49 mb Zip File)
If you want more put me a request!
by Ben Rama

Introduction:To start off 2010 I wanted to create a slightly grungy, retro futuristic sci-fi poster. I basically wanted an image that could represent the feeling 2010 seems like the future to some of us. If you know what I mean, good, I’m sure this poster will be plenty of fun.
To create an image like this I like to look through some stock and brainstorm. A really excellent place to help with this is a site called Compfight. It’s a search engine for flickr photos that allows you to search for creative commons images.
Once I have a few images in Photoshop Ill come back to the project 2 or three times with new ideas and get them down. If I’m stuck for ideas looking through the art magazines and websites which usually gets the creative juices flowing again.
As usual the PSD file is available for download free at the end.
Time to complete 2 hrs .
Note:
Create the doc according to the dimensions of your screen if you want to use this as desktop wallpaper.
Resources used :Sea by visualpanic /Moon by luc.viatour/ Infinity font
Thank you to the artists who provided the materials ,please remember to follow these artists rules and credit them where appropriate.
Step 1
Create a document at 800 x 950 at 72 DPI Then bring in this image of the sea , press C do get the crop tool and select only the sea portion ignoring the people.

Step 2
Select the gradient tool, choose the radial gradient (second from the top) Draw a radial gradient using this red colour ff0000 halfway down the left hand side. Then change the blend mode to multiply and reduce the opacity to 79%.

Step 3
With the background setup we can bring in this image of the moon resize and position the moon like this image, and then reduce the layer’s opacity to 76%.

Step 4Choose this purple colour 271642 for the foreground colour and black for the background colour. Then in a new layer go to filter render clouds. Drop the layers opacity to 73 %. Usually to create stars we can use the noise filter but this time well we’ll use a different technique. Create a new layer above the clouds and fill it with white, change its blend mode to dissolve and reduce its opacity to 1 to 2 %. Finally do a gaussian blur at around 0.7 and voila very quick stars.


Step 5White rectangle: Now well create the white rectangle shapes that make up the background. Create a rectangle like in the following image and fill it with white, then reduce the opacity to 10 %.


Step 6Now well add a layer mask by clicking the circle in a square at the bottom of the layers palette. With the gradient on linear and set to black to white click and drag a gradient. Make sure you are on the layer mask and hold shift to get a good fade.
 Step 7
Now duplicate this layer with CTRL + J and rotate it with Ctrl + T to free transform. You should end up with something like this.

Keep duplicating the layer and rotating it until you have this kind of effect.
 Step 9
Your layers palette should look like this:
 Step 10
Now using shift select all the rectangles in the layers palette and merge them Ctrl + E. (To work non – destructively you can duplicate the layers ). Then add a layer mask and using a black to white gradient on the layer mask fade the bottom part of the rectangles.
 This is what you should end up with :

Step 11
Now find a quote you like or a group of words you think will work well in this graphic. Go to Wordle paste in your favourite quote and select go. This is a brilliant little website that puts the words you enter into a new layout font and colour. After hitting randomise play around with the font layout and colour. Once you are happy with the image if on windows: hold down Alt and then the print screen (Prt Sc) button, hit Ctrl + V to paste into Photoshop. On a Mac press command and shift then press 3 to capture to your desktop.
Step 12
Once the image you like is in Photoshop crop any extra bits away then resize and position the text like in the following image. I set the image to screen which gets rid of the dark area. Depending on the colour of your background and text you may need to choose overlay or multiply, just have a scroll through the blend modes until your happy.
 Step 13
Download these brilliant cloud brushes .After loading them create a new layer then brush some clouds in like the following image.

Step 14
Duplicate the cloud layer add a colour overly layer style with colour set to 83b2e7. Then lower the opacity to 83%.
 Step 15
Download the infinity font from here and once installed type out the words ‘TWENTY TEN’. Now position this at the top use the align buttons to get it in the middle.
 Step 16
Rasterize the type and add a gradient overlay layer style, with default settings from black to white.
 Step 17
Download these Kinetic brushes and brush with white behind the Twenty ten letters ( so in a layer below them ) . When done we’ll add a gradient overlay from7fe0f8 to cef8ff. Finally lower the opacity to 39 %.

 Step 18
Finally create a layer below the cloud brushes and Wordle letters but above the white rectangle shapes. Then fill it with white and go to filter, render lighting effects and choose ‘RGB lights’, leave all the other settings as default.

Then use a Gaussian blur at 31.7 image.
 For the final steps change the blend mode to soft light and reduce the opacity to 60 %
Conclusion
That’s a wrap for now having gone through the tutorial you will now know how to use layer masks a neat little way of putting words together with different layouts and how to create a rounded retro futuristic poster . Hopefully you had fun and learnt something new.
Free PSD
The PSD file is available for download free from here.
Rapidshare Download (6.49 mb Zip File)
Mediafire Download (6.49 mb Zip File)
If you want more put me a request!
http://bestphotoshoptutorials.net/2010/01/16/infinity-brush-set/Infinity Brush Set

Author: ShiftyJ
17 brushes (399 KB) Size of Brushes: 1000 Pxls Width
Photoshop version: CS3
Clich here to download Infinity Brush Set (193)

Author: ShiftyJ
17 brushes (399 KB) Size of Brushes: 1000 Pxls Width
Photoshop version: CS3
Clich here to download Infinity Brush Set (193)
Last edited:
keep it up machan...me thread eka mage Guruwaraya wage thamai...meken thamai man Photoshop Igena gaththe...man class giye ne PS walata kawadawath...
Water Abstract!
See how to create water abstract in just few steps.
Step 1: Start with this new document.

Step 2: Press 'D' to reset your color palette.
Go to Filter> Render> Fiber and use this settings:

Step 3: Go to Filter> Distort> Polar Coordinates and use this settings:

Step 4: Now go to Filter> Blur> Radial Blur and use this settings:

Step 5: Add some colors so go to Image> Adjustments> Hue/Saturation and use this settings:

Step 6: Duplicate the layer. Go to Filter> Blur> Gaussian Blur and use this settings:

Step 7: Set the duplicated layer blending mode to 'Lighten'.

Step 8: Merge the layer together by pressing Ctrl+E and duplicate the layer again.
Go to Filter> Distort> Ocean Ripple and use this settings:

Step 10: Set the duplicated layer blending mode to 'Lighten'.

Here's is the Final Result:

Similar threads
- Replies
- 28
- Views
- 844
- Replies
- 3
- Views
- 257