[FONT=Times New Roman, serif]Recently I got the information from internet. I feel it is useful for all, so I’d like to share it with you guys. It is third-party software that can rip DVD and convert video for iPad. And the whole process is so easy. They are Aiseesoft DVD to iPad Converter and Aiseesoft iPad Video Converter. [/FONT]
[FONT=Times New Roman, serif]Next it is divided into two parts to describe it in details.[/FONT]
[FONT=Times New Roman, serif]Part One: How to Rip DVD to iPad.[/FONT]
[FONT=Times New Roman, serif]Firstly you need download the software: Aiseesoft DVD to iPad Converter. And then install and run DVD to iPad Converter. [/FONT]
[FONT=Times New Roman, serif]The specific operating steps as follows:[/FONT]
[FONT=Times New Roman, serif]
 [/FONT]
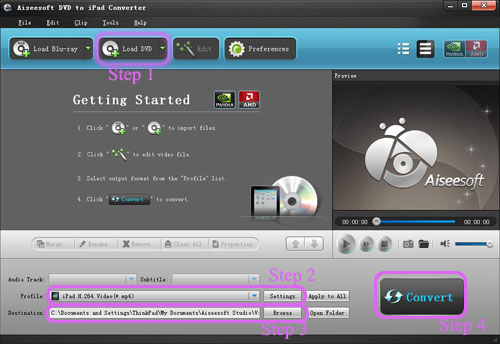
[FONT=Times New Roman, serif]Step 1: Load DVD.[/FONT]
[FONT=Times New Roman, serif]Click "Load DVD" to add your DVD contents.[/FONT]
[FONT=Times New Roman, serif]Step 2: Set output video format.[/FONT]
[FONT=Times New Roman, serif]Click "Profile" button from the drop-down list to select the exact output video format that is the most suitable for your iPad. You can click the "Settings" button to set parameters of your output video such as such as Resolution, Video Bitrate, Frame Rate, Audio Channels, Sample Rate, etc. to get the best video quality as you want.[/FONT]
[FONT=Times New Roman, serif]Step 3: Select the output path by clicking “Browse” button from the line of destination. [/FONT]
[FONT=Times New Roman, serif]Step 4: Click the "Start" button to start the conversion.[/FONT]
[FONT=Times New Roman, serif]Part Two: How to Convert Video to iPad.[/FONT]
[FONT=Times New Roman, serif]Also it is the same. Firstly download the software: Aiseesoft iPad Video Converter. And then install and run iPad Video Converter. [/FONT]
[FONT=Times New Roman, serif]The specific operating steps as follows:[/FONT]
[FONT=Times New Roman, serif]
 [/FONT]
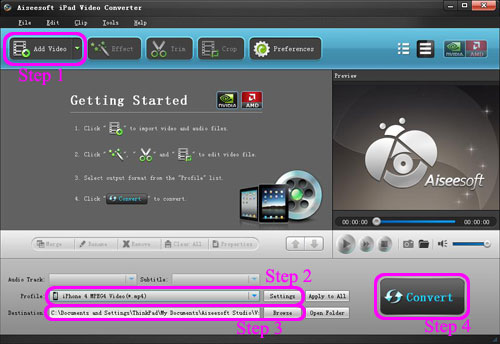
[FONT=Times New Roman, serif]Step 1: Add video.[/FONT]
[FONT=Times New Roman, serif]Click "Add Video" to add your video contents.[/FONT]
[FONT=Times New Roman, serif]Step 2: Set output video format.[/FONT]
[FONT=Times New Roman, serif]Click "Profile" button from the drop-down list to select the exact output video format that is the most suitable for your iPad. You can click the "Settings" button to set parameters of your output video such as such as Resolution, Video Bitrate, Frame Rate, Audio Channels, Sample Rate, etc. to get the best video quality as you want.[/FONT]
[FONT=Times New Roman, serif]Step 3: Select the output path by clicking “Browse” button from the line of destination. [/FONT]
[FONT=Times New Roman, serif]Step 4: Click the "Start" button to start the conversion.[/FONT]
[FONT=Times New Roman, serif]Tips:[/FONT]
[FONT=Times New Roman, serif]The two pieces of software have some basically editing functions such as trim, crop, effect, [/FONT]
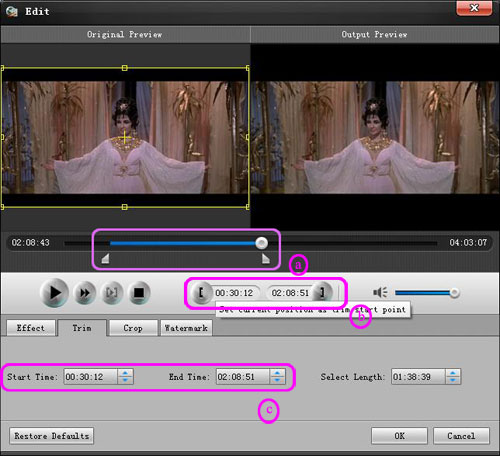
[FONT=Times New Roman, serif]1. Trim:[/FONT]
[FONT=Times New Roman, serif]Three ways to do trim:[/FONT]
[FONT=Times New Roman, serif]a. Drag the “start scissors bar” button to where you want to start and “end scissors bar” button where you want to end. (1)[/FONT]
[FONT=Times New Roman, serif]b. You can click the “Trim From” button when you want to start the trim during your preview and click “Trim To” button when you want to end.[/FONT]
[FONT=Times New Roman, serif]c. Set the exact “start time” and “end time” at right part of the trim window and click “ok”.[/FONT]
[FONT=Times New Roman, serif]
 [/FONT]
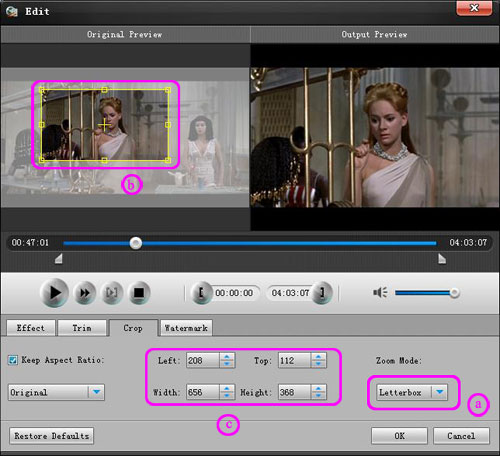
[FONT=Times New Roman, serif]2. Crop:[/FONT]
[FONT=Times New Roman, serif]Three ways to do crop[/FONT]
[FONT=Times New Roman, serif]a. Select one crop mode from the “Crop Mode” drop-list.[/FONT]
[FONT=Times New Roman, serif]b. Dragging crop frame to choose your own crop.[/FONT]
[FONT=Times New Roman, serif]c. Set your own crop value.[/FONT]
[FONT=Times New Roman, serif]
 [/FONT]
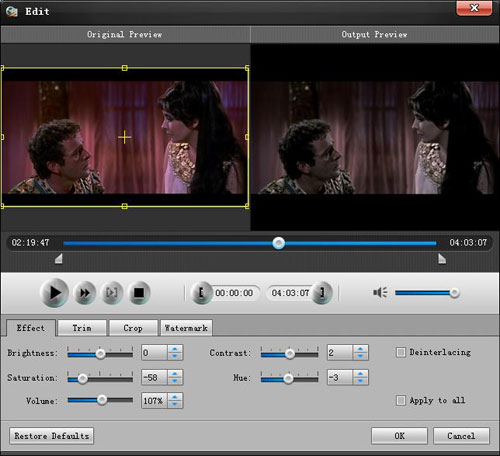
[FONT=Times New Roman, serif]3. Effect[/FONT]
[FONT=Times New Roman, serif]Drag the adjustment bar to find your favorite effect of Brightness, Contrast, Saturation and Volume.[/FONT]
[FONT=Times New Roman, serif]
 [/FONT]
[FONT=Times New Roman, serif]4. Merge into one file.[/FONT]
[FONT=Times New Roman, serif]Pick the “Merge into one file” to merge the files you choose into one output file. (2)[/FONT]
[FONT=Times New Roman, serif]There is another piece of software named iPad Converter Suite . It includes DVD to iPad Converter, iPad Video Converter and iPad Transfer. [/FONT]
[FONT=Times New Roman, serif]DVD Creator[/FONT]
[FONT=Times New Roman, serif]Next it is divided into two parts to describe it in details.[/FONT]
[FONT=Times New Roman, serif]Part One: How to Rip DVD to iPad.[/FONT]
[FONT=Times New Roman, serif]Firstly you need download the software: Aiseesoft DVD to iPad Converter. And then install and run DVD to iPad Converter. [/FONT]
[FONT=Times New Roman, serif]The specific operating steps as follows:[/FONT]
[FONT=Times New Roman, serif]

[FONT=Times New Roman, serif]Step 1: Load DVD.[/FONT]
[FONT=Times New Roman, serif]Click "Load DVD" to add your DVD contents.[/FONT]
[FONT=Times New Roman, serif]Step 2: Set output video format.[/FONT]
[FONT=Times New Roman, serif]Click "Profile" button from the drop-down list to select the exact output video format that is the most suitable for your iPad. You can click the "Settings" button to set parameters of your output video such as such as Resolution, Video Bitrate, Frame Rate, Audio Channels, Sample Rate, etc. to get the best video quality as you want.[/FONT]
[FONT=Times New Roman, serif]Step 3: Select the output path by clicking “Browse” button from the line of destination. [/FONT]
[FONT=Times New Roman, serif]Step 4: Click the "Start" button to start the conversion.[/FONT]
[FONT=Times New Roman, serif]Part Two: How to Convert Video to iPad.[/FONT]
[FONT=Times New Roman, serif]Also it is the same. Firstly download the software: Aiseesoft iPad Video Converter. And then install and run iPad Video Converter. [/FONT]
[FONT=Times New Roman, serif]The specific operating steps as follows:[/FONT]
[FONT=Times New Roman, serif]

[FONT=Times New Roman, serif]Step 1: Add video.[/FONT]
[FONT=Times New Roman, serif]Click "Add Video" to add your video contents.[/FONT]
[FONT=Times New Roman, serif]Step 2: Set output video format.[/FONT]
[FONT=Times New Roman, serif]Click "Profile" button from the drop-down list to select the exact output video format that is the most suitable for your iPad. You can click the "Settings" button to set parameters of your output video such as such as Resolution, Video Bitrate, Frame Rate, Audio Channels, Sample Rate, etc. to get the best video quality as you want.[/FONT]
[FONT=Times New Roman, serif]Step 3: Select the output path by clicking “Browse” button from the line of destination. [/FONT]
[FONT=Times New Roman, serif]Step 4: Click the "Start" button to start the conversion.[/FONT]
[FONT=Times New Roman, serif]Tips:[/FONT]
[FONT=Times New Roman, serif]The two pieces of software have some basically editing functions such as trim, crop, effect, [/FONT]
[FONT=Times New Roman, serif]1. Trim:[/FONT]
[FONT=Times New Roman, serif]Three ways to do trim:[/FONT]
[FONT=Times New Roman, serif]a. Drag the “start scissors bar” button to where you want to start and “end scissors bar” button where you want to end. (1)[/FONT]
[FONT=Times New Roman, serif]b. You can click the “Trim From” button when you want to start the trim during your preview and click “Trim To” button when you want to end.[/FONT]
[FONT=Times New Roman, serif]c. Set the exact “start time” and “end time” at right part of the trim window and click “ok”.[/FONT]
[FONT=Times New Roman, serif]

[FONT=Times New Roman, serif]2. Crop:[/FONT]
[FONT=Times New Roman, serif]Three ways to do crop[/FONT]
[FONT=Times New Roman, serif]a. Select one crop mode from the “Crop Mode” drop-list.[/FONT]
[FONT=Times New Roman, serif]b. Dragging crop frame to choose your own crop.[/FONT]
[FONT=Times New Roman, serif]c. Set your own crop value.[/FONT]
[FONT=Times New Roman, serif]

[FONT=Times New Roman, serif]3. Effect[/FONT]
[FONT=Times New Roman, serif]Drag the adjustment bar to find your favorite effect of Brightness, Contrast, Saturation and Volume.[/FONT]
[FONT=Times New Roman, serif]

[FONT=Times New Roman, serif]4. Merge into one file.[/FONT]
[FONT=Times New Roman, serif]Pick the “Merge into one file” to merge the files you choose into one output file. (2)[/FONT]
[FONT=Times New Roman, serif]There is another piece of software named iPad Converter Suite . It includes DVD to iPad Converter, iPad Video Converter and iPad Transfer. [/FONT]
[FONT=Times New Roman, serif]DVD Creator[/FONT]