Latest ads
-
ZTE MF283U 4G Unlocked Router (Used)
- ayanthamaxi
- Updated:
-
 ලංකාවේ හොඳම උපකාරක පන්ති සහ ගුරුවරුන් එකම තැනකින් - TopTuition.lk
- dulithapathum
- Updated:
-
 Colombo RidhMathraa ’26 🎶✨
- Tmadhusanka
- Updated:
-
Colombo PXN V10 Pro Direct Drive Racing Wheel (Under Warranty)
- Abdur Rahman
- Updated:
-
USDT ණය සේවාව - USDT Loan Service
- පුරවැසියා
- Updated:
:::::::How To Hack::::::::::
- Thread starter Chooty malli
- Start date
You are using an out of date browser. It may not display this or other websites correctly.
You should upgrade or use an alternative browser.
You should upgrade or use an alternative browser.
How To Use Parental Controls in Windows 7
The Parental Controls feature is a valuable tool for controlling the amount of time your children spend on the computer and the programs they’re using. Today we take a look at how to setup and use Parental Controls in Windows 7.
Parental Controls
To access Parental Controls open the Start Menu and type parental controls into the Search box and hit Enter.

Alternatively you can open Control Panel and click on Parental Controls.

When you open Parental Controls, click on the child’s account you want to set up.

Make sure to password protect your Administrator account…otherwise anyone can turn off Parental Controls and use the computer with no restrictions.

If you see a password hasn’t been set when you go into Parental Controls, click on the message and you’ll be prompted and Ensure Administrator Passwords.

Under Parental Controls mark the radio button next to On, enforce current settings. Then you can go through and control their computer time, games, and programs.

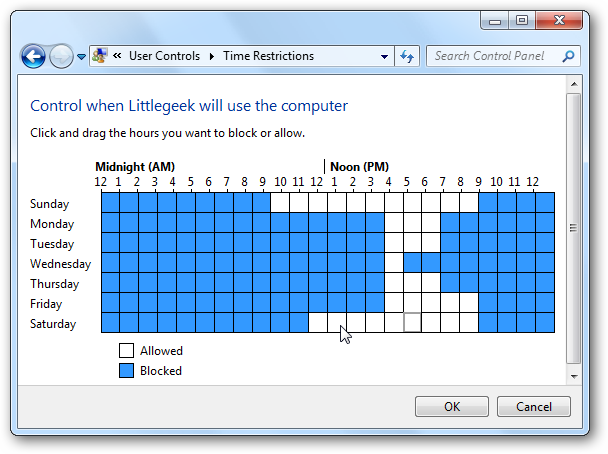
Set Time Limits
Click on Time limits to control when your child has access to the computer. If you want to only allow a few hours each day, it’s easiest to left-click and drag the mouse across all of the time slots to block them. Then allow the time blocks when you want to make the computer available.
Control Games
Click on Games to control the type of access your child has to games on the computer. You can completely block all games or select games by ratings and game names. These game ratings are based on the Entertainment Software Rating Board.

You can also select different game rating systems if it’s more appropriate for your location or if you like a certain system better than another.

You can also block games based on the type of content it contains…and it gives you a lot of choices.

Control Programs
If you want to restrict certain programs on the machine, click on Allow and block specified programs then scroll through the list of installed programs and block them.

Additional Controls
Windows 7 doesn’t have a Web Filter included like Vista did. If you want additional controls like Web Filtering and activity reports, you’ll need to install Windows Live Family Safety which is part of the Window Live Essentials suite. With it you can block access to certain sites and also get access to an activity report that shows you what sites your children have been visiting.

Everything can be controlled online which makes it nice if you want to access a report or change settings while at work.

The Parental Controls feature is easy to use and helps you administer how your children use the computer. Of course nothing is perfect or foolproof and the Parental Controls won’t replace good old fashioned “real parenting” but it makes it easier.
The Parental Controls feature is a valuable tool for controlling the amount of time your children spend on the computer and the programs they’re using. Today we take a look at how to setup and use Parental Controls in Windows 7.
Parental Controls
To access Parental Controls open the Start Menu and type parental controls into the Search box and hit Enter.

Alternatively you can open Control Panel and click on Parental Controls.

When you open Parental Controls, click on the child’s account you want to set up.

Make sure to password protect your Administrator account…otherwise anyone can turn off Parental Controls and use the computer with no restrictions.

If you see a password hasn’t been set when you go into Parental Controls, click on the message and you’ll be prompted and Ensure Administrator Passwords.

Under Parental Controls mark the radio button next to On, enforce current settings. Then you can go through and control their computer time, games, and programs.

Set Time Limits
Click on Time limits to control when your child has access to the computer. If you want to only allow a few hours each day, it’s easiest to left-click and drag the mouse across all of the time slots to block them. Then allow the time blocks when you want to make the computer available.

Control Games
Click on Games to control the type of access your child has to games on the computer. You can completely block all games or select games by ratings and game names. These game ratings are based on the Entertainment Software Rating Board.

You can also select different game rating systems if it’s more appropriate for your location or if you like a certain system better than another.

You can also block games based on the type of content it contains…and it gives you a lot of choices.

Control Programs
If you want to restrict certain programs on the machine, click on Allow and block specified programs then scroll through the list of installed programs and block them.

Additional Controls
Windows 7 doesn’t have a Web Filter included like Vista did. If you want additional controls like Web Filtering and activity reports, you’ll need to install Windows Live Family Safety which is part of the Window Live Essentials suite. With it you can block access to certain sites and also get access to an activity report that shows you what sites your children have been visiting.

Everything can be controlled online which makes it nice if you want to access a report or change settings while at work.

The Parental Controls feature is easy to use and helps you administer how your children use the computer. Of course nothing is perfect or foolproof and the Parental Controls won’t replace good old fashioned “real parenting” but it makes it easier.

64 Tips to Make Windows 7 Faster, Secure, Easy to Use
Windows 7 may be Microsoft’s most anticipated product ever. It builds on Windows Vista’s positives, and eliminates many of that OS’s negatives. It adds new functionality, too—all in a package that is less resource-hungry than its predecessor.
And whether or not you're upgrading from Vista or skipping it altogether and moving up from Windows XP, you'll need to know how to make the most of it in your environment. Here are 77 tips and tricks to get you there.
1. Pick Your Edition. Most business users do not need the more expensive Ultimate Edition; stick with Professional unless you specifically need BitLocker.
2. Upgrading? Go 64-bit. As the second major Windows release to fully support 64-bit, the x64 architecture has definitely arrived on the desktop. Don't buy new 32-bit hardware unless it's a netbook.
3. Use Windows XP Mode.Yes, it's only an embedded Virtual PC with a full copy of WinXP—but it's an embedded Virtual PC with a full copy of Windows XP! This is the first profoundly intelligent use of desktop virtualization we've seen—and a great way to move to Windows 7 without giving up full Windows XP compatibility.
4. Use Windows PowerShell v2.More than just a shell, this is the administration tool you've always wanted: Parallel, distributed processing for administrative tasks! Manage 100 machines literally as easily as you manage one with the new Remoting feature. Windows PowerShell v2 ships for the first time in Windows 7, and within six months will be available for older versions of Windows.
5. Use AppLocker.We've been fans of Software Restriction Policies since Windows XP, and AppLocker finally makes application whitelisting possible. Use it to enhance or even replace your anti-virus software, ensuring that only the software you want to run will run.
6. Shift to and from Explorer and CommandPrompt. The classic Windows power toy Open Command Prompt Here is now an integral part of Windows 7 Explorer. Hold down the shift key then right-click a folder to add this option to the property menu. While you're in a command prompt, if you want to open an Explorer window with the focus of the window on the current directory, enter start.
7. Record Problems.The Problem Steps Recorder (PSR) is a great new feature that helps in troubleshooting a system (see Figure 1). At times, Remote Assistance may not be possible. However, if a person types psr in their Instant Search, it will launch the recorder. Now they can perform the actions needed to recreate the problem and each click will record the screen and the step. They can even add comments. Once complete, the PSR compiles the whole thing into an MHTML file and zips it up so that it can be e-mailed for analysis to the network admin (or family problem solver, depending on how it's being used).

Figure 1 The Problem Steps Recorder dramatically speeds up troubleshooting. (Click the image for a larger view)
8. Make Training Videos. Use a tool like Camtasia to record short, two to three minute video tutorials to help your users find relocated features, operate the new Taskbar and so forth. Get them excited about Windows 7—and prepared for it.
9. Start Thinking About Windows Server 2008 R2. Some of Windows 7's more compelling features, like BranchCache, work in conjunction with the new server OS. The R2 upgrade path is pretty straightforward, so there's little reason not to take advantage of the synergies if you can afford upgrade licenses.
10. Prepare Those XP Machines. There's no in-place upgrade from Windows XP to Windows 7, so start planning to migrate user data now, in advance of a Windows 7 upgrade deployment.
11. Consider Clean Installs. Even when upgrading Windows Vista machines, consider a clean install rather than an in-place upgrade. Yes, it's more hassle, but it'll produce a more trouble-free computer in the long run.
12. Consider Upgrade Assurance. Even if you've never bought it before, consider it for your new Windows 7 licenses. Access to the Microsoft Desktop Optimization Pack (MDOP), which includes App-V, MED-V and other cool technologies, is worth the premium.
13. Find New Tools.Within Control Panel is a single Troubleshooting link that leads you to all of your diagnostic tools on the system. There are additional tools, however, not installed by default. Selecting the "View all" link in the top left-hand corner will help you to see which troubleshooting packs are local and which ones are online. If you find a tool that you don't have, you can grab it from here.
14. Understand Virtual Desktop Infrastructure (VDI). Windows 7 plays an important role in Microsoft's VDI strategy, where virtualized Windows 7 machines are hosted on a central virtualization server using a special blanket "Enterprise Centralized Desktop" license. Read up and figure out if you can take advantage of this new strategy.
15. Prepare for DirectAccess. DirectAccess makes it easier for users to remotely access their office-based resources, without a VPN. DirectAccess also opens up remote computers more fully to Group Policy—but it requires Windows 7 and Windows 2008 R2.
16. Employ Deployment Image Servicing and Management (DISM). If you quickly want to list or manage Windows packages, features or drivers, use the command-line utility DISM. The "image" in the name may fool you into thinking that this is solely a deployment tool. An online command-line switch lets you manage the features in the currently loaded OS. To get a list of the loaded Windows features, enter dism /online /get-features /format:table. To enable a feature, enter dism /online /enable-feature /featurename:.
17. Embrace Troubleshooting Packs. Designed to help users troubleshoot and solve problems on their own, you need to update your support procedures to acknowledge these Packs. For example, don't force users to repeat steps the Pack already walked them through, and consider developing your own Packs (in Windows PowerShell) to support in-house systems.
18. Check Reliability. The Reliability Monitor was introduced in Windows Vista as 'The Reliability and Performance Monitor." In Windows 7 it has been separated from Performance Monitor and moved to a new location under the Action Center. You open the Action Center in Control Panel and then look under the Maintenance options for the "View reliability history" link. You can also just type in Reliability Monitor from the Instant Search (see Figure 2).

Figure 2 The Reliability Monitor has been broken out separately from Performance Monitor. (Click the image for a larger view)
19. Accept Diversity.Not every organization will be ready to move entirely to Windows 7 right away. That's fine—but that shouldn't mean the entire organization stays on Windows XP, either. The myths of the cost savings of having only one OS have been largely disproven or downplayed, so use Windows 7 where it makes sense to do so.
20. Get Snippy. The snipping tool has also been around in various incarnations but it's even easier to use in Windows 7. Launch the tool, then drag and drop any part of your screen. The tool will snip the selection. You can save it as a graphic file or annotate with basic drawing tools. Teach your end users how to use this tool so they can grab the snapshots of their problems and send them to the help desk. Or create your own library of visual notes.
21. Presentation Nirvana. Press Windows+P to access the new Presentation mode, and easily turn on your projector and laptop screen at the same time. No more messing with vendor-specific utilities and arcane keystrokes. (Windows+X accesses the Mobility Center, with additional presentation options.)
22. Cut the Clutter. Press Windows+Home to minimize all but the current window, removing background clutter and letting you focus on that report your boss has been bugging you about.
23. Be a Mouse-Click Administrator. Windows 7 makes it easy to gain admin rights with a keyboard shortcut. Click on Ctrl+Shift on a taskbar-locked icon, and voila! You've launched it with appropriate admin rights.
24. Faster Installations. If your computer is capable of booting from USB, try this: XCopy the Windows 7 installation DVD to a sufficiently large USB drive, boot from that drive, and install Windows from there. It's faster than a spinning platter.
25. Burn Discs with a Click.Or two; double-click an ISO file to burn it to your CD or DVD writer.
26. Restore Point PreviewsMany of us used to shut off System Restore because we were terrified to actually use it; under Windows 7, we can be much calmer. After selecting a Restore Point, Windows will now offer to show you which files and folders will be affected by restoring to that point.
27. Sync Time Zones. If you work with offices in different time zones and frequently find yourself missing meeting times because you are not in sync with their time zone, try the "Additional Clocks" feature that was first introduced in Vista. Within your Date and Time settings is a tab called Additional Clocks, where you can add two or more clocks to your taskbar time, and set them to provide different time zones from your current time zone.
28. Configure User Account Control (UAC). Even if you're a UAC hater, give it another try. Go to the Control Panel to configure its behavior to something slightly less obnoxious than what Windows Vista had, and see if you can't live with the extra protection it offers (see Figure 3).

Figure 3 User Account Control, the bane of administrators, has been revamped and improved. (Click the image for a larger view)
29. RoboCopyCopyCopy. The always-useful Robocopy.exe can now run multi-threaded; run Robocopy /? to review its new parameters (like /MT for multithreading) and make your copies go faster.
30. Remote Desktop Console. Windows 7 Remote Server Administration Tools (RSAT) does not include a console-based remote desktop utility. And even if it did, the standard remote desktop console has some nagging limitations: It can't move connections around in the list; it can't sort by folders and so forth. If you manage lots of servers from your Windows 7 workstation, try downloading a copy of mRemote from mremote.org. This donation-requested utility allows you to mix together a variety of remote control applications, including Citrix Independent Computing Architecture (ICA), Microsoft Remote Desktop Protocol (RDP), Virtual Network Computing (VNC), Secure Shell (SSH) and rlogin. All host names are displayed in a standard tree control that can be divided into folders, sorted alphabetically, and allow you to assign different logon accounts and secure passwords to each connection.
31. Multiple Monitors.Windows 7 makes working with multiple monitors intuitive and flexible. There are a variety of shortcuts and mouse motions that flick windows from monitor to monitor. To make the most of this, you need lots and lots of screen real estate. Try one of the new QWXGA monitors from Samsung (tinyurl.com/qwxgasamsung) or Dell (tinyurl.com/qwxgadell). These 23-inch monitors have a 2048x1152 resolution, making it possible to put two full-sized pages on the same monitor. Pair them together and you'll get enough space to have all your admin tools open along with Office, Visio, your intranet sites and a little note to your mom in Live Mail. Move your taskbar to the left or right side of the window instead of along the bottom to free up even more real estate.
32. Windows PowerShell Scripting. If you want to make the most of Windows PowerShell on Windows 7, you'll need a quick way to build and debug scripts. Windows 7 comes with an interactive editor that allows you to try out cmdlets and test functions on the fly.
33. Drag-and-Drop Notification Icons. The redesigned notification area displays only a minimum number of icons; all other notification icons are moved to a side window. Rather than using the Customize option to select icons for the main display, you can drag-and-drop icons from the side window to the notification area.
34. Add Unindexed Shared Folders to Library. You can add UNC paths such as \\servername\sharename to a Library, but the server must index the folder. If you want to add a UNC path to an unindexed server, you can create a symbolic link to the UNC path, then add the link or links to the library. Use the mklink command. For example, mklink HomeFolder \\ServerName\Homefolder.
35. Simplify Cloned Machine Setups.You can't run Sysinternals' newsid utility to change the identity of a cloned Windows 7 machine (either a virtual machine or imaged PC). Instead, create a template installation then run sysprep /oobe /generalize /reboot /shutdown /unattend:scriptfile. Clone or copy this virtual machine file. When it launches, it will get a new SID and you can fill in the name. The reference for building unattended script files is at tinyurl.com/winunattend.
36. Snap That Aero. The Windows key is great for all your shortcuts. Now you can use it to work with the new AeroSnap feature in Windows 7. Select a window, hit the Windows key and a left or right arrow to snap the window to that half of the screen, or use the up arrow to snap it to the top of the screen.
37. Shortcut the Taskbar. The Windows key is great for shortcuts. You can select the Windows key and a number to correspond to items on your taskbar. So, if IE (for example) is the third icon on your taskbar (not counting the Start button), you can hit the Windows key and the number three to launch or open IE.
38. Manage Passwords.Control Panel includes a new application called Credential Manager. This may appear to be a completely new tool that allows you to save your credentials (usernames and passwords) for Web sites you log into and other resources you connect to (such as other systems). Those credentials are saved in the Windows Vault, which can be backed up and restored. However, you might see this as similar to a tool we have in XP and Vista. From the Instant Search, type in control /userpasswords2 and you will be brought to the Advanced User Accounts Control Panel, where you can also manage passwords for your account (see Figure 4).

Figure 4 The Credential Manager provides a handy, secure place to store passwords. (Click the image for a larger view)
39. Trigger Actions.Event Viewer is closely tied into Task Scheduler. You have the ability to take an event (select it in Event Viewer) and then from the Actions pane, select the option "Attach a Task" to have that event, when it appears, trigger an action. That action can be: launch a program; send an e-mail; or display a message. This feature may be very helpful in troubleshooting a problem.
40. Browse InPrivate.A new feature in IE8 is the ability to open the browser in an InPrivate Browsing session that allows you to perform banking and so forth from a public location without fear of leaving behind any residue. IE will not retain anything you do in an In Private Browsing session. You can perform this action if you are already within IE by selecting the Safety button and then InPrivate Browsing. This will open another IE window altogether. However, you can save a few steps by using the shortcut. Right-click the desktop IE icon, click InPrivate and the windows will open in an InPrivate session already.
41. Go Live. Many applications installed on past versions of Windows have been removed. Starting with Windows 7, these applications (and a few others not typically installed with Windows) have been moved into the Live Essentials downloadable applications, at download.live.com. These applications include Messenger, Mail, Writer, Photo Gallery, Movie Maker, Family Safety and a few others.
42. Remove Apps.Although some applications have been moved off of Windows to become an optional download, other apps, such as IE8, Media Player, Media Center and DVD Maker are still included. In times past, especially when it came to IE, the applications were tied into the OS. However, in Windows 7 you can easily remove them if desired. Head to the Program and Features applet in Control Panel and select the "Turn Windows features on or off" link in the top left-hand corner. Then you can select the checkbox of the features you want to lose or add for your system (see Figure 5).

Figure 5 Windows 7 unbinds many applications from the OS, making it easy to add and remove them. (Click the image for a larger view)
43. Are You Windows 7 Experienced? System properties has a rating called the Windows Experience Index (WEI). This rating is a collection of five different ratings that are determined by the Windows System Assessment Tool (WinSAT). The highest rating score is 7.9 (compared to 5.9 in Vista), using the categories of Processor, RAM, Graphics, Gaming Graphics and Primary Hard Disk. The final rating is not an average of all the ratings, but the lowest of the subcomponent scores.
44. Analyze Processes. One of the coolest new features in the revamped Resource Monitor (resmon) is the ability to see the "wait chain traversal." An unresponsive process will be shown in red in the Resource Monitor; right-click the process and choose Analyze Process. This will show the threads in the process and see who holds the resources that are holding up the process itself. You can then kill that part of the process if you like.
45. Create Virtual Worlds. Virtualization capability has been added to the Disk Management tools. If you open Computer Management, go to the Disk Manager tool and then click the Action button at top, you will see the options Create VHD and/or Attach VHD. This allows you to create and mount a virtual hard drive directly from within the GUI. Note: With Windows 7 you even have the ability to boot a Windows 7 VHD (see Figure 6).

Figure 6 Windows 7 adds a great deal of virtualization support, including the ability to create and attach virtual hard drives from the GUI. (Click the image for a larger view)
46. Encrypt USB Sticks. Use BitLocker To Go. Maybe you've managed to never misplace or lose a USB key, but for the rest of us mere mortals, it's a fact of life. Most of the time it's no big deal, but what if it contains sensitive data? BitLocker To Go enables you to encrypt data on removable storage devices with a password or a digital certificate stored on a smart card.
The 14 Best Windows 7 Keyboard Shortcuts
The Windows key now performs a wide variety of functions. Here are a handful of the most useful ones:
64. Win+h - Move current window to full screen
65. Win+i - Restore current full screen window to normal size or minimize current window if not full screen
66. Win+Shift+arrow - Move current window to alternate screen
67. Win+D - Minimize all windows and show the desktop
68. Win+E - Launch Explorer with Computer as the focus
69. Win+F - Launch a search window
70. Win+G - Cycle through gadgets
71. Win+L - Lock the desktop
72. Win+M - Minimize the current window
73. Win+R - Open the Run window
74. Win+T - Cycle through task bar opening Aero Peek for each running item
75. Win+U - Open the Ease of Use center
76. Win+Space - Aero Peek the desktop
47. Lock with Group Policy.Take control through AppLocker application control. AppLocker intercepts kernel calls that try to create new processes or load libraries and ensures the code is allowed to execute. Practically, that means you can eliminate unknown and unwanted software by implementing AppLocker through Group Policy.
48. Be Our Guest. Guest mode proves a convenient method to give a guest or child access to your computer with limits on making system changes, installing software, or writing to the disk outside the user profile. After the user is done and logs off, data saved inside of the user profile is deleted.
49. Restore from Backed up Restore Points. You can choose to include restore points in your backups and restore from them when using System Restore. This is convenient if you want to create a baseline of a working configuration and be able to restore to it in the future without overwriting other data on the hard disk.
50. Benefit from BranchCache.BranchCache helps you save on round trips for requested files in remote branch scenarios. If one person requests a file over the WAN, it's cached locally and either distributed across computers at the remote branch or stored on a central server at the remote branch.
51. Disable Search Suggestion Popups. As you type in the Search Box, Windows 7 makes suggestions based on past queries by pulling past queries from the Registry. You can disable this in the Local Group Policy by enabling User Configuration | Administrative Templates | Windows Components | Windows Explorer | Turn Off Display Of Recent Search Entries In the Windows Explorer.
52. Pin Control Panel to Taskbar. If you use the Control Panel frequently, you may have noticed that you cannot simply right-click the Control Panel and select Pin to Taskbar. Instead, you must first Open Control Panel so its icon appears in the taskbar. From there, you can right-click the icon in the taskbar and select Pin this program to taskbar.
53. Leverage Search Connectors. You can now search the Web using the search functionality. Windows 7 includes Federated Search to increase the search scope beyond the local and network resources. Several search connectors are available, such as for YouTube and Twitter, or you can create custom ones to fit your needs.
54. Use Stickier Notes. Even though this feature has existed in previous versions of Windows in one form or another, it's much easier to use in Windows 7. You can stick a note on your desktop for quick reminders. It's a snap to change the font or note color. If you have a note selected, use Ctrl-N to create a new one.
55. Try out Improved WordPad. You probably haven't given much thought to WordPad lately, but the version shipping with Windows 7 has undergone a major renovation. Think of it as a lite version of Microsoft Word. WordPad sports a spiffy ribbon interface, making it a snap to create well-formatted documents. Plus, you are no longer relegated to saving them as .RTF files. WordPad now supports the Office Open XML document (.DOCX) format. This makes it even easier to open .DOCX files created in Word in WordPad.
56. Calculate.Another basic utility that received a major overhaul is the venerable calculator. In addition to standard and scientific views, there are now programmer and statistic modes. You will also love the conversion and calculation features. Want to convert Celsius to Fahrenheit but can never remember the formula? Use the conversion panel. You'll also enjoy the data calculation extension. Quickly find the difference between two dates or calculate a new date by adding or subtracting years, months or days.
57. Manage Services from Task Manager. The Windows 7 Task Manager now includes a tab to manage services. You can quickly see at a glance the status of all services on your machine. Click a column heading to sort. You can even start and stop services with a simple right-click. If you need full-blown service management, use the Services button to launch the Services management console. You may often have the Task Manager running in the system tray; now, having service management access means one less window to have open.
58. Get Under the Hood. Windows 7 offers more ways to peek under the hood without adding third-party solutions. A terrific example is the Resource Monitor. The performance tab in Windows Task Manager is a good start, but sometimes you need more information. Click the Resource Monitor button to get more detailed information and performance graphs for key subsystems like CPU and Disk. You can also find the Resource Monitor under Accessories | System Tools.
59. Check Vital Signs.Another new system tool you'll enjoy is the System Health report. In the Run dialog box, type perfmon /report, which generates a system health report. This report records details about your computer's performance, resource usage and more. The report also includes diagnostic information about things that aren't working as they should and suggested steps to resolve. The reports are saved and can be accessed with the Performance Monitor management console. You can also save as an HTML file or send via e-mail.
60. Get More Windows PowerShell. Windows PowerShell v2 promises to be a game-changer for many system administrators. Many will prefer to use the graphical Windows PowerShell console, also known as the Integrated Scripting Environment (ISE). You'll find this in the Windows Power Shell folder under Accessories. Add a keyboard shortcut of Ctrl+Alt+I to quickly launch it. Run any Windows PowerShell command in the lower panel and see the results in the middle. Create or edit scripts in the top pane. Open multiple Windows PowerShell sessions connected to remote computers. The ISE makes Windows PowerShell v2 easy to use and fun (see Figure 7).

Figure 7 Windows PowerShell has been much more tightly integrated with Windows 7, and adds the Integrated Scripting Environment. (Click the image for a larger view)
61. Put It on Old Stuff. One perhaps-not-so-obvious Windows 7 tip is that you should attempt to install it everywhere. One user has a 6-year-old laptop that originally shipped with Windows XP. He could never get Windows Vista to install on it. But Windows 7 installed without complaint and runs extremely smooth. Granted, there are some Windows 7 features he can't take advantage of because the processor lacks certain features, but these are minor issues considering the laptop now has life again.
62. Improve Security. In Vista it was difficult to manage system protection via restore points. The System Protection tab in Windows 7 is a vast improvement. In one spot you can configure how much space to devote to restore points, delete and create restore points or even turn off system protection altogether. This is very useful on older systems where disk space may be at a premium.
63. Actually Use Help and Support. Much of Vista's clutter has been reduced in Windows 7. For instance, the Help and Support page has three links, a search window and a link back to Microsoft's Windows site. It's much less intimidating for end users, so make sure they know about it. Search is much improved as well, making for a better, faster experience.
How To Restrict Access To Drives In My Computer In Windows
If you have a shared or public computer that several people use, you might want to restrict access to it’s drives to prevent users from deleting important data. Today we look at restricting access to some or all drives on the machine using Local Group Policy.
Note: This method uses Local Group Policy Editor which is not available on home versions of Windows 7 or Vista
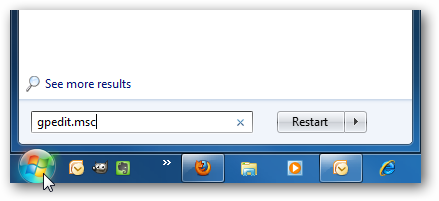
First type gpedit.msc in the search box of the Start Menu and hit Enter.
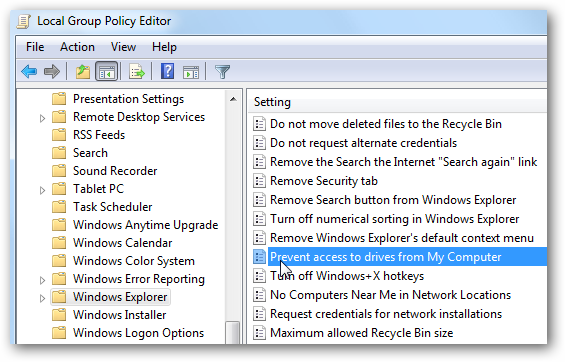
Now navigate to User Configuration \ Administrative Templates \ Windows Components \ Windows Explorer. Then on the right side under Setting, double click on Prevent access to drives from My Computer.
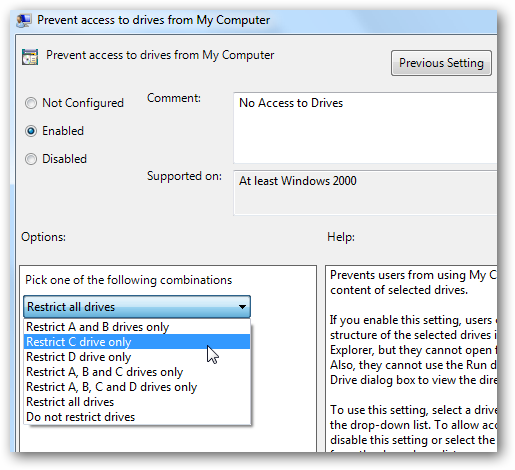
Select Enable then under Options from the drop down menu you can restrict a certain drive, a combination of drives, or restrict them all. The main drive you would probably want to restrict is the C:\ drive or which ever lettered drive Windows is installed on. Restricting all drives means they can’t access the CD or DVD drive, and cannot use a flash drive if they need to get files from it.
Note: This setting won’t prevent users from using programs that access the local drives.
The restrictions take effect immediately, no restart is required. When a user opens up My Computer they’ll be able to see which drives are listed, but when they try to access a restricted drive, they’ll get the following error message.

For the screenshots in this tutorial we used Windows 7 Ultimate, but this process also works with XP Professional and Vista (not in Home versions) the screens just look different.

Local Group Policy allows you to customize several settings for how you want to administer your machine. Restricting access to certain drives in addition to other security and access measures, can help keep a shared computer stable and secure.
If you have a shared or public computer that several people use, you might want to restrict access to it’s drives to prevent users from deleting important data. Today we look at restricting access to some or all drives on the machine using Local Group Policy.
Note: This method uses Local Group Policy Editor which is not available on home versions of Windows 7 or Vista
First type gpedit.msc in the search box of the Start Menu and hit Enter.

Now navigate to User Configuration \ Administrative Templates \ Windows Components \ Windows Explorer. Then on the right side under Setting, double click on Prevent access to drives from My Computer.

Select Enable then under Options from the drop down menu you can restrict a certain drive, a combination of drives, or restrict them all. The main drive you would probably want to restrict is the C:\ drive or which ever lettered drive Windows is installed on. Restricting all drives means they can’t access the CD or DVD drive, and cannot use a flash drive if they need to get files from it.
Note: This setting won’t prevent users from using programs that access the local drives.

The restrictions take effect immediately, no restart is required. When a user opens up My Computer they’ll be able to see which drives are listed, but when they try to access a restricted drive, they’ll get the following error message.

For the screenshots in this tutorial we used Windows 7 Ultimate, but this process also works with XP Professional and Vista (not in Home versions) the screens just look different.

Local Group Policy allows you to customize several settings for how you want to administer your machine. Restricting access to certain drives in addition to other security and access measures, can help keep a shared computer stable and secure.
")
A Bluescreen By Any Other Color
Seeing a bluescreen that’s not blue is disconcerting, even for me, and based on the reaction of the TechEd audiences, I bet you’ll have fun generating ones of a color you pick and showing them off to your techy friends. I first saw Dan Pearson do this in a crash dump troubleshooting talk he delivered with Dave Solomon a couple of years ago and now close my Case of the Unexplained presentations with a bluescreen of the color the audience choses (you can hear the audience’s response at the end of this recording, for example). Note that the steps I’m gong to share for changing the color of the bluescreen are manual and only survive a boot session, so are suitable for demonstrations, not for general bluescreen customization. Be sure to check out the special holiday bluescreen I’ve prepared for you at the end of the post.
Preparing the System
Because you’re going to modify kernel code, the first step is to enable the ability to edit kernel code in memory if it’s not already enabled. Windows systems with less than 2 GB of RAM uses 4KB pages to store kernel code, so can protect pages with the protection most suitable for the contents they contain. For instance, kernel data pages should allow both read and write access while kernel code should only allow read and execute access. As an optimization that helps improve the speed of virtual address translations, Windows uses large pages (4 MB on x86 and x64) on larger systems. That means that if there’s both code and data stored in a page, the page must allow read, write and execute accesses, so to ensure that you can edit a page, you have to encourage Windows to use large pages. If your system is Windows XP or Server 2003 and has less than 256 MB, or is Windows Vista or higher and has 2 GB or less of RAM, create a REG_DWORD value called LargePageMinimum that’s set to 1 under HKLM\System\CurrentControlSet\Control\Session Manager\Memory Management:

So that you don’t have to rush to show off your handiwork before Windows automatically reboots after the crash, change the auto-reboot setting. On Windows XP and Server 2003, right-click on My Computer, select the Advanced Tab, and press the Settings button in the “Startup and Recovery” section. On Windows Vista and higher, right-click on Computer in the Start Menu, select properties to open the Properties dialog, click Advanced System Settings, select the Advanced tab and press the Settings button in the “Startup and Recovery” section. Finally, uncheck the “Automatically restart” checkbox:

If you’re running 64-bit Windows Vista or higher, you need to boot the system in Debug mode so that you can run the kernel debugger in “local” mode. You can do that either by selecting F8 during the system boot and choosing the Debug boot or by checking the Debug checkbox in the System Configuration (Msconfig) utility:

Next, reboot the system and start the debugger with administrator rights (if UAC is on, run it as administrator). Point the debugger at the Microsoft symbol server by opening the Symbol Search Path dialog under the File menu and enter this string: srv*c:\symbols*http://msdl.microsoft.com/download/symbols (replace c:\symbols with whatever local directory in which you want the debugger to store cached symbols). Next, open the Kernel Debugging dialog from the File menu, click the Local page, and press OK:

The subsequent steps vary depending on whether you’re running 32-bit or 64-bit Windows and whether it’s Windows Vista or newer.
32-bit Windows XP and Windows Server 2003
The function that displays the bluescreen on these operating systems is KeBugCheck2. You’re looking for the place where the function passes the color value to the function that fills the screen background, InbvSolidColorFill. Enter the command “u kebugcheck2” to list the start of the function, then enter the “u” command to dump additional pages of the function’s code until you see the reference to InbvSolidColorFill (after entering “u” once, you can just press enter to repeat the command). You’ll need to dump 30-40 pages before you come across the one with the call:

Preceding the call, you’ll see an instruction that has the number 4 as its argument (“push 4”), as you can see above. Copy the code address of that instruction by selecting it from the address column on the left and typing Ctrl+C. Then in the debugger command window, type “eb “, then Ctrl+V to paste the address, then “+1”, then enter. The debugger will go into memory editing mode, starting with the address of the color value. Now you can choose the color you want. 1 is red, 2 is green, and you can experiment if you want a different color. Simply enter the number and press enter twice to commit it and exit editing mode. Here’s what the screen should look like after you’re done:

64-bit Versions of Windows and 32-bit Windows Vista and Higher
On these versions of Windows, the core bluescreen drawing function is KiDisplayBlueScreen. Type “u kidisplaybluescreen” and then continue entering “u” commands to dump pages of the function until you see the call to InbvSolidColorFill. On 32-bit versions of Windows, continue by following the instructions given in the Windows XP/Server 2003 section to find and edit the color value. On 64-bit versions of these operating systems, the instruction preceding the call to InvbSolidColorFill is the one that passes the color, so copy its address (the number in the left column) and enter this command to edit it: “eb <address>+4”. The debugger will go into memory editing mode and you can change the value (e.g. 1 for red, 2 for green):

Viewing the Result
You’re now ready to crash the system. If you’re running 64-bit Windows, you might get a crash without doing anything additionally. That’s because Kernel Patch Protection will notice the modification and crash the system as a deterrent to ISVs that might consider modifying the kernel’s code to change its behavior. There might be a delay of up to several minutes before that happens, though. To generate a crash on demand, run the Notmyfault tool (you can download it from the Windows Internals book page) and press the “Do Bug” button (to avoid data loss, make sure you’ve saved any work and closed all other applications):

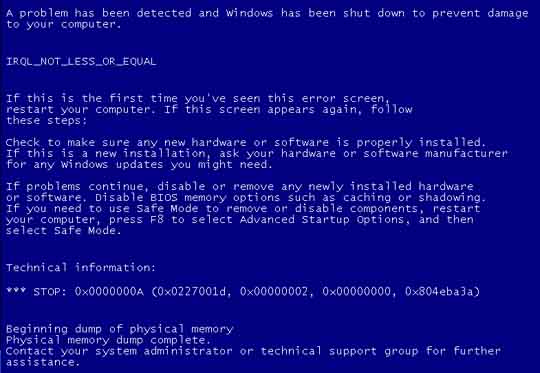
You’ll now get a bluescreen in the color you picked, in this case the red screen of death:

The Holiday Bluescreen
In the spirit of the holiday season, I took things one step further to generate a holiday-themed bluescreen: not only did I modify the background color, but the text color as well. To do this on 64-bit versions of Windows Vista or higher, note the call to InvbSetTextColor immediately following the one to InvbSolidColorFill and the address of the instruction that passes the text color to the function, “move ecx, 0Fh”:

The 0Fh parameter represents white, but you can change it using the same editing technique. Use the “eb” command, passing the address of the instruction plus 1. Here I set the color to red (which is a value of 1):

And here’s the festive bluescreen I produced:

Happy holidays! And remember, if you have any troubleshooting cases you want to share, please send me screenshots (.PNG preferred) and log files.
For the people who want some other colors, here you are:
Hexadecimal code for which color
0 black
1 blue
2 green
3 cyan
4 red
5 magenta
6 yellow/brown
7 white
8 gray
9 bright blue
A bright green
B bright cyan
C bright red
D bright magenta
E bright yellow
F white

Seeing a bluescreen that’s not blue is disconcerting, even for me, and based on the reaction of the TechEd audiences, I bet you’ll have fun generating ones of a color you pick and showing them off to your techy friends. I first saw Dan Pearson do this in a crash dump troubleshooting talk he delivered with Dave Solomon a couple of years ago and now close my Case of the Unexplained presentations with a bluescreen of the color the audience choses (you can hear the audience’s response at the end of this recording, for example). Note that the steps I’m gong to share for changing the color of the bluescreen are manual and only survive a boot session, so are suitable for demonstrations, not for general bluescreen customization. Be sure to check out the special holiday bluescreen I’ve prepared for you at the end of the post.
Preparing the System
Because you’re going to modify kernel code, the first step is to enable the ability to edit kernel code in memory if it’s not already enabled. Windows systems with less than 2 GB of RAM uses 4KB pages to store kernel code, so can protect pages with the protection most suitable for the contents they contain. For instance, kernel data pages should allow both read and write access while kernel code should only allow read and execute access. As an optimization that helps improve the speed of virtual address translations, Windows uses large pages (4 MB on x86 and x64) on larger systems. That means that if there’s both code and data stored in a page, the page must allow read, write and execute accesses, so to ensure that you can edit a page, you have to encourage Windows to use large pages. If your system is Windows XP or Server 2003 and has less than 256 MB, or is Windows Vista or higher and has 2 GB or less of RAM, create a REG_DWORD value called LargePageMinimum that’s set to 1 under HKLM\System\CurrentControlSet\Control\Session Manager\Memory Management:

So that you don’t have to rush to show off your handiwork before Windows automatically reboots after the crash, change the auto-reboot setting. On Windows XP and Server 2003, right-click on My Computer, select the Advanced Tab, and press the Settings button in the “Startup and Recovery” section. On Windows Vista and higher, right-click on Computer in the Start Menu, select properties to open the Properties dialog, click Advanced System Settings, select the Advanced tab and press the Settings button in the “Startup and Recovery” section. Finally, uncheck the “Automatically restart” checkbox:

If you’re running 64-bit Windows Vista or higher, you need to boot the system in Debug mode so that you can run the kernel debugger in “local” mode. You can do that either by selecting F8 during the system boot and choosing the Debug boot or by checking the Debug checkbox in the System Configuration (Msconfig) utility:

Next, reboot the system and start the debugger with administrator rights (if UAC is on, run it as administrator). Point the debugger at the Microsoft symbol server by opening the Symbol Search Path dialog under the File menu and enter this string: srv*c:\symbols*http://msdl.microsoft.com/download/symbols (replace c:\symbols with whatever local directory in which you want the debugger to store cached symbols). Next, open the Kernel Debugging dialog from the File menu, click the Local page, and press OK:

The subsequent steps vary depending on whether you’re running 32-bit or 64-bit Windows and whether it’s Windows Vista or newer.
32-bit Windows XP and Windows Server 2003
The function that displays the bluescreen on these operating systems is KeBugCheck2. You’re looking for the place where the function passes the color value to the function that fills the screen background, InbvSolidColorFill. Enter the command “u kebugcheck2” to list the start of the function, then enter the “u” command to dump additional pages of the function’s code until you see the reference to InbvSolidColorFill (after entering “u” once, you can just press enter to repeat the command). You’ll need to dump 30-40 pages before you come across the one with the call:

Preceding the call, you’ll see an instruction that has the number 4 as its argument (“push 4”), as you can see above. Copy the code address of that instruction by selecting it from the address column on the left and typing Ctrl+C. Then in the debugger command window, type “eb “, then Ctrl+V to paste the address, then “+1”, then enter. The debugger will go into memory editing mode, starting with the address of the color value. Now you can choose the color you want. 1 is red, 2 is green, and you can experiment if you want a different color. Simply enter the number and press enter twice to commit it and exit editing mode. Here’s what the screen should look like after you’re done:

64-bit Versions of Windows and 32-bit Windows Vista and Higher
On these versions of Windows, the core bluescreen drawing function is KiDisplayBlueScreen. Type “u kidisplaybluescreen” and then continue entering “u” commands to dump pages of the function until you see the call to InbvSolidColorFill. On 32-bit versions of Windows, continue by following the instructions given in the Windows XP/Server 2003 section to find and edit the color value. On 64-bit versions of these operating systems, the instruction preceding the call to InvbSolidColorFill is the one that passes the color, so copy its address (the number in the left column) and enter this command to edit it: “eb <address>+4”. The debugger will go into memory editing mode and you can change the value (e.g. 1 for red, 2 for green):

Viewing the Result
You’re now ready to crash the system. If you’re running 64-bit Windows, you might get a crash without doing anything additionally. That’s because Kernel Patch Protection will notice the modification and crash the system as a deterrent to ISVs that might consider modifying the kernel’s code to change its behavior. There might be a delay of up to several minutes before that happens, though. To generate a crash on demand, run the Notmyfault tool (you can download it from the Windows Internals book page) and press the “Do Bug” button (to avoid data loss, make sure you’ve saved any work and closed all other applications):

You’ll now get a bluescreen in the color you picked, in this case the red screen of death:

The Holiday Bluescreen
In the spirit of the holiday season, I took things one step further to generate a holiday-themed bluescreen: not only did I modify the background color, but the text color as well. To do this on 64-bit versions of Windows Vista or higher, note the call to InvbSetTextColor immediately following the one to InvbSolidColorFill and the address of the instruction that passes the text color to the function, “move ecx, 0Fh”:

The 0Fh parameter represents white, but you can change it using the same editing technique. Use the “eb” command, passing the address of the instruction plus 1. Here I set the color to red (which is a value of 1):

And here’s the festive bluescreen I produced:

Happy holidays! And remember, if you have any troubleshooting cases you want to share, please send me screenshots (.PNG preferred) and log files.
For the people who want some other colors, here you are:
Hexadecimal code for which color
0 black
1 blue
2 green
3 cyan
4 red
5 magenta
6 yellow/brown
7 white
8 gray
9 bright blue
A bright green
B bright cyan
C bright red
D bright magenta
E bright yellow
F white
How to Increase Internet Speed to Maximum available speed??
Step1 : Right Click on my Computer
Step2 : Selects the Properties Tag
Step3 : Now a New Window opens, Select The Hardware and Then Select Device Manager.
Step4 : Now a New Window will open . Click on the + sign in front of Ports and select the Communication Ports and Double Click on It.
Step5: A new window Will Open . Now Select the Port Settings and Chnage the Settings as shown in figure and Click on Ok.
Change bit per Second value as 128000
select hardware in Flow Control
and hit OK button
Thats all the Procedure. Now restart your computer and Experience . You will experience that your Internet speed is better than previous.
Step1 : Right Click on my Computer
Step2 : Selects the Properties Tag
Step3 : Now a New Window opens, Select The Hardware and Then Select Device Manager.
Step5: A new window Will Open . Now Select the Port Settings and Chnage the Settings as shown in figure and Click on Ok.
Change bit per Second value as 128000
select hardware in Flow Control
and hit OK button
Thats all the Procedure. Now restart your computer and Experience . You will experience that your Internet speed is better than previous.
Last edited:
How To Repair Your Corrupted Windows System Files for Windows XP
There are times when for some unknown reasons, the registry entries or system files get corrupted.
Here is one method of restoring those files using a program called 'webfldrs.msi' without reinstalling the whole of Windows. The program is located right there on your PC and can be run from c:\windows\system32\webfldrs.msi
If it's not on your system, you can download it from here;-
RAPIDSHARE
STEPS INVOLVED:
- Insert your Windows XP CD into your CD-ROM
- Run webfldrs.msi
You will see the following dialogs. Just follow the instructions.


Thats All The Procedure to recover from corrupted Files...
Make your Own Text to Talk Software in Windows XP
I will Show You How to make the talking software in Windows Xp... Here we will utilize the default voices of Xp. Using this software you can make Windows to Speak the Words that you type..So Guys Read On..
Steps:
1. Open the Notepad File and Copy the Text Given Below..
Dim msg, sapi
msg=InputBox("Enter your text","My Talking Software")
Set sapi=CreateObject("sapi.spvoice")
sapi.Speak msg

2. Now Save the File as anyname.vbs (note that vbs Extension).

3.Now Open the anyname .vbs file and Write the Text that you want that Xp will speak...

4. Click on Ok and See that your Xp is Spaeking the Text...
Adding Applications to the Desktop Context Menu
For today’s lesson we’ll show you how to add Notepad to the menu, but you could add any applications you want instead. The first thing you’ll want to do is open up regedit.exe through the Start Menu search or run box, and then browse down to the following key:
HKEY_CLASSES_ROOT\Directory\Background\shell

The screen should look similar to this one if you are in the right place.
Next, you’ll want to create a new key underneath the shell key, the name of which is exactly what is going to show up on the desktop menu. Right-click on the “shell” key, and then choose New \ Key from the menu.

Give the new key the name that you want to show up on the desktop context menu. For this example we’ll be using Notepad.

Optional: If you want to assign an “Alt” key to this menu entry for quicker access, you can change the (Default) value on the right and put an & character in front of the key you want to use. For instance, if you wanted to be able to just use the N key to launch Notepad once the desktop context menu pops up, you can do this:

Personally I don’t find this terribly useful since you have to use the mouse to right-click on the desktop… may as well just use the mouse to click the item. Still, for completeness I’ve included it.
Next you’ll need to create the command key that will actually hold the command used to launch the application. Right-click on the new Notepad key, and then choose New \ Key from the menu.

Give this key the name “command” in lowercase.

To complete this step you’ll need the full path to the application that you want to launch. You can use Shift + Right-Click to get the Copy as Path menu item to find this more quickly. Note: of course, for Notepad you wouldn’t need the full path, but this is just an example.

Now click on “command” on the left side, and then double-click on the (Default) key in the right side to edit the string value.

Paste in the full path to the executable that you got from the “Copy as Path” step above, or you can put in the full path yourself if you’d like.
Once it’s done, it should look like this:

And right-clicking on the desktop will produce the new menu item… naturally, using this menu item should launch Notepad.

You can add as many applications to the desktop context menu as you’d like, just repeat the steps again with a new menu item name.
Hide Drives from Your Computer in Windows 7 or Vista
If you’ve got drives in My Computer that you never access, such as a USB Flash drive that you are using solely for ReadyBoost, a floppy drive, or a network drive only used for a particular piece of software, then you might want to simply hide the drive from your computer.
This tip will only hide the drive from being displayed, applications and the command prompt will still have access to it, and you can still manually browse to the folder if you type in the path.
Now what’s that floppy drive doing there?

Configure the Hidden Drives
Open up regedit.exe by using the start menu search box, and then browse down to the following key.

The NoDrives key most likely does not exist by default, so you’ll need to create it with right-click \ new 32-bit DWORD and name it NoDrives.
This value is a 32 bit number, and the bits are arranged in reverse order with a value of 1 hiding that drive. For example, if we wanted to hide drives A: and F: we would arrange it like this:
Z Y X W V U T S R Q P O N M L K J I H G F E D C B A 0 0 0 0 0 0 0 0 0 0 0 0 0 0 0 0 0 0 0 0 1 0 0 0 0 1 Converting 100001 to decimal we end up with a decimal value of 33 or a hex value of 0×21, so if you double-click on the key in the registry editor, choose Decimal and then enter 33 into the value field.

In order to see these changes, you’ll need to restart explorer.exe, which you can do easily from Task Manager or the longer way by just logging off and back on.
Uninstall Tweak
To disable this tweak, simply remove the NoDrives registry key entirely.
Reference Info
Here’s a list of the values you’ll want to enter for a few different drive letters.
Drive Letter Decimal Hex A 1 1 B 2 2 C 4 4 D 8 8 E 16 10 F 32 20 G 64 40 H 128 80 If you want to hide multiple drives, you’ll need to use the table of all the drive letters to figure out the correct binary code, and then convert that to decimal or hex. (hint: you can use the calculator in scientific mode)
Look, now that worthless floppy drive is gone!

Naturally it would be better to disable the floppy drive in your BIOS, but this tip is still valid for other types of drives.
Note that this also works on Windows XP.
If you’ve got drives in My Computer that you never access, such as a USB Flash drive that you are using solely for ReadyBoost, a floppy drive, or a network drive only used for a particular piece of software, then you might want to simply hide the drive from your computer.
This tip will only hide the drive from being displayed, applications and the command prompt will still have access to it, and you can still manually browse to the folder if you type in the path.
Now what’s that floppy drive doing there?

Configure the Hidden Drives
Open up regedit.exe by using the start menu search box, and then browse down to the following key.
HKEY_CURRENT_USER\Software\Microsoft\Windows\CurrentVersion\Policies\Explorer
If the Explorer key does not exist, you can right-click on Policies, select New Key and name it Explorer.

The NoDrives key most likely does not exist by default, so you’ll need to create it with right-click \ new 32-bit DWORD and name it NoDrives.
This value is a 32 bit number, and the bits are arranged in reverse order with a value of 1 hiding that drive. For example, if we wanted to hide drives A: and F: we would arrange it like this:
Z Y X W V U T S R Q P O N M L K J I H G F E D C B A 0 0 0 0 0 0 0 0 0 0 0 0 0 0 0 0 0 0 0 0 1 0 0 0 0 1 Converting 100001 to decimal we end up with a decimal value of 33 or a hex value of 0×21, so if you double-click on the key in the registry editor, choose Decimal and then enter 33 into the value field.

In order to see these changes, you’ll need to restart explorer.exe, which you can do easily from Task Manager or the longer way by just logging off and back on.
Uninstall Tweak
To disable this tweak, simply remove the NoDrives registry key entirely.
Reference Info
Here’s a list of the values you’ll want to enter for a few different drive letters.
Drive Letter Decimal Hex A 1 1 B 2 2 C 4 4 D 8 8 E 16 10 F 32 20 G 64 40 H 128 80 If you want to hide multiple drives, you’ll need to use the table of all the drive letters to figure out the correct binary code, and then convert that to decimal or hex. (hint: you can use the calculator in scientific mode)
Look, now that worthless floppy drive is gone!

Naturally it would be better to disable the floppy drive in your BIOS, but this tip is still valid for other types of drives.
Note that this also works on Windows XP.
Remove NVIDIA Control Panel from Desktop Right-Click Menu
Have you ever wondered how to remove the “NVIDIA Control Panel” item from the desktop context menu? If so, you probably didn’t realize that it’s trivially easy to remove.
Note: This method works the same for XP, Vista, and Windows 7.
For those of you in the dark about what we’re talking about, here’s the menu item we’re looking to remove:

I rarely need to use the NVIDIA Control Panel, and it’s accessible via the control panel’s Additional Options section if I really needed to get to it.
Remove the Easy Way
Just open up the NVIDIA Control Panel, and uncheck View \ Add Desktop Context Menu

This will immediately remove the item from the context menu:

The only problem with this is that the shell menu item doesn’t actually get removed, just disabled.
Remove With a Registry Hack
If you want to make remove the menu item from the registry, you can open up regedit.exe through the start menu search or run box, and then browse down to the following key:

Find the NvCplDesktopContext key on the left-hand side, and then make sure to Export the current key out to a file for backup purposes. Once you’ve done that, delete that key.
Completely Disable the Shell Extension
If you don’t want that shell extension loading at all, you can use the awesome Nirsoft ShellExView application to just completely disable the extension and prevent it from running.
Note: make sure to launch ShellExView by right-clicking and choosing Run as Administrator if you are using Vista.
Find “DesktopContextClass” with the description “NVIDIA Display Properties Extension”, and click the Disable button.

If you aren’t sure it’s the right one, double-click on it to see the details, and verify that it’s similar to this one (although your version could be different)

As soon as you use the Disable button, the menu item will be gone.
Have you ever wondered how to remove the “NVIDIA Control Panel” item from the desktop context menu? If so, you probably didn’t realize that it’s trivially easy to remove.
Note: This method works the same for XP, Vista, and Windows 7.
For those of you in the dark about what we’re talking about, here’s the menu item we’re looking to remove:

I rarely need to use the NVIDIA Control Panel, and it’s accessible via the control panel’s Additional Options section if I really needed to get to it.
Remove the Easy Way
Just open up the NVIDIA Control Panel, and uncheck View \ Add Desktop Context Menu

This will immediately remove the item from the context menu:

The only problem with this is that the shell menu item doesn’t actually get removed, just disabled.
Remove With a Registry Hack
If you want to make remove the menu item from the registry, you can open up regedit.exe through the start menu search or run box, and then browse down to the following key:
HKEY_CLASSES_ROOT\Directory\Background\shellex\ContextMenuHandlers\

Find the NvCplDesktopContext key on the left-hand side, and then make sure to Export the current key out to a file for backup purposes. Once you’ve done that, delete that key.
Completely Disable the Shell Extension
If you don’t want that shell extension loading at all, you can use the awesome Nirsoft ShellExView application to just completely disable the extension and prevent it from running.
Note: make sure to launch ShellExView by right-clicking and choosing Run as Administrator if you are using Vista.
Find “DesktopContextClass” with the description “NVIDIA Display Properties Extension”, and click the Disable button.

If you aren’t sure it’s the right one, double-click on it to see the details, and verify that it’s similar to this one (although your version could be different)

As soon as you use the Disable button, the menu item will be gone.
How to create a Password Protected Folder
Do you want to password protect your folder? Do you want to make it invisible so that it remains unnoticed by the normal users? Well here is a way to do that. In this post I will show you how to make a password protected folder in Windows without using any additional software. Here is is step by step procedure to create a password protected folder.

Step-1: Create a new folder (Right-click -> New -> Folder) and give it any name of your choice. For instance I name it as ABC.
Step-2: Now in this folder place all the important files, documents or any folders that you want to password protect.
Step-3: Now Right-click on this folder (ABC) and select the option Send To -> Compressed (zipped) Folder.
Step-4: Now a new compressed zipped folder gets created next this folder (ABC) with the same name.
Step-5: Double-click on this compressed zipped folder and you should see your original folder (ABC) here.
Step-6: Now goto the File menu and select the option Add a password.
ie: File -> Add a password
Now a small window will pop up and here you can set your desired password. Once the password is set, the folder will ask for the password every time it is opened. Thus you have now created the password protected folder.
How to make it Invisible
Step-1: Now Right-click on this password protected folder and select Properties.
Step-2: At the bottom select the option Hidden and press OK. Now your folder gets invisible (hidden).
Step-3: In order to unhide this folder go to My Computer – >Tools -> Folder options. Switch to View tab, scroll down and under Hidden files and folders you’ll see the following two options
- Do not show hidden files and folders
- Show hidden files and folders
Last edited:
Similar threads
- Replies
- 6
- Views
- 217
- Replies
- 1
- Views
- 227