

Latest ads
-
 ඔයාගෙ Assignment හෝ Thesis එක හරියට හදාගමු
- ErMurazor
- Updated:
-
BlackWall V2ray servers
- hu KANNA
- Updated:
-
 Peppa Pig Family Plush Toy Set – 5 Characters
- anil1961
- Updated:
-
Express VPN PC - 1 Year Rs. 600.00
- Sanathbh
- Updated:
-
Capcut Pro 7 Days Team Plan - Rs. 3️⃣0️⃣0️⃣
- Sanathbh
- Updated:
You are using an out of date browser. It may not display this or other websites correctly.
You should upgrade or use an alternative browser.
You should upgrade or use an alternative browser.

Kronic said:Machan BOOSTERS thiyenawa habai freee thiyenawada danne na
uba use karala tiyenawada?


psyche said:
Router eke utorrent port number eka foward karalada thiyenne?
aka kohomada karanne?
buddhika19 said:aka kohomada karanne?
router eke brand name (Dlink, USR etc) ekai model number ekai post karanna...

Proceed at your own risk!
Introduction:
This is a step by step guide on setting up uTorrent. It details the steps from downloading to optimizing your settings.
A quick rundown of its major features:
1. Protocol Encryption - This is the major speed booster if your ISP throttles bittorrent traffic. It can do wonders on torrents with high speeds and can give high speeds especially if your peers are using uTorrent/Azureus, as those are the popular ones that support this standard.
2. Distributed Hash Table (DHT) - Similar to Peer Exchange, disable this.
3. Capping Upload Speed - Uploading data to other peers at full throttle will severely limit your download rate. This is one key element we have to adjust for a good download/upload ratio. Unless you are purely seeding and not using your computer for other tasks, limit your upload to 80% of full bandwidth.
Tools We Need:
1. An internet connection and its maximum download and upload speed. If unsure, visit
http://www.speedtest.net.
2.Patched TCPIP.sys to allow more concurrent half-open connections. Windows XP SP2 and Vista limits the number of half-connections to 10. This limitation can impact your bittorrent experience. To increase the limit,
NOTE: IF UNSURE, DON'T DO THIS PART. Proceed at your own risk!
Windows XP Users (NOT Vista users)
1. Go to this site - http://lvllord.de/
2. Click on Downloads
3. Right click the link and click "Save Target As"
4. Save it in your Desktop
5. Open the file and run the program located inside the archive, agreeing to the security warning.
6. Some text should scroll by in MS-DOS window, after it ends, type C.
7. Enter 100 for the number of concurrent half-open connections and press Enter.
8. Type Y and the file should be patched, Cancel any Windows XP warnings that should appear, it is part of
Microsoft's way of ensuring its files are not tampered with (the utility tampers them to break the limit on purpose).
Windows Vista Users (NOT XP users)
1. Go to this site - http://www.yaronmaor.net/repair.htm
2. Look for the item named - EventlD4226Fix for Windows Vista (Line 2)
3. Right click the link and click "Save Target As".
4. Save it in your Desktop.
5. Extract all contents of the file to a folder.
6. If you are running 64-bit Vista, double click on InstallPatch64.bat. If you are running 32-bit Vista, double click on InstallPatch32.bat. Unsure? Run InstallPatch32.bat.
7. Some text should scroll by in a MS-DOS window, after it ends, type Y and press Enter.
8. After the restart notice appears, press any key and restart your PC.
NOTE: IF UNSURE, DON'T DO THIS PART. Proceed at your own risk!
3. uTorrent
4. A FunFile torrent/s to kick off the download.
Note: Windows Vista users - try the beta (may have problems) which is fully Vista supported. The download links are provided in the first post in the link. Skip to step 3 after you click on the link.
Getting to the file:
1. Click on this download page - http://www.uTorrent.com/download.php
2. Click "get uTorrent 1.*.*". Choose to RUN it.
3. If any security dialogs appear, click Run as we know this is a safe file.
4. uTorrent will prompt you with the following dialog.
5. Click OK to install.
Configuring uTorrent
1. Run the program. Ignore the security warning (Click Run).
2. It will give the following dialog.
You want the program to be easily accessible, don't you? Click Yes and the shortcut will be created in your desktop and start menu.
3. Next you will be given another dialog
Click Yes, so the next time you download on a FunFile torrent, uTorrent will automatically start up to handle the downloading job.
4. And the next dialog box is the most important step
Now the value that we are interested in right now is the Upload Limit in kB/s (aka KBps). If you have trouble understanding your speed, consider this: Internet Explorer shows download speed as KBps when you download a file.
There is a big difference between 5Kbps and 5KBps. make sure you got the right values in KBps (not Kbps). Use Google Calculator if you need help with convertions.
5. Click Current Settings
The authors of uTorrent have been very helpful in providing a list of predefined values. Your connection should be near to one of the above categories. "xx/384k" means that your download is unlimited and your upload is limited to 384kbps (which is 48KBps).
With your results of the speed test you did above, select the closest upload speed from the list. uTorrent immediately adjusts the "Affected Settings" area with recommended values for your upload speed.
Note: The default download speed in utorrent is Unlimited
TIP: uTorrent randomly generates a port number in Current Port. This tutorial assumes the port number to be 55641 - but you can substitute it with the number uTorrent shows.
6. Port forwarding is also important. Click on "Test if port is forwarded properly" to run the test. If you have trouble running the test, it could be due to one or more of the following reasons:
a. Home Router - If you are running a router (sometimes called wireless access point) at home, you will have to configure it to direct all TCP/UDP bittorrent traffic to port 55641 to be routed to your computer. If so, click this
link (http://www.portforward.com/routers.htm). Click the router you are using. Click the application, which is uTorrent, and follow the instructions.
b.Personal Firewall - If you are running a firewall software such as Norton Internet Security, Norton Personal
Firewall, ZoneAlarm, etc, then configure your firewall such that uTorrent has access to port 55641. This is normally accomplished by starting up utorrent, and the firewall should spring up an access alert. Simply select the option to
"Always Allow" the program to access the Internet.
Windows Firewall Users - uTorrent will automatically configure Windows Firewall so there is no action needed from you.
c. Corporate Firewall - Are you running this software in a corporate network? Bad news - you have to inform the admin that you want the port to be directed to your computer. The good news - you can still go by without port forwarding, but speeds will not be optimal.
d. Utorrent.Com Port Forward Checking Website has a problem - Yes, especially if you are accessing the Internet through a transparent proxy that your ISP forces you to use. This simply means that the website is reporting false info, and the best way to verify that your port is forwarded is to proceed into the next step. This case is very unlikely as utorrent.com uses a different port for checking.
Having done all the above, if the website still says that it has problems accessing the port, the ultimate test will be when we do a test file downloading. Let's click on Use Selected Settings.
7. Now you see the full uTorrent window in full glamour.
Starting a simple torrent
We need to start a simple download, and the one that comes to my mind right now is uTorrent 1.6.1 Bit Torrent Client! We will be downloading this file purely for testing and delete it later on.
1. Minimize uTorrent for now. Notice it resides on the system tray (bottom right) automatically.
2. Click to http://azureus.sourceforge.net/download.php. Click on "Jar, Jar torrent, Source". Click the "Jar Torrent" to download the torrent file.
3. Select a mirror and click the download link on the right most column.
4. You should get this dialog
This is the metadata file, it contains information on the file you want to download eventually. That is why it is so small. We want uTorrent to automatically start downloading it, so click Open.
NOTE: The "Name, Type and From" may differ on your system. This is normal, as uTorrent is frequently updated
5. The file opens with uTorrent which automatically pops up this dialog (scaled for easier viewing)
All values are automatically filled in for you. Here is also where you select files that you don't want to download - if the download has many files which in this case is not. Remember where the file is stored in "Save As", or save it in a different location that is more convenient for you.
All looking good, click OK.
Progress of the Download
Click on the uTorrent torrent (the only item in the list) to view more information on it. Suddenly all the values begin filling up!
Looks like the torrent has a total of x seeds and y downloaders. x seeds is a lot and it means you should get the full file in no time! A seed is a term used to refer to peers who have downloaded and sharing the complete file.
However, after running for 5 minutes, the speed refuses to go above 5 KB/s, which is not possible for a highly seeded torrent. Could it be my ISP throttling?
Enabling Protocol Encryption and Increasing Max Half Open Connections
uTorrent by default disables protocol encryption. We need to enable this so that the ISP's packet shaping hardware will detect our bit torrent traffic as normal traffic and hopefully let it pass.
1. Click on Options, Preferences.
2. Click on BitTorrent.
3. You should get a dialog similar to one below
4. The one we are concerned about is Protocol Encryption. Set the Outgoing to Enabled.
5. Click on Advanced.
Change the "net.max_halfopen" value to 50 by selecting the line, changing the value at the bottom to 50 and clicking Set.
NOTE: It is normal for a asterisk to appear. This is to indicate that the value has been changed.
6. Click OK. Stop all torrents, wait 10 seconds, and Start the torrent. Now let's watch the speeds.
Hopefully, the above changes will improve speeds. Ultimately, it depends on the number of seeders and peers with high upload rate. Remember, you must upload at a high rate to enjoy good download rates, but not so high that it affects download speed. Experiment.
Further Things You Can Try For Optimum Speed
1. There should be a green tick at the bottom, not a exclamation mark as below.
If uTorrent keeps showing this even after 5 minutes, check the possible causes.
2. Setting a high upload can sometimes slow down a fast torrent. But remember, you must upload in order for peers to share their downloaded data with you. It is possible to set a very low upload, but the chance of peers sending you their data will decrease, pulling down your download speed.
3. Some people have reported speed increases by setting the peer.lazy_bitfield setting to false in Advanced Preferences. However, in my case, it lowered the speeds.
4. Change the Protocol Encryption to Forced. This will force encryption on all outgoing packets and will not fallback to un-encrypted mode if the peer refuses to co-operate. Good to connect to only encryption-enabled peers. Avoid doing this for torrents with low peers/seeds.
5. Remove the check for "Allow Incoming Legacy Connections". This will make all your outgoing and incoming packets fully encrypted, except for tracker communications. Peers who are using a client that don't support encryption are dropped. Avoid doing this for torrents with low peers/seeds.
Frequently Asked Questions (FAQ)
1) What are the good/best ports for uTorrent?
There's no "best port" or good ports . All ports are suitable for use with uTorrent, unless you are running a program that is using the port (use a port number above 49152 to be safe).
Note: For some this might be confusing. FF doesn't tell you on what port/s to use but DAKz included in his Advanced Tweaking of uTorrent to use port 10571 or 57000. I am using a port above 50000.
However, feel free to change the default port of it by going to Options, Preferences, Connection and adjusting the "Port used for incoming connections" as necessary. Remember to re-adjust your port forwarding settings in your firewall/router too.
2) I have tried all the above and my speeds are still slow! What can I do?
Try downloading a different torrent. A high ratio of seeds to leechers (Eg 2000 seeds to 10 leechers) will make a big difference in speeds. Make sure there is a green light at the bottom or check the possible causes.
Verify your speed by running a speed test from different locations to ensure your connection is fast to the major locations in the world. For example, if you are downloading Chinese torrents, you should select a download location from China (or somewhere nearby) in the speed test.
Finally, try enabling Forced encryption and performing the extra things you can try as outlined here. If speeds still do not improve, we are also not aware of the cause. Perhaps your ISP has managed to break encryption in bit torrent traffic.
Note: Don't go shouting "how the hell my dl speed sucks though i have a gazillion mb connection!?" as there are lots of external/internal factors to consider. (ISP throttling, Leech/Seed ratio, Seed/s connection speed, firewalled router/windows, etc)
Introduction:
This is a step by step guide on setting up uTorrent. It details the steps from downloading to optimizing your settings.
A quick rundown of its major features:
1. Protocol Encryption - This is the major speed booster if your ISP throttles bittorrent traffic. It can do wonders on torrents with high speeds and can give high speeds especially if your peers are using uTorrent/Azureus, as those are the popular ones that support this standard.
2. Distributed Hash Table (DHT) - Similar to Peer Exchange, disable this.
3. Capping Upload Speed - Uploading data to other peers at full throttle will severely limit your download rate. This is one key element we have to adjust for a good download/upload ratio. Unless you are purely seeding and not using your computer for other tasks, limit your upload to 80% of full bandwidth.
Tools We Need:
1. An internet connection and its maximum download and upload speed. If unsure, visit
http://www.speedtest.net.
2.Patched TCPIP.sys to allow more concurrent half-open connections. Windows XP SP2 and Vista limits the number of half-connections to 10. This limitation can impact your bittorrent experience. To increase the limit,
NOTE: IF UNSURE, DON'T DO THIS PART. Proceed at your own risk!
Windows XP Users (NOT Vista users)
1. Go to this site - http://lvllord.de/
2. Click on Downloads
3. Right click the link and click "Save Target As"
4. Save it in your Desktop
5. Open the file and run the program located inside the archive, agreeing to the security warning.
6. Some text should scroll by in MS-DOS window, after it ends, type C.
7. Enter 100 for the number of concurrent half-open connections and press Enter.
8. Type Y and the file should be patched, Cancel any Windows XP warnings that should appear, it is part of
Microsoft's way of ensuring its files are not tampered with (the utility tampers them to break the limit on purpose).
Windows Vista Users (NOT XP users)
1. Go to this site - http://www.yaronmaor.net/repair.htm
2. Look for the item named - EventlD4226Fix for Windows Vista (Line 2)
3. Right click the link and click "Save Target As".
4. Save it in your Desktop.
5. Extract all contents of the file to a folder.
6. If you are running 64-bit Vista, double click on InstallPatch64.bat. If you are running 32-bit Vista, double click on InstallPatch32.bat. Unsure? Run InstallPatch32.bat.
7. Some text should scroll by in a MS-DOS window, after it ends, type Y and press Enter.
8. After the restart notice appears, press any key and restart your PC.
NOTE: IF UNSURE, DON'T DO THIS PART. Proceed at your own risk!
3. uTorrent
4. A FunFile torrent/s to kick off the download.
Note: Windows Vista users - try the beta (may have problems) which is fully Vista supported. The download links are provided in the first post in the link. Skip to step 3 after you click on the link.
Getting to the file:
1. Click on this download page - http://www.uTorrent.com/download.php
2. Click "get uTorrent 1.*.*". Choose to RUN it.
3. If any security dialogs appear, click Run as we know this is a safe file.
4. uTorrent will prompt you with the following dialog.
5. Click OK to install.
Configuring uTorrent
1. Run the program. Ignore the security warning (Click Run).
2. It will give the following dialog.
You want the program to be easily accessible, don't you? Click Yes and the shortcut will be created in your desktop and start menu.
3. Next you will be given another dialog
Click Yes, so the next time you download on a FunFile torrent, uTorrent will automatically start up to handle the downloading job.
4. And the next dialog box is the most important step
Now the value that we are interested in right now is the Upload Limit in kB/s (aka KBps). If you have trouble understanding your speed, consider this: Internet Explorer shows download speed as KBps when you download a file.
There is a big difference between 5Kbps and 5KBps. make sure you got the right values in KBps (not Kbps). Use Google Calculator if you need help with convertions.
5. Click Current Settings
The authors of uTorrent have been very helpful in providing a list of predefined values. Your connection should be near to one of the above categories. "xx/384k" means that your download is unlimited and your upload is limited to 384kbps (which is 48KBps).
With your results of the speed test you did above, select the closest upload speed from the list. uTorrent immediately adjusts the "Affected Settings" area with recommended values for your upload speed.
Note: The default download speed in utorrent is Unlimited
TIP: uTorrent randomly generates a port number in Current Port. This tutorial assumes the port number to be 55641 - but you can substitute it with the number uTorrent shows.
6. Port forwarding is also important. Click on "Test if port is forwarded properly" to run the test. If you have trouble running the test, it could be due to one or more of the following reasons:
a. Home Router - If you are running a router (sometimes called wireless access point) at home, you will have to configure it to direct all TCP/UDP bittorrent traffic to port 55641 to be routed to your computer. If so, click this
link (http://www.portforward.com/routers.htm). Click the router you are using. Click the application, which is uTorrent, and follow the instructions.
b.Personal Firewall - If you are running a firewall software such as Norton Internet Security, Norton Personal
Firewall, ZoneAlarm, etc, then configure your firewall such that uTorrent has access to port 55641. This is normally accomplished by starting up utorrent, and the firewall should spring up an access alert. Simply select the option to
"Always Allow" the program to access the Internet.
Windows Firewall Users - uTorrent will automatically configure Windows Firewall so there is no action needed from you.
c. Corporate Firewall - Are you running this software in a corporate network? Bad news - you have to inform the admin that you want the port to be directed to your computer. The good news - you can still go by without port forwarding, but speeds will not be optimal.
d. Utorrent.Com Port Forward Checking Website has a problem - Yes, especially if you are accessing the Internet through a transparent proxy that your ISP forces you to use. This simply means that the website is reporting false info, and the best way to verify that your port is forwarded is to proceed into the next step. This case is very unlikely as utorrent.com uses a different port for checking.
Having done all the above, if the website still says that it has problems accessing the port, the ultimate test will be when we do a test file downloading. Let's click on Use Selected Settings.
7. Now you see the full uTorrent window in full glamour.
Starting a simple torrent
We need to start a simple download, and the one that comes to my mind right now is uTorrent 1.6.1 Bit Torrent Client! We will be downloading this file purely for testing and delete it later on.
1. Minimize uTorrent for now. Notice it resides on the system tray (bottom right) automatically.
2. Click to http://azureus.sourceforge.net/download.php. Click on "Jar, Jar torrent, Source". Click the "Jar Torrent" to download the torrent file.
3. Select a mirror and click the download link on the right most column.
4. You should get this dialog
This is the metadata file, it contains information on the file you want to download eventually. That is why it is so small. We want uTorrent to automatically start downloading it, so click Open.
NOTE: The "Name, Type and From" may differ on your system. This is normal, as uTorrent is frequently updated
5. The file opens with uTorrent which automatically pops up this dialog (scaled for easier viewing)
All values are automatically filled in for you. Here is also where you select files that you don't want to download - if the download has many files which in this case is not. Remember where the file is stored in "Save As", or save it in a different location that is more convenient for you.
All looking good, click OK.
Progress of the Download
Click on the uTorrent torrent (the only item in the list) to view more information on it. Suddenly all the values begin filling up!
Looks like the torrent has a total of x seeds and y downloaders. x seeds is a lot and it means you should get the full file in no time! A seed is a term used to refer to peers who have downloaded and sharing the complete file.
However, after running for 5 minutes, the speed refuses to go above 5 KB/s, which is not possible for a highly seeded torrent. Could it be my ISP throttling?
Enabling Protocol Encryption and Increasing Max Half Open Connections
uTorrent by default disables protocol encryption. We need to enable this so that the ISP's packet shaping hardware will detect our bit torrent traffic as normal traffic and hopefully let it pass.
1. Click on Options, Preferences.
2. Click on BitTorrent.
3. You should get a dialog similar to one below
4. The one we are concerned about is Protocol Encryption. Set the Outgoing to Enabled.
5. Click on Advanced.
Change the "net.max_halfopen" value to 50 by selecting the line, changing the value at the bottom to 50 and clicking Set.
NOTE: It is normal for a asterisk to appear. This is to indicate that the value has been changed.
6. Click OK. Stop all torrents, wait 10 seconds, and Start the torrent. Now let's watch the speeds.
Hopefully, the above changes will improve speeds. Ultimately, it depends on the number of seeders and peers with high upload rate. Remember, you must upload at a high rate to enjoy good download rates, but not so high that it affects download speed. Experiment.
Further Things You Can Try For Optimum Speed
1. There should be a green tick at the bottom, not a exclamation mark as below.
If uTorrent keeps showing this even after 5 minutes, check the possible causes.
2. Setting a high upload can sometimes slow down a fast torrent. But remember, you must upload in order for peers to share their downloaded data with you. It is possible to set a very low upload, but the chance of peers sending you their data will decrease, pulling down your download speed.
3. Some people have reported speed increases by setting the peer.lazy_bitfield setting to false in Advanced Preferences. However, in my case, it lowered the speeds.
4. Change the Protocol Encryption to Forced. This will force encryption on all outgoing packets and will not fallback to un-encrypted mode if the peer refuses to co-operate. Good to connect to only encryption-enabled peers. Avoid doing this for torrents with low peers/seeds.
5. Remove the check for "Allow Incoming Legacy Connections". This will make all your outgoing and incoming packets fully encrypted, except for tracker communications. Peers who are using a client that don't support encryption are dropped. Avoid doing this for torrents with low peers/seeds.
Frequently Asked Questions (FAQ)
1) What are the good/best ports for uTorrent?
There's no "best port" or good ports . All ports are suitable for use with uTorrent, unless you are running a program that is using the port (use a port number above 49152 to be safe).
Note: For some this might be confusing. FF doesn't tell you on what port/s to use but DAKz included in his Advanced Tweaking of uTorrent to use port 10571 or 57000. I am using a port above 50000.
However, feel free to change the default port of it by going to Options, Preferences, Connection and adjusting the "Port used for incoming connections" as necessary. Remember to re-adjust your port forwarding settings in your firewall/router too.
2) I have tried all the above and my speeds are still slow! What can I do?
Try downloading a different torrent. A high ratio of seeds to leechers (Eg 2000 seeds to 10 leechers) will make a big difference in speeds. Make sure there is a green light at the bottom or check the possible causes.
Verify your speed by running a speed test from different locations to ensure your connection is fast to the major locations in the world. For example, if you are downloading Chinese torrents, you should select a download location from China (or somewhere nearby) in the speed test.
Finally, try enabling Forced encryption and performing the extra things you can try as outlined here. If speeds still do not improve, we are also not aware of the cause. Perhaps your ISP has managed to break encryption in bit torrent traffic.
Note: Don't go shouting "how the hell my dl speed sucks though i have a gazillion mb connection!?" as there are lots of external/internal factors to consider. (ISP throttling, Leech/Seed ratio, Seed/s connection speed, firewalled router/windows, etc)
µTorrent WebUI Widget for Google HP
For those of you who don't already have Google Homepages, now's the time to signup and create one. uTorrent has recently released a great new widget for the Google HP that allows you to monitor your uTorrent downloads while you're reading the daily headlines or playing that great Pac-man game they have available on there as well. It's quick and easy to install. Now you never have to leave your BitTorrent downloads unattended, plus it just looks darn cool.
The first thing you need to do is download and set up the WebUI (Web User Interface) plugin if you haven't done so already.
Controlling uTorrent Remotely: a Beginner's Guide
So after you have the Web UI plugin installed and set up correctly, log in and open up your Google Homepage.
On your Google Homepage select "Add more to this page."

Then select "Add by URL"

In the box paste the following URL:
http://river.hidden.googlepages.com/uTorrent.xml

After clicking the "add" button of course, return to your Google HP. You should then see the picture below.

What we need to do now is configure the widget so that it will then display the torrent trackers currently loaded in the uTorrent client server.
In the "Address" box you will enter your IP address. If you are unsure what it is go to the IPTools website and it will tell you your address.
The "Port" box is for the port you currently have open as the listening port for incoming connections to the uTorrent client server. You can find it under uTorrent's "Preferences" tab as shown below.

Lastly, for the "Guest username" type in the username you previously chose to use with the Web UI plugin
When all is said and done you should have all the information entered as shown in this picture below.

Once you're done just click the "Save" button to proceed.
You will immediately get a prompt from uTorrent asking you to login. This is the username and password you selected when you previously set up the Web UI plugin.

Then presto the widget will load the torrent trackers you currently have running in uTorrent.

The cool thing about this plugin is that it could allow you to monitor the status of you uTorrent downloads from work or school in a fairly easy and convenient fashion.
This is definitely a Google HP widget that is a must have for all of you BitTorrent users out there.
*thanks to soul. Proceed at yer own risk!
µTorrent WebUI Widget for Google HP For those of you who don't already have Google Homepages, now's the time to signup and create one. uTorrent has recently released a great new widget for the Google HP that allows you to monitor your uTorrent downloads while you're reading the daily headlines or playing that great Pac-man game they have available on there as well. It's quick and easy to install. Now you never have to leave your BitTorrent downloads unattended, plus it just looks darn cool. The first thing you need to do is download and set up the WebUI (Web User Interface) plugin if you haven't done so already. Controlling uTorrent Remotely: a Beginner's Guide So after you have the Web UI plugin installed and set up correctly, log in and open up your Google Homepage. On your Google Homepage select "Add more to this page."
Then select "Add by URL"
In the box paste the following URL: http://river.hidden.googlepages.com/uTorrent.xml
After clicking the "add" button of course, return to your Google HP. You should then see the picture below.
What we need to do now is configure the widget so that it will then display the torrent trackers currently loaded in the uTorrent client server. In the "Address" box you will enter your IP address. If you are unsure what it is go to the IPTools website and it will tell you your address. The "Port" box is for the port you currently have open as the listening port for incoming connections to the uTorrent client server. You can find it under uTorrent's "Preferences" tab as shown below.
Lastly, for the "Guest username" type in the username you previously chose to use with the Web UI plugin When all is said and done you should have all the information entered as shown in this picture below.
Once you're done just click the "Save" button to proceed. You will immediately get a prompt from uTorrent asking you to login. This is the username and password you selected when you previously set up the Web UI plugin.
Then presto the widget will load the torrent trackers you currently have running in uTorrent.
The cool thing about this plugin is that it could allow you to monitor the status of you uTorrent downloads from work or school in a fairly easy and convenient fashion. This is definitely a Google HP widget that is a must have for all of you BitTorrent users out there. *thanks to soul. Proceed at yer own risk!
No Subjecthttp://www.elakiri.com/forum/ http://www.elakiri.com/forum/
ryeanne

Elite VIP
3.205
664 Posts
2007-08-18 07:17:25 (45 weeks ago) by ryeanne
Controlling uTorrent Remotely
uTorrent released a WebUI (Web User Interface) plugin that allows you to control this BitTorrent client server remotely.
For those on the go, be it at school, work, or even play, the ability to control uTorrent remotely is a must have. So let's get started and get this little bad boy up and running.
INSTALLATION
First off, if you don't have the uTorrent client server already, download and install it now.
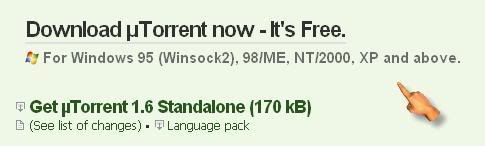
Once this is done then download the WebUI plugin.
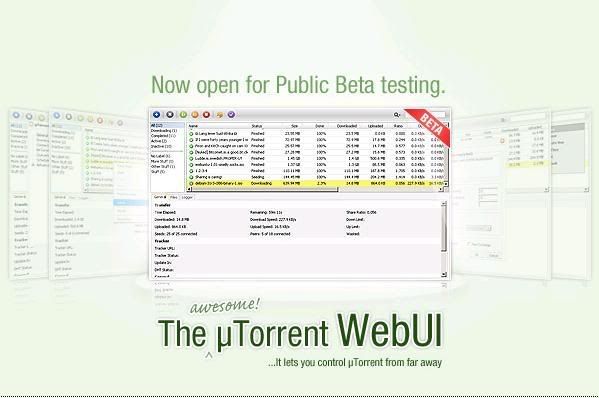
Now find and locate the folder that contains the SETTINGS FILE for uTorrent, which is usually found in the folder location as pictured below.
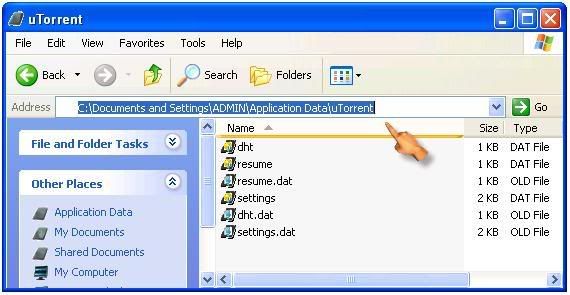
Then take the WebUI plugin you just downloaded and drag and drop it into the SETTINGS FOLDER as pictured below. It's downloaded as a WinRAR archive meaning it must be decompressed into a regular folder.

So far so good, now it's time to configure the plugin and take it for a test drive.
CONFIGURATION
Open up uTorrent and scroll down the OPTIONS TAB to PREFERENCES as shown in the image below.

Select "WebUI" from the ADVANCED OPTION. Then check the "Enable Web Interface" box and choose a username and password to use.

This is all we need to do to configure the plugin, now it's time to check it out.
STARTUP
First of all we will now need to use uTorrent's corresponding client server beta version that is located in the folder of the WebUI plugin we recently downloaded. It's name is as follows:
uTorrent-1.6.1-beta-build-478 (NOTE:This is only an example)
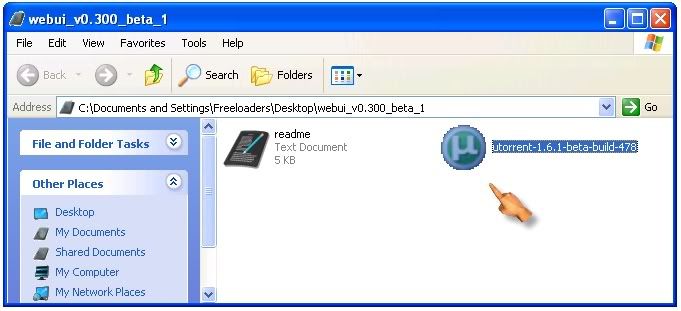
The address you need to type in the URL browser is as follows:
CODE
http://(your IP address)
 Listening Port)/gui/index.html
So for example, we'll say my IP address is 12.345.67.890 and my listening port is 41000. I'll then need to type
CODE
http://12.345.67.890:41000/gui/index.html in my internet browser.
After the page loads it will prompt you to enter your username and password as pictured below.

After selecting "okay," of course, the browser will load uTorrent's WebUI control page.
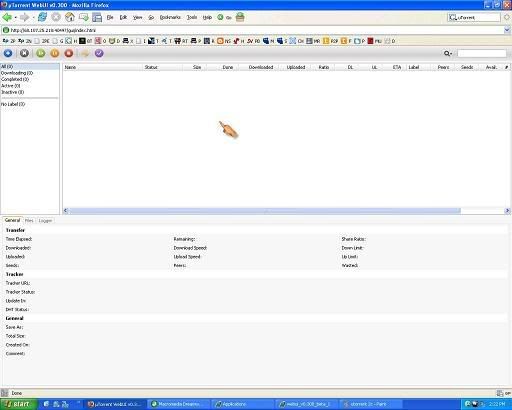
The options are just as they are in the standard uTorrent client server and should be self-explanatory to use.
*thanks to soul
For those of you who don't already have Google Homepages, now's the time to signup and create one. uTorrent has recently released a great new widget for the Google HP that allows you to monitor your uTorrent downloads while you're reading the daily headlines or playing that great Pac-man game they have available on there as well. It's quick and easy to install. Now you never have to leave your BitTorrent downloads unattended, plus it just looks darn cool.
The first thing you need to do is download and set up the WebUI (Web User Interface) plugin if you haven't done so already.
Controlling uTorrent Remotely: a Beginner's Guide
So after you have the Web UI plugin installed and set up correctly, log in and open up your Google Homepage.
On your Google Homepage select "Add more to this page."

Then select "Add by URL"

In the box paste the following URL:
http://river.hidden.googlepages.com/uTorrent.xml

After clicking the "add" button of course, return to your Google HP. You should then see the picture below.

What we need to do now is configure the widget so that it will then display the torrent trackers currently loaded in the uTorrent client server.
In the "Address" box you will enter your IP address. If you are unsure what it is go to the IPTools website and it will tell you your address.
The "Port" box is for the port you currently have open as the listening port for incoming connections to the uTorrent client server. You can find it under uTorrent's "Preferences" tab as shown below.

Lastly, for the "Guest username" type in the username you previously chose to use with the Web UI plugin
When all is said and done you should have all the information entered as shown in this picture below.

Once you're done just click the "Save" button to proceed.
You will immediately get a prompt from uTorrent asking you to login. This is the username and password you selected when you previously set up the Web UI plugin.

Then presto the widget will load the torrent trackers you currently have running in uTorrent.

The cool thing about this plugin is that it could allow you to monitor the status of you uTorrent downloads from work or school in a fairly easy and convenient fashion.
This is definitely a Google HP widget that is a must have for all of you BitTorrent users out there.
*thanks to soul. Proceed at yer own risk!
µTorrent WebUI Widget for Google HP For those of you who don't already have Google Homepages, now's the time to signup and create one. uTorrent has recently released a great new widget for the Google HP that allows you to monitor your uTorrent downloads while you're reading the daily headlines or playing that great Pac-man game they have available on there as well. It's quick and easy to install. Now you never have to leave your BitTorrent downloads unattended, plus it just looks darn cool. The first thing you need to do is download and set up the WebUI (Web User Interface) plugin if you haven't done so already. Controlling uTorrent Remotely: a Beginner's Guide So after you have the Web UI plugin installed and set up correctly, log in and open up your Google Homepage. On your Google Homepage select "Add more to this page."
No Subjecthttp://www.elakiri.com/forum/ http://www.elakiri.com/forum/
ryeanne

Elite VIP
3.205
664 Posts
2007-08-18 07:17:25 (45 weeks ago) by ryeanne
Controlling uTorrent Remotely
uTorrent released a WebUI (Web User Interface) plugin that allows you to control this BitTorrent client server remotely.
For those on the go, be it at school, work, or even play, the ability to control uTorrent remotely is a must have. So let's get started and get this little bad boy up and running.
INSTALLATION
First off, if you don't have the uTorrent client server already, download and install it now.
Once this is done then download the WebUI plugin.
Now find and locate the folder that contains the SETTINGS FILE for uTorrent, which is usually found in the folder location as pictured below.
Then take the WebUI plugin you just downloaded and drag and drop it into the SETTINGS FOLDER as pictured below. It's downloaded as a WinRAR archive meaning it must be decompressed into a regular folder.

So far so good, now it's time to configure the plugin and take it for a test drive.
CONFIGURATION
Open up uTorrent and scroll down the OPTIONS TAB to PREFERENCES as shown in the image below.

Select "WebUI" from the ADVANCED OPTION. Then check the "Enable Web Interface" box and choose a username and password to use.

This is all we need to do to configure the plugin, now it's time to check it out.
STARTUP
First of all we will now need to use uTorrent's corresponding client server beta version that is located in the folder of the WebUI plugin we recently downloaded. It's name is as follows:
uTorrent-1.6.1-beta-build-478 (NOTE:This is only an example)
The address you need to type in the URL browser is as follows:
CODE
http://(your IP address)

So for example, we'll say my IP address is 12.345.67.890 and my listening port is 41000. I'll then need to type
CODE
http://12.345.67.890:41000/gui/index.html in my internet browser.
After the page loads it will prompt you to enter your username and password as pictured below.

After selecting "okay," of course, the browser will load uTorrent's WebUI control page.
The options are just as they are in the standard uTorrent client server and should be self-explanatory to use.
*thanks to soul
Etha kotahariyai doooooooooooooooo??psyche said:router eke brand name (Dlink, USR etc) ekai model number ekai post karanna...
port eka forward karanne nathuwa thamai godak ayata slow speed kiya kiya complain karanneKronic said:Etha kotahariyai doooooooooooooooo??

you can get the max speed possible from the net connection you have when you forward the port in your router....


KZRO said:macho seedersla wadi torrent1k ganin....
ube vrs guard1 mokadda......?
KASPERSKY
Similar threads


- Replies
- 7
- Views
- 231

