Blogger Tricks And Tips ELAKIRI.COM Mega Thread

nelik

Well-known member
  • Nov 23, 2007
    16,800
    574
    113
    Blogger Tricks And Tips ELAKIRI.COM Mega Thread

    හිතුන පොඩි වැඩක් පටන් ගන්න කියල. මේවානම් කවුරුත් දන්නා දේවල් වෙන්න ඇති. :dull: එත් මම හිතනවා නොදන්නා අයත් ඇති කියල. :yes: මොකද මමත් නොදන්නා දේවල් බොහොමයක් තියෙනවා.:lol::lol: මම දන්නා දේවල් නම් බෙදාගන්න කමතයි බ්ලොග් ගැන .... :):) ඔයාලටත් පුළුවන් ඔයාල දන්නා දේවල් මෙතන පොස්ට් කරන්න. ඒ වගේම ඔයාලගේ බ්ලොග් එකෙත් පොඩි ට්‍රැෆික් එකක් ගන්න හොද තැනක් වෙයි. :D මේක දැන් කාටවත් ඕනේ නැති උනාට කවද හරි බ්ලොග් ගැන හෙල්ප් එකක් ගන්න ගුගල් එකේ හොයන කෙනෙක් ට එළකිරි ත්‍රෙඩ් එකත් පෙනෙයි. :) වැදගත් වෙන හැම දෙයක් ම පොස්ට් කරමු.
    11.gif


    1 පියවර.

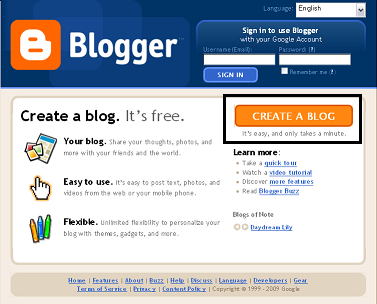
    1- Go to this link http://www.blogger.com/ and click on CREATE A BLOG button.

    blogger+main+page.png


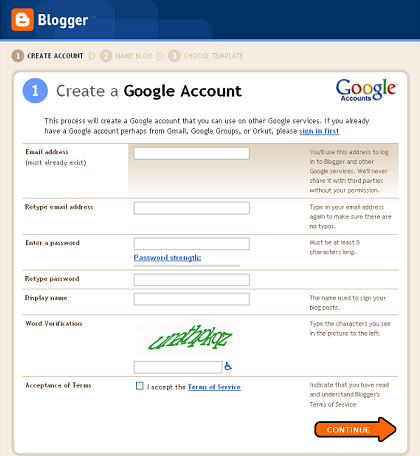
    2- As Blogger is owned by Google, so, you need to create a Google Account. Type in all the fields but make sure that you already have an email address of any web service like Yahoo, Hotmail or Gmail. This Email will be your username in the future. After filling all the fields in this page, click CONTINUE button at the bottom of the page.

    Blogger+Create+Account+Page.png


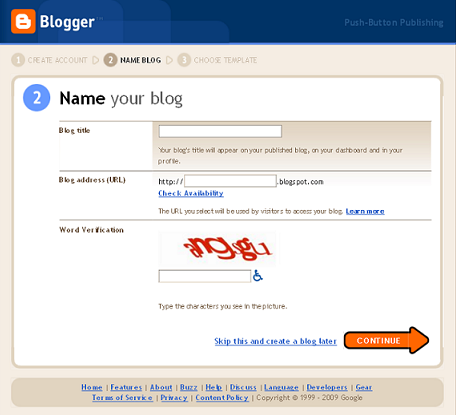
    3- Your Google Account has now been created so you can create a blog on this page. Enter a Blog title (can be changed later) and a Blog address (can be changed later but not recommended). Please chose your Blog address wisely, it will be something like http://YOURNAME.blogspot.com/. After that click CONTINUE button to move on.

    Blogger+first+time+blog+creating+page.PNG


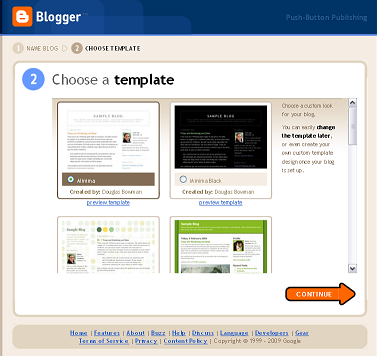
    4- Now, you've also created your first Blogger blog. Chose a template from this page (can be changed later) and click CONTINUE.

    Blogger+chose+template+page.png


    5- your blog is alive now online.
     
    Last edited:

    Inshaffadhil

    Member
    May 16, 2009
    5,740
    379
    0
    C:\Srilanka\Colombo\Maradana
    How to add Blogger Share Buttons to Custom Blogger Templates


    Recently, Blogger released their new Share Buttons feature which makes it easier for your Blog visitors to bookmark, tweet, fshare, email ,etc your post.

    But, if you're using any custom blogger template.. you may not see the widget appearing in blog..even though you activate it.

    So, if you have that problem. here is how to fix it.
    (before making any changes..first backup your template)

    1. Sign into Blogger > Design > Edit html
    (tick the expand widget templates)

    2. Add this line anywhere you want the widget to appear


    <b:include data='post' name='shareButtons'/>


    Normally, in most templates, you can add it after this line..

    <p class='post-footer-line post-footer-line-1'>


    If you don't find that above line in your template....
    Find this one.


    <p><data:post.body/></p>

    and add this code after that line..


    <p><data:post.body/></p>
    <div style='clear:both; padding: 10px 10px 10px 10px;'> <b:include data='post' name='shareButtons'/> </div>


    Note: If you're using Magazine style blogger template, You can find the data:post.body line TWO TIMES.. So, try in both ways and find out which one is working..and remove the other one.

    Finally..Save the template!

    If you still don't see it in your Blog, Make sure..you activated it by going to
    Blogger dashboard > Design > Click the 'edit' button of the Blog post section.


    activating+blogger+share+buttons.jpg
     
    Last edited:
    • Like
    Reactions: nelik

    Inshaffadhil

    Member
    May 16, 2009
    5,740
    379
    0
    C:\Srilanka\Colombo\Maradana
    Create a Cute Subscription Form

    Subscription-form%5B3%5D.gif


    How To Add this Subscription Form To Blogger?

    Go To Blogger > Design > Page Elements
    Choose HTML JavaScript Widget
    Paste the following code in it,


    Code:
    [B]<style> 
    .mbt-email{ 
    background:url(http://i53.tinypic.com/2igja0n.png) no-repeat 0px 12px ; 
    width:300px; 
    padding:10px 0 0 55px; 
    float:left; 
    font-size:1.4em; 
    font-weight:bold; 
    margin:0 0 10px 0; 
    color:#686B6C; 
    }
    .mbt-emailsubmit{ 
    background:#9B9895; 
    cursor:pointer; 
    color:#fff; 
    border:none; 
    padding:3px; 
    text-shadow:0 -1px 1px rgba(0,0,0,0.25); 
    -moz-border-radius:6px; 
    -webkit-border-radius:6px; 
    border-radius:6px; 
    font:12px sans-serif; 
    } 
    .mbt-emailsubmit:hover{ 
    background:#E98313; 
    } 
    .textarea{ 
    padding:2px; 
    margin:6px 2px 6px 2px; 
    background:#f9f9f9; 
    border:1px solid #ccc; 
    resize:none; 
    box-shadow:inset 1px 1px 1px rgba(0,0,0,0.1); 
    -moz-box-shadow:inset 1px 1px 1px rgba(0,0,0,0.1); 
    -webkit-box-shadow:inset 1px 1px 1px rgba(0,0,0,0.1); font-size:13px;   
    width:170px; 
    color:#666;}
    </style>
    <div class="mbt-email"> 
    Subscribe via Email 
    <form action="[COLOR="Red"][B]http://feedburner.google.com/fb/a/mailverify[/B][/COLOR]" id="feedform" method="post" target="popupwindow" onsubmit="window.open('http://feedburner.google.com/fb/a/mailverify?uri=TntByStc', 'popupwindow', 'scrollbars=yes,width=550,height=520');return true"> 
    <input gtbfieldid="3" class="textarea" name="email" onblur="if (this.value == "") {this.value = "Enter email address here";}" onfocus="if (this.value == "Enter email address here") {this.value = "";}" value="Enter email address here" type="text" /> 
    <input type="hidden" value="[COLOR="red"][B]TntByStc[/B][/COLOR]" name="uri"/><input type="hidden" name="loc" value="en_US"/> 
    <input class="mbt-emailsubmit" value="Submit" type="submit" /> 
    </form> 
    </div>[/B]

    Now make these changes,

    Now replace http://feedburner.google.com/fb/a/mailverify?uri=TntByStc with your Feedburner Email Feed link. You can get it by visiting your feedburner account then navigate to Publicize and then to Email Subscriptions.

    Replace TntByStc with your feed title.
    It appear at the end of your feed link.
    In this case it is http://feedburner.google.com/fb/a/mailverify?uri=TntByStc


    Save your widget and view your blog to see it showcasing live! :)

    That’s All!
     

    nelik

    Well-known member
  • Nov 23, 2007
    16,800
    574
    113
    Subscription-form%5B3%5D.gif


    How To Add this Subscription Form To Blogger?

    Go To Blogger > Design > Page Elements
    Choose HTML JavaScript Widget
    Paste the following code in it,


    Code:
    [B]<style> 
    .mbt-email{ 
    background:url(http://i53.tinypic.com/2igja0n.png) no-repeat 0px 12px ; 
    width:300px; 
    padding:10px 0 0 55px; 
    float:left; 
    font-size:1.4em; 
    font-weight:bold; 
    margin:0 0 10px 0; 
    color:#686B6C; 
    }
    .mbt-emailsubmit{ 
    background:#9B9895; 
    cursor:pointer; 
    color:#fff; 
    border:none; 
    padding:3px; 
    text-shadow:0 -1px 1px rgba(0,0,0,0.25); 
    -moz-border-radius:6px; 
    -webkit-border-radius:6px; 
    border-radius:6px; 
    font:12px sans-serif; 
    } 
    .mbt-emailsubmit:hover{ 
    background:#E98313; 
    } 
    .textarea{ 
    padding:2px; 
    margin:6px 2px 6px 2px; 
    background:#f9f9f9; 
    border:1px solid #ccc; 
    resize:none; 
    box-shadow:inset 1px 1px 1px rgba(0,0,0,0.1); 
    -moz-box-shadow:inset 1px 1px 1px rgba(0,0,0,0.1); 
    -webkit-box-shadow:inset 1px 1px 1px rgba(0,0,0,0.1); font-size:13px;   
    width:170px; 
    color:#666;}
    </style>
    <div class="mbt-email"> 
    Subscribe via Email 
    <form action="[COLOR=Red][B]http://feedburner.google.com/fb/a/mailverify[/B][/COLOR]" id="feedform" method="post" target="popupwindow" onsubmit="window.open('http://feedburner.google.com/fb/a/mailverify?uri=TntByStc', 'popupwindow', 'scrollbars=yes,width=550,height=520');return true"> 
    <input gtbfieldid="3" class="textarea" name="email" onblur="if (this.value == "") {this.value = "Enter email address here";}" onfocus="if (this.value == "Enter email address here") {this.value = "";}" value="Enter email address here" type="text" /> 
    <input type="hidden" value="[COLOR=red][B]TntByStc[/B][/COLOR]" name="uri"/><input type="hidden" name="loc" value="en_US"/> 
    <input class="mbt-emailsubmit" value="Submit" type="submit" /> 
    </form> 
    </div>[/B]
    Now make these changes,

    Now replace http://feedburner.google.com/fb/a/mailverify?uri=TntByStc with your Feedburner Email Feed link. You can get it by visiting your feedburner account then navigate to Publicize and then to Email Subscriptions.

    Replace TntByStc with your feed title.
    It appear at the end of your feed link.
    In this case it is http://feedburner.google.com/fb/a/mailverify?uri=TntByStc


    Save your widget and view your blog to see it showcasing live! :)

    That’s All!

    niyamai yaluwa Rep :yes: