Latest ads
-
 Bodim.lk out now !
- Manoj Suranga Bandara
- Updated:
-
 Power Lifting Lever Belt
- SkullVamp
- Updated:
-
port.lk Domain for sale
- Lankan-Tech
- Updated:
-
 Colombo Kaduwela - Two Storey House for Sale
- dilrasan
- Updated:
-
Wechat qr verification
- Pawan2005
- Updated:
You are using an out of date browser. It may not display this or other websites correctly.
You should upgrade or use an alternative browser.
You should upgrade or use an alternative browser.

How to Repair Cellphone Not Charging, No Reponse, Charger Not Supported Problem Issue
There are few types of charging problem issues like Not Charging, No Charging Response and Charger Not Supported.
A problem issues with "Not Charging" shows on a display when a charger is being plug-in, this problem occurs when a required current or voltage is not enough to boost up and charge the mobile phones battery.
One reason of this problem is a faulty BSI Line, a BSI line is a Battery Size Indicator that tell the charging control circuit how's the batteries working status.
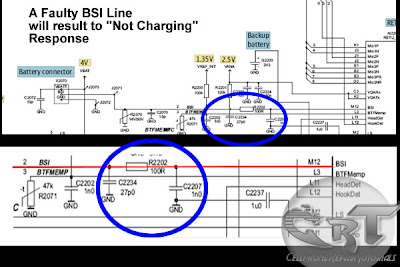
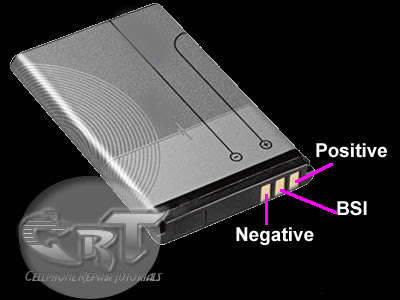
The battery has a BSI output indicator terminal that connected to its negatives terminal with desired value of resistor on it.
One other charging problem issues is the No charging response when a battery charger is being plug-in, it stays no response or nothing happens.
One reason of this is a faulty protection circuit section. this happens when there is no voltage reach to charging circuit indicators and controls. If the protection circuit breakdown this will result to "charging no response" situation. You need to check each components for short and open circuits. You may start from the fuse then to the coil and the diode.
 Charger Not Supported problem is cause by a faulty BTEMP thermistor component, BTEMP stands for Battery Temperature, This is the one that monitors the battery temperature status during at charging status, if this one having a problem , it wont allow any charger to proceed to charging stage.
 This all, is only a brief explanation of how charging problem issues occurs, while charging the mobile phones .
There are lots of ways on how to troubleshoot each and every kind of handsets. Hope at least, this one let help you understand how charging problem issues occurs, and by this you can gain ideas to move into a stage where you can practice how to troubleshoot this kind of issues.
There are few types of charging problem issues like Not Charging, No Charging Response and Charger Not Supported.
A problem issues with "Not Charging" shows on a display when a charger is being plug-in, this problem occurs when a required current or voltage is not enough to boost up and charge the mobile phones battery.
One reason of this problem is a faulty BSI Line, a BSI line is a Battery Size Indicator that tell the charging control circuit how's the batteries working status.

The battery has a BSI output indicator terminal that connected to its negatives terminal with desired value of resistor on it.

One other charging problem issues is the No charging response when a battery charger is being plug-in, it stays no response or nothing happens.
One reason of this is a faulty protection circuit section. this happens when there is no voltage reach to charging circuit indicators and controls. If the protection circuit breakdown this will result to "charging no response" situation. You need to check each components for short and open circuits. You may start from the fuse then to the coil and the diode.


There are lots of ways on how to troubleshoot each and every kind of handsets. Hope at least, this one let help you understand how charging problem issues occurs, and by this you can gain ideas to move into a stage where you can practice how to troubleshoot this kind of issues.
How to Trace and Map Keypads Layout on Mobile Phone Printed Circuit Board (PCB)
There are few methods in tracing and mapping the keypad layout on a mobile phones keypads on printed circuit board. One of this quick and very easy method is by using an schematic diagram, if that certain mobile phones have available unto it. Schematic diagram is very useful guide in every aspects of hardware troubleshooting.
Now assuming that you already have knowledge how to use and read it, follow this simple steps below.
Browse to bottom of the pages where yo can locate and find like the picture below., it is the keypad circuit section. In that schematic layout you will notice that each corresponding key characters is being group into lines. This group of keypad switch lines is being marked with rows and columns.
trace each and every lines where those keypads switch symbols is being connected, once you been manage to trace it. configure and trace it on the printed circuit board by using an analog or digital multimeter, just set it the resistance value X1 and attach both probes to corresponding keypads groups in every rows and column
 Practice this kind of method with an aide of schematic diagram, in this way if you're skills grows further, you can then trace any other mobile phones without any schematic diagram available at first hand.
There are few methods in tracing and mapping the keypad layout on a mobile phones keypads on printed circuit board. One of this quick and very easy method is by using an schematic diagram, if that certain mobile phones have available unto it. Schematic diagram is very useful guide in every aspects of hardware troubleshooting.
Now assuming that you already have knowledge how to use and read it, follow this simple steps below.
Browse to bottom of the pages where yo can locate and find like the picture below., it is the keypad circuit section. In that schematic layout you will notice that each corresponding key characters is being group into lines. This group of keypad switch lines is being marked with rows and columns.
trace each and every lines where those keypads switch symbols is being connected, once you been manage to trace it. configure and trace it on the printed circuit board by using an analog or digital multimeter, just set it the resistance value X1 and attach both probes to corresponding keypads groups in every rows and column


How Do LED light bulbs works on Mobile Phone Circuit
An LED - light emitting diode is used to illuminate keypads keys and LCD screen displays on all mobile phones handsets. It is being controlled by a voltage or current draws on its terminal leds.
a picture below is an Schematic Diagram that tells us how does the LED circuit works on cellular phone whole circuitry.
 On schematic diagram we notice that the LEDs is driven by an LED driver chip's, and an Switching Control circuit that also being packed in a chip. The LED driver is being used to stabilized the voltage and current and do take control on engaging ON and OFF status of an LEDs to light up or not.
It also drives the amount of brightness or dimming status of the LEDs by applying Pulse Width Modulation signal from the Switching control circuit.
The block diagram below interpreted a component and section or parts of an LED circuit to work during application process.
The Switching control circuit feeds and release a Pulse Width Modulation Signal (PWM) to switch and light up the LEDs light bulbs. A pulse width modulation signal is a type of digital frequency signal range up to 1khz to enable and implement to take control of LED brightness.
Once that certain signal is being received by the LED driver, the LED driver now will engage and release the voltage or current that being feeds up from the mobile phones battery supply voltage;
The output voltage release by the LED driver is the one that draws the LED light bulbs to light up.
LED drivers is a high frequency, synchronous boost converter with constant current output to drive up to 5 white LEDs. This device circuit is designed for maximum safety, it integrates overvoltage and short circuit protection when the output is being shorted to the ground. Meaning this chips circuitry will not easily breakdown for it is designed to protect when short circuit happens.
like for example, the two LED light bulbs commits short circuit to its terminal
In mobile phones application methods; the switching control circuit that release pulse switching signal is also being synchronized programmed by the the application processor (CPU) to engaged a full control on how and which proper situation that the LED will be switch to light up or not.
like for example the LED will only switch and light up, if the handset is being in used and remain off if the handset is not in used.
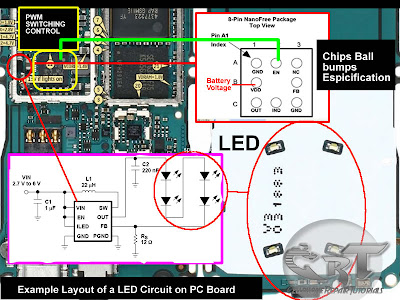 The above image is an example of the LED circuit, how those particular stages and components being mounted on a phones circuits. Note that the LED driver and switching control circuits is being packed into an Integrated Circuit or ICs.
To all beginners: A bunch of simplified STEP By STEP Procedures On Troubleshooting LED Problem issues on various mobile phones product will be Posted Here Later.. Just keep on visiting this blog more often.
An LED - light emitting diode is used to illuminate keypads keys and LCD screen displays on all mobile phones handsets. It is being controlled by a voltage or current draws on its terminal leds.
a picture below is an Schematic Diagram that tells us how does the LED circuit works on cellular phone whole circuitry.

It also drives the amount of brightness or dimming status of the LEDs by applying Pulse Width Modulation signal from the Switching control circuit.
The block diagram below interpreted a component and section or parts of an LED circuit to work during application process.
The Switching control circuit feeds and release a Pulse Width Modulation Signal (PWM) to switch and light up the LEDs light bulbs. A pulse width modulation signal is a type of digital frequency signal range up to 1khz to enable and implement to take control of LED brightness.
Once that certain signal is being received by the LED driver, the LED driver now will engage and release the voltage or current that being feeds up from the mobile phones battery supply voltage;
The output voltage release by the LED driver is the one that draws the LED light bulbs to light up.

LED drivers is a high frequency, synchronous boost converter with constant current output to drive up to 5 white LEDs. This device circuit is designed for maximum safety, it integrates overvoltage and short circuit protection when the output is being shorted to the ground. Meaning this chips circuitry will not easily breakdown for it is designed to protect when short circuit happens.
like for example, the two LED light bulbs commits short circuit to its terminal
In mobile phones application methods; the switching control circuit that release pulse switching signal is also being synchronized programmed by the the application processor (CPU) to engaged a full control on how and which proper situation that the LED will be switch to light up or not.
like for example the LED will only switch and light up, if the handset is being in used and remain off if the handset is not in used.

To all beginners: A bunch of simplified STEP By STEP Procedures On Troubleshooting LED Problem issues on various mobile phones product will be Posted Here Later.. Just keep on visiting this blog more often.
How to: Mobile Phone Secret Codes Tips and Tricks, Tutorials and Procedures
NOKIA SYMBIANS
*#06# Serial Number/IMEI indicates
*#0000# SW version (e.g. V3.42.1, 16-10-03, NHL-10)
*#2820# Bluetooth (BT) device address
xx# Directory quick access (xx = storage location and afterwards lozenge e.g. 24 #)
On/Off key -short pressing for menu for switching between profiles
Menu key - Long pressing for "task manager" - switching between active programs (with "C" key programs can be terminated.)
Menu quick access - Over in the menu e.g. to point 3.1 arrive simply 31 enter (if the third symbol a file is opened is for these and then in it started the first Programm/Icon).
No Autostart - When switching the phone on up to the pin inquiry press the whole time the "ABC" key (pen) - this is to ignore the autoinitialization programs (and the MMC programs) - "safeboot".
12345 ... is according to be the standard Nokia nokia-securitycode.
0000 ... is according to be standard PIN2 at Vodafone (germany)
----------------------------------------
Caution - starting from here the codes are "dangerous"
*#7370925538#
*#Res0Wallet#
... is to delete the code around the "wallet"
Input like normal telephone number (not in wallet code inquiry windows).
NOTE! Afterwards the "wallet" is empty, can again be put on however with new code.
*#7780# - Reset to original settings
NOTE! Afterwards various "attitudes" are away - among other things these:
Points of entrance (Provider dependent points of entrance and attitudes)
Bluetooth attitudes
Favorite
Allocation of the two keys (beside Navi keys) in the main menue
Profiles are "neglected" (as with distribution) - still there however new bell tones, etc. are...
SMS/MMS/E Mail attitudes
Logos and spielstaende (allegedly) also deleted...
Programs, calendars and contacts, etc. not changed...
*#7370# - Soft format - resets all the telefone Memory (like Formatting a disk
NOTE! Battery should be full up to at least 75%, do not accomplish during the procedure under any circumstances ! The procedure takes some minutes (approx. 3-4)
Green, * 3 - Hard format: If the Mobile (only telephone memory) formats, puts back the attitudes (see * to # 7780 #) and implements a RESET.
NOTE! Battery should be full up to at least 75%, do not accomplish during the procedure under any circumstances ! The procedure takes some minutes (approx. 3-4)
Proceeding: Equipment switch off, keep "green key" (take off) at the same time pressed, "*" and to "3" key and switch the equipment on (the keys thereby keep further pressed)... to "Formatting" on the display appears...
Tip 1 : Do u know how to use the edit button (abc or pencil button)?
Heres how... in the inbox for example; u wanna delete multiple sms, simply hold the edit button, scroll down, and then, press c to delete the marked sms. The edit button can also b used to copy and past text in sms, simply hold it and scroll across, choose copy. pretty good for placing song names in ngages
Tip 2 : **** happens, on a smartphone, its inevitable u do something wrong, and this calls for a format of fone. to format the fone, press *#7370#, then enter the lock code, which is the sec code of the fone. NOTE : batt must b full, else if format is disrupted by low batt, consequences will b disatrous
I heard the code *#7780# works too, pretty much the same i tink.
for 6600 users, to format the fone, theres an alternative way. Press and hold <3>, <*>, and the buttons, then power on fone, keep holding on the 3 buttons, till u come to a format screen. tis method ONLY works on 6600, and need not enter the sec code. BUT sec code wun be reset to default 12345.
There are two kinds of formatting: hard formatting and soft formatting
SOFT formatting: This does not realy format your phone (c-drive). It restores ini files from rom but preserves user data (photos, 3rd party apps etc). This is just a normal reset!!
HOW? There are two ways to do a normal reset:
1) *#7780# (this seems to work only on S60 v6.1 and 7.0)
2) Go to Settings, General and scroll down to factorysettings (works on all S60 phones)
--------------------------------------------------------------------
HARD formatting: This reformats completely the C-drive. All applications and files stored on this drive will be lost and clean but default files will be rewritten. This is a deep reset.
HOW? Again there are two ways:
1) *#7370#
2) When unable to startup your phone: press and hold the green (talk) key on the left + number 3 on the keypad + the * key and then turn the phone on. This trick works on every S60 v7.0 and it works fine on my 6630 too but without formatting screen...
Tip 3 : TO NGAGE USERS; Did u know u can install .sis files simply using the cable given? Juz plug it in, place the .sis file anywhere on e: (the mmc), not in any folders, root of e:, disconnect, then look for it in manager.
Tip 4: Save on battery and system memory being used by regulary checking the task manager which can be accessed by holding down the menu button!!
Tip 5: Type *#06# to display your IMEI serial number, very valuable for the unlocking your phone to other sim cards...
Tip 6: Save memory when installing apps, by installing over bluetooth. This can be done using the nokia phone suite and a bluetooth serial connection. Only works with .SIS files, so java still has to be sent to the phone, but will save space when using .SIS files.
Tip 7: Operator logos
Use a filemanager like FExplorer or SeleQ to add the folders: "c:/system/Apps/phone/oplogo". Add a .bmp picture to folder "oplogo" and restart your phone! The .bmp picture size needs to be: 97 x 25 pixels
Tip 8: BlueJacking
First up, you need to know what Bluetooth is. There are lots of types of modern devices that incorporate Bluetooth as one of their many features. PDAs, mobile phones and laptops are a few of these modern devices. Bluetooth means that Bluetooth enabled devices can send things like phonebook/address book contacts, pictures & notes to other Bluetooth enabled devices wirelessly over a range of about 10 metres. So, we've got past the boring part. Now, using a phone with Bluetooth, you can create a phonebook contact and write a message, eg. 'Hello, you've been bluejacked', in the 'Name' field. Then you can search for other phones with Bluetooth and send that phonebook contact to them. On their phone, a message will popup saying "'Hello, you've been bluejacked' has just been received by Bluetooth" or something along those lines. For most 'victims' they will have no idea as to how the message appeared on their phone.
Tip 9: While you are viewing a picture in your phone's gallery, press one of these shortcut keys (definitely works on 6600, not sure about other symbians)
1 - turn image anticlockwise
3 - turn image clockwise
* - toggle on/off of full screen
5 - zoom in
0 - zoom out
Tip 10: Operator logos
Use a filemanager like FExplorer or SeleQ to add the folders: "c:/system/Apps/phone/oplogo". Add a .bmp picture to folder "oplogo" and restart your phone! The .bmp picture size needs to be: 97 x 25 pixels
Tip 11: Check if the recepients phone is on
Delivery reports
or
Type *0# your message in the message composer window space then write your message, the recipient will not see the star zero hash bit - just the message When they read it it will relay a message back to your fone showing the time they recieved it. (haven't yet tried it myself though)
A soft and Hard reset
A Soft-reset - the process of resetting all the settings of the phone to the factory default! No applications are deleted! A Hard-reset is like formatting a drive! It does format the memory. Everything that has been installed after the first use of the phone is deleted! It will recover the memory of the phone to the state you purchased it! It is done by inputing the following code: *#7370# NOTE: The battery must be full or the charger has to be connected to the phone so that it does not run out of power and make the phone unusable
Start up in Safe Mode so no 'auto start' apps will be running:
To make sure that no memory-resident programs start when you reboot your phone,
hold down the pencil key when you turn on the phone and hold it on untill you have to enter your PIN code.
(When you have trouble booting up the phone with the MMC in it because it got corrupted for some reason, this trick will
almost always let you boot up the phone so you can remove the latest installed app which might have caused the
problem or if your phone is "unrepairable" you can still back up your important data before you do a format.)
NOKIA
Nokia Code function
*3370# This Nokia code activates Enhanced Full Rate Codec (EFR) - Your Nokia cell phone uses the best sound quality but talk time is reduced my approx. 5%
#3370# Deactivate Enhanced Full Rate Codec (EFR)
*#4720# Activate Half Rate Codec - Your phone uses a lower quality sound but you should gain approx 30% more Talk Time
*#4720# With this Nokia code you can deactivate the Half Rate Codec
*#0000# Displays your phones software version, 1st Line : Software Version, 2nd Line : Software Release Date, 3rd Line : Compression Type
*#9999# Phones software version if *#0000# does not work
*#06# For checking the International Mobile Equipment Identity (IMEI Number)
#pw+1234567890+1# Provider Lock Status. (use the "*" button to obtain the "p,w" and "+" symbols)
#pw+1234567890+2# Network Lock Status. (use the "*" button to obtain the "p,w" and "+" symbols)
#pw+1234567890+3# Country Lock Status. (use the "*" button to obtain the "p,w" and "+" symbols)
#pw+1234567890+4# SIM Card Lock Status. (use the "*" button to obtain the "p,w" and "+" symbols)
*#147# This lets you know who called you last (Only vodofone)
*#1471# Last call (Only vodofone)
*#21# This phone code allows you to check the number that "All Calls" are diverted to
*#2640# Displays phone security code in use
*#30# Lets you see the private number
*#43# Allows you to check the "Call Waiting" status of your cell phone.
*#61# Allows you to check the number that "On No Reply" calls are diverted to
*#62# Allows you to check the number that "Divert If Unreachable (no service)" calls are diverted to
*#67# Allows you to check the number that "On Busy Calls" are diverted to
*#67705646# Phone code that removes operator logo on 3310 & 3330
*#73# Reset phone timers and game scores
*#746025625# Displays the SIM Clock status, if your phone supports this power saving feature "SIM Clock Stop Allowed", it means you will get the best standby time possible
*#7760# Manufactures code
*#7780# Restore factory settings
*#8110# Software version for the nokia 8110
*#92702689# Displays - 1.Serial Number, 2.Date Made, 3.Purchase Date, 4.Date of last repair (0000 for no repairs), 5.Transfer User Data. To exit this mode you need to switch your phone off then on again
*#94870345123456789# Deactivate the PWM-Mem
**21*number# Turn on "All Calls" diverting to the phone number entered
**61*number# Turn on "No Reply" diverting to the phone number entered
**67*number# Turn on "On Busy" diverting to the phone number entered
12345 This is the default security code
press and hold # Lets you switch between lines
The Operating Systems
Symb OS v6.1
Nokia 7650
Nokia 3650
Nokia 3660
Nokia N-Gage
Nokia N-Gage QD
Siemens SX-1
Sendo X
Symb OS v7.0
Nokia 3230
Nokia 6600
Nokia 6620
Nokia 6260
Nokia 6670
Nokia 7610
Panasonic X700
Panasonic X800
Symb OS v8.0
Nokia 6630
Nokia 6680
Nokia 6681
Symb OS v8.1
Nokia N70
Nokia N90
Symb OS v9.1
Nokia N91
Nokia 3250
Nokia E60
Nokia E61
Nokia E70
Nokia N71
Nokia N80
Nokia N92
Nokia phones service codes
*#0000# - SW version
*#06# - IMEI
*#war0anty# - SIMLOCK info
*3370# - Enhanced Full Rate ON
#3370# - OFF
*4720# - alternative sound quality codec ON
#4720# - OFF
*#7780# - default factory settings
*#7760# - production serial no.
*#2820# - Bluetooth info.
*#73# - reset phone timers and game scores.
*#7370925538# - delete all the content of the wallet and the wallet code.
*#7370# - soft format — erases all telephone memory.
[Green]*3 - hard format — if only the telephone memory is formatted, puts back the attitudes and reboots
*#delset# - MMS/GPRS settings removal
NOKIA SYMBIANS
*#06# Serial Number/IMEI indicates
*#0000# SW version (e.g. V3.42.1, 16-10-03, NHL-10)
*#2820# Bluetooth (BT) device address
xx# Directory quick access (xx = storage location and afterwards lozenge e.g. 24 #)
On/Off key -short pressing for menu for switching between profiles
Menu key - Long pressing for "task manager" - switching between active programs (with "C" key programs can be terminated.)
Menu quick access - Over in the menu e.g. to point 3.1 arrive simply 31 enter (if the third symbol a file is opened is for these and then in it started the first Programm/Icon).
No Autostart - When switching the phone on up to the pin inquiry press the whole time the "ABC" key (pen) - this is to ignore the autoinitialization programs (and the MMC programs) - "safeboot".
12345 ... is according to be the standard Nokia nokia-securitycode.
0000 ... is according to be standard PIN2 at Vodafone (germany)
----------------------------------------
Caution - starting from here the codes are "dangerous"
*#7370925538#
*#Res0Wallet#
... is to delete the code around the "wallet"
Input like normal telephone number (not in wallet code inquiry windows).
NOTE! Afterwards the "wallet" is empty, can again be put on however with new code.
*#7780# - Reset to original settings
NOTE! Afterwards various "attitudes" are away - among other things these:
Points of entrance (Provider dependent points of entrance and attitudes)
Bluetooth attitudes
Favorite
Allocation of the two keys (beside Navi keys) in the main menue
Profiles are "neglected" (as with distribution) - still there however new bell tones, etc. are...
SMS/MMS/E Mail attitudes
Logos and spielstaende (allegedly) also deleted...
Programs, calendars and contacts, etc. not changed...
*#7370# - Soft format - resets all the telefone Memory (like Formatting a disk
NOTE! Battery should be full up to at least 75%, do not accomplish during the procedure under any circumstances ! The procedure takes some minutes (approx. 3-4)
Green, * 3 - Hard format: If the Mobile (only telephone memory) formats, puts back the attitudes (see * to # 7780 #) and implements a RESET.
NOTE! Battery should be full up to at least 75%, do not accomplish during the procedure under any circumstances ! The procedure takes some minutes (approx. 3-4)
Proceeding: Equipment switch off, keep "green key" (take off) at the same time pressed, "*" and to "3" key and switch the equipment on (the keys thereby keep further pressed)... to "Formatting" on the display appears...
Tip 1 : Do u know how to use the edit button (abc or pencil button)?
Heres how... in the inbox for example; u wanna delete multiple sms, simply hold the edit button, scroll down, and then, press c to delete the marked sms. The edit button can also b used to copy and past text in sms, simply hold it and scroll across, choose copy. pretty good for placing song names in ngages
Tip 2 : **** happens, on a smartphone, its inevitable u do something wrong, and this calls for a format of fone. to format the fone, press *#7370#, then enter the lock code, which is the sec code of the fone. NOTE : batt must b full, else if format is disrupted by low batt, consequences will b disatrous
I heard the code *#7780# works too, pretty much the same i tink.
for 6600 users, to format the fone, theres an alternative way. Press and hold <3>, <*>, and the buttons, then power on fone, keep holding on the 3 buttons, till u come to a format screen. tis method ONLY works on 6600, and need not enter the sec code. BUT sec code wun be reset to default 12345.
There are two kinds of formatting: hard formatting and soft formatting
SOFT formatting: This does not realy format your phone (c-drive). It restores ini files from rom but preserves user data (photos, 3rd party apps etc). This is just a normal reset!!
HOW? There are two ways to do a normal reset:
1) *#7780# (this seems to work only on S60 v6.1 and 7.0)
2) Go to Settings, General and scroll down to factorysettings (works on all S60 phones)
------------------------------------------------------------------------------------------------------------------------------------------------------------
HARD formatting: This reformats completely the C-drive. All applications and files stored on this drive will be lost and clean but default files will be rewritten. This is a deep reset.
HOW? Again there are two ways:
1) *#7370#
2) When unable to startup your phone: press and hold the green (talk) key on the left + number 3 on the keypad + the * key and then turn the phone on. This trick works on every S60 v7.0 and it works fine on my 6630 too but without formatting screen...
Tip 3 : TO NGAGE USERS; Did u know u can install .sis files simply using the cable given? Juz plug it in, place the .sis file anywhere on e: (the mmc), not in any folders, root of e:, disconnect, then look for it in manager.
Tip 4: Save on battery and system memory being used by regulary checking the task manager which can be accessed by holding down the menu button!!
Tip 5: Type *#06# to display your IMEI serial number, very valuable for the unlocking your phone to other sim cards...
Tip 6: Save memory when installing apps, by installing over bluetooth. This can be done using the nokia phone suite and a bluetooth serial connection. Only works with .SIS files, so java still has to be sent to the phone, but will save space when using .SIS files.
Tip 7: Operator logos
Use a filemanager like FExplorer or SeleQ to add the folders: "c:/system/Apps/phone/oplogo". Add a .bmp picture to folder "oplogo" and restart your phone! The .bmp picture size needs to be: 97 x 25 pixels
Tip 8: BlueJacking
First up, you need to know what Bluetooth is. There are lots of types of modern devices that incorporate Bluetooth as one of their many features. PDAs, mobile phones and laptops are a few of these modern devices. Bluetooth means that Bluetooth enabled devices can send things like phonebook/address book contacts, pictures & notes to other Bluetooth enabled devices wirelessly over a range of about 10 metres. So, we've got past the boring part. Now, using a phone with Bluetooth, you can create a phonebook contact and write a message, eg. 'Hello, you've been bluejacked', in the 'Name' field. Then you can search for other phones with Bluetooth and send that phonebook contact to them. On their phone, a message will popup saying "'Hello, you've been bluejacked' has just been received by Bluetooth" or something along those lines. For most 'victims' they will have no idea as to how the message appeared on their phone.
Tip 9: While you are viewing a picture in your phone's gallery, press one of these shortcut keys (definitely works on 6600, not sure about other symbians)
1 - turn image anticlockwise
3 - turn image clockwise
* - toggle on/off of full screen
5 - zoom in
0 - zoom out
Tip 10: Operator logos
Use a filemanager like FExplorer or SeleQ to add the folders: "c:/system/Apps/phone/oplogo". Add a .bmp picture to folder "oplogo" and restart your phone! The .bmp picture size needs to be: 97 x 25 pixels
Tip 11: Check if the recepients phone is on
Delivery reports
or
Type *0# your message in the message composer window space then write your message, the recipient will not see the star zero hash bit - just the message When they read it it will relay a message back to your fone showing the time they recieved it. (haven't yet tried it myself though)
A soft and Hard reset
A Soft-reset - the process of resetting all the settings of the phone to the factory default! No applications are deleted! A Hard-reset is like formatting a drive! It does format the memory. Everything that has been installed after the first use of the phone is deleted! It will recover the memory of the phone to the state you purchased it! It is done by inputing the following code: *#7370# NOTE: The battery must be full or the charger has to be connected to the phone so that it does not run out of power and make the phone unusable
Start up in Safe Mode so no 'auto start' apps will be running:
To make sure that no memory-resident programs start when you reboot your phone,
hold down the pencil key when you turn on the phone and hold it on untill you have to enter your PIN code.
(When you have trouble booting up the phone with the MMC in it because it got corrupted for some reason, this trick will
almost always let you boot up the phone so you can remove the latest installed app which might have caused the
problem or if your phone is "unrepairable" you can still back up your important data before you do a format.)
NOKIA
Nokia Code function
*3370# This Nokia code activates Enhanced Full Rate Codec (EFR) - Your Nokia cell phone uses the best sound quality but talk time is reduced my approx. 5%
#3370# Deactivate Enhanced Full Rate Codec (EFR)
*#4720# Activate Half Rate Codec - Your phone uses a lower quality sound but you should gain approx 30% more Talk Time
*#4720# With this Nokia code you can deactivate the Half Rate Codec
*#0000# Displays your phones software version, 1st Line : Software Version, 2nd Line : Software Release Date, 3rd Line : Compression Type
*#9999# Phones software version if *#0000# does not work
*#06# For checking the International Mobile Equipment Identity (IMEI Number)
#pw+1234567890+1# Provider Lock Status. (use the "*" button to obtain the "p,w" and "+" symbols)
#pw+1234567890+2# Network Lock Status. (use the "*" button to obtain the "p,w" and "+" symbols)
#pw+1234567890+3# Country Lock Status. (use the "*" button to obtain the "p,w" and "+" symbols)
#pw+1234567890+4# SIM Card Lock Status. (use the "*" button to obtain the "p,w" and "+" symbols)
*#147# This lets you know who called you last (Only vodofone)
*#1471# Last call (Only vodofone)
*#21# This phone code allows you to check the number that "All Calls" are diverted to
*#2640# Displays phone security code in use
*#30# Lets you see the private number
*#43# Allows you to check the "Call Waiting" status of your cell phone.
*#61# Allows you to check the number that "On No Reply" calls are diverted to
*#62# Allows you to check the number that "Divert If Unreachable (no service)" calls are diverted to
*#67# Allows you to check the number that "On Busy Calls" are diverted to
*#67705646# Phone code that removes operator logo on 3310 & 3330
*#73# Reset phone timers and game scores
*#746025625# Displays the SIM Clock status, if your phone supports this power saving feature "SIM Clock Stop Allowed", it means you will get the best standby time possible
*#7760# Manufactures code
*#7780# Restore factory settings
*#8110# Software version for the nokia 8110
*#92702689# Displays - 1.Serial Number, 2.Date Made, 3.Purchase Date, 4.Date of last repair (0000 for no repairs), 5.Transfer User Data. To exit this mode you need to switch your phone off then on again
*#94870345123456789# Deactivate the PWM-Mem
**21*number# Turn on "All Calls" diverting to the phone number entered
**61*number# Turn on "No Reply" diverting to the phone number entered
**67*number# Turn on "On Busy" diverting to the phone number entered
12345 This is the default security code
press and hold # Lets you switch between lines
The Operating Systems
Symb OS v6.1
Nokia 7650
Nokia 3650
Nokia 3660
Nokia N-Gage
Nokia N-Gage QD
Siemens SX-1
Sendo X
Symb OS v7.0
Nokia 3230
Nokia 6600
Nokia 6620
Nokia 6260
Nokia 6670
Nokia 7610
Panasonic X700
Panasonic X800
Symb OS v8.0
Nokia 6630
Nokia 6680
Nokia 6681
Symb OS v8.1
Nokia N70
Nokia N90
Symb OS v9.1
Nokia N91
Nokia 3250
Nokia E60
Nokia E61
Nokia E70
Nokia N71
Nokia N80
Nokia N92
Nokia phones service codes
*#0000# - SW version
*#06# - IMEI
*#war0anty# - SIMLOCK info
*3370# - Enhanced Full Rate ON
#3370# - OFF
*4720# - alternative sound quality codec ON
#4720# - OFF
*#7780# - default factory settings
*#7760# - production serial no.
*#2820# - Bluetooth info.
Samsung T309 and T809 100%
No need to use BOX
1st Make Full Eprom Reset *2767*3855#
After Rebooting Mobile
then enter...
*7465625*638*00000000*00000000# (to change NCK code to 00000000)
then enter...
#7465625*638*00000000# (to permanently unlock the phone)
check the lock status...
*#7465625#
*#73# - reset phone timers and game scores.
*#7370925538# - delete all the content of the wallet and the wallet code.
*#7370# - soft format — erases all telephone memory.
[Green]*3 - hard format — if only the telephone memory is formatted, puts back the attitudes and reboots
*#delset# - MMS/GPRS settings removal
NOTE: code depends on phone model.
Samsung D500 openline
*7465625*638*00000000*00000000#
NEXT ENTER
#7465625*638*00000000#
:#7465625*638*KEY2#
Sanyo 200
Codes
To enter codes dial the code just like any other phone number
| ##786# - Phone Usage & Master Reset (##RTN#)
| ##33284# - Debug Menu
Sanyo VI-2300
Codes
To enter codes dial the code just like any other phone number
| ##786# - Phone Usage & Master Reset (##RTN#)
| ##3282# - Data Provisioning (##DATA#)
| ##33284# - Debug Menu
Known Issues
The Sanyo VI-2300 cannot be used as a modem. Sanyo made minor modifications to this phone's modem protocol, and have refused to publish the drivers for the device to be used with a computer.
Sanyo VI-2400
Sanyo 4700
Codes
To enter codes dial the code (just like any other phone number) then press the OK key and select "Save Phone #" from the menu
| ##786 - Phone Usage & Master Reset (##RTN)
| ##3282 - Data Provisioning (##DATA)
| ##040793 - Modify phone's data speed, the built-in cap. Changing the phone to 144/230 mode can improve speed over the default setting of 144K, as it removes the phone's built-in cap
Hacks
Sanyo 4900 > 7200 Hack
The Sanyo 4900 and 7200 use almost identical hardware, if not exactly identical on the inside. Because of this, the firmware is interchangeable. This will even enable ReadyLink on the 4900. To do this you pretty much need to be a Sprint Store technician, as most TSRs will refuse to do the firmware swap.
Sanyo RL-4920
Codes
To enter codes dial the code just like any other phone number
| ##786# - Phone Usage & Master Reset (##RTN#)
| ##3282# - Data Provisioning (##DATA#)
| ##33284# - Debug Menu
Sanyo 5150
Codes
To enter codes dial the code (just like any other phone number) then press the OK key and select "Save Phone #" from the menu
| ##786 - Phone Usage & Master Reset (##RTN)
| ##3282 - Data Provisioning (##DATA)
| ##040793 - Modify phone's data speed, the built-in cap. Changing the phone to 144/230 mode can improve speed over the default setting of 144K, as it removes the phone's built-in cap
Sanyo 5400/RL2500
Codes
To enter codes dial the code (just like any other phone number) then press the OK key
| ##786 - Phone Usage & Master Reset (##RTN)
| ##3282 - Data Provisioning (##DATA)
| ##040793 - Change the in-phone data rate cap to full speed (144/230)
Sanyo 5500/VM4500
Codes
To enter codes dial the code (just like any other phone number) then press the OK key
| ##786 - Phone Usage & Master Reset (##RTN)
| ##3282 - Data Provisioning (##DATA)
| ##040793 - Change the in-phone data rate cap to full speed (144/230)
Recall Info
Sprint is aware of a hardware issue affecting a significant number of Sanyo 5500/VM4500 units. These units have trouble placing outgoing calls, causing the phone to go into a redialing loop. In addition, some affected units may have trouble receiving incoming calls or text messages. Units suffering from this problem will pass the HP Test diagnostic used in Sprint Stores to diagnose problems usually associated with these symptoms.
Hardware revision 201 was released to solve these problems. If under the Phone Info menu you have a revision earlier than 201, and are suffering from these problems, take your phone to the nearest Sprint Store and request a replacement. It may also be helpful to print this page out and take it with you to the store, as not all Sprint employees and affiliate stores are fully informed in regards to this service bulletin.
[edit]
Sanyo MM-5600
Codes
To enter codes dial the code (just like any other phone number)
| ##786# - Phone Usage & Master Reset (##RTN#)
| ##3282# - Data Provisioning (##DATA#)
| ##33284# - Debug Menu (##DEBUG#)
Known Issues
The Sanyo MM-5600 cannot be used as a modem. Sanyo made minor modifications to this phone's modem protocol, and have refused to publish the drivers for the device to be used with a computer.
Sanyo 6200
Codes
To enter codes dial the code (just like any other phone number) then press the OK key and select "Save Phone #" from the menu
| ##786 - Phone Usage & Master Reset (##RTN)
| ##3282 - Data Provisioning (##DATA)
| ##040793 - Modify phone's data speed, the built-in cap. Changing the phone to 144/230 mode can improve speed over the default setting of 144K, as it removes the phone's built-in cap
Known Issues
When web browser is open you can't cancel an incoming call (you can cancel the ringer, but the phone locks up until the caller hangs up)
[edit]
Sanyo 7200/RL2000
Codes
To enter codes dial the code (just like any other phone number) then press the OK key and select "Save Phone #" from the menu
| ##786 - Phone Usage & Master Reset (##RTN)
| ##3282 - Data Provisioning (##DATA)
| ##040793 - Change the in-phone data rate cap to full speed (144/230)
Sanyo RL-7300
Codes
To enter codes dial the code (just like any other phone number) then press the OK key
| ##786 - Phone Usage & Master Reset (##RTN)
| ##3282 - Data Provisioning (##DATA)
| ##040793 - Change the in-phone data rate cap to full speed (144/230)
Sanyo MM-7400
Codes
To enter codes dial the code (just like any other phone number)
| ##786# - Phone Usage & Master Reset (##RTN#)
| ##3282# - Data Provisioning (##DATA#)
| ##33284# - Debug Menu (##DEBUG#)
Sanyo 8100
Codes
To enter codes dial the code (just like any other phone number) then press the OK key and select "Save Phone #" from the menu
| ##786 - Phone Usage & Master Reset (##RTN)
| ##3282 - Data Provisioning (##DATA)
| ##040793 - Modify phone's data speed, the built-in cap. Changing the phone to 144/230 mode can improve speed over the default setting of 144K, as it removes the phone's built-in cap
Sanyo PM-8200
Codes
To enter codes dial the code just like any other phone number
| ##786# - Phone Usage & Master Reset (##RTN#)
| ##3282# - Data Provisioning (##DATA#)
| ##33284# - Debug Menu (##DEBUG#)
Sanyo MM-8300
Codes
To enter codes dial the code just like any other phone number
| ##786# - Phone Usage & Master Reset (##RTN#)
| ##3282# - Data Provisioning (##DATA#)
| ##33284# - Debug Menu (##DEBUG#)
Known Issues
The Sanyo MM-8300 cannot be used as a modem. Sanyo made minor modifications to this phone's modem protocol, and have refused to publish the drivers for the device to be used with a computer.
Sanyo MM-9000
Codes
To enter codes dial the code (just like any other phone number)
| ##786# - Phone Usage & Master Reset (##RTN#)
| ##3282# - Data Provisioning (##DATA#)
| ##33284# - Debug Menu (##DEBUG#)
Sanyo 4900, 5150, 5300, 8100, etc Nam Programming :
Nam Set: ##Spc+Ok+Key Down+Ok
Advanced Setup: ##3282+Ok+Key Down+Ok+Msl
A-key: ##2539+Ok+Key Down+Ok
Version: ##**837+Ok+Key Down+Ok
Debug Menu: ##FSC+Ok+Key Down+Ok
Airtime menu: ##8463+Ok+Key Down+Ok
Change CAI: ##7738+Ok+Key Down+Ok
Vocoder: ##8626337+Ok+Key Down+Ok
Reverse Logistic: ##786+Ok+Key Down+Ok
Set IP Address: ##2769737+Ok+Key Down+Ok
TTY On/Off: ##889+Ok+Key Down+Ok
Ready Link: ##4636+Ok+Key Down+Ok
Browser Init On/Off: ##4682+Ok+Key Down+Ok
Picture Token: ##25327+Ok+Key Down+Ok
Unknown Code: ##5282277+Ok+Key Down+Ok
(SPC=000000, FSC=040793)
--------------------------------------------------------------------------------
LG
2945#*# - service menu (code resetW3000 G5300 C1200 G7100...)
2945#- hold (LG 500,600)
B1200 *+pwr, 6,6,8 Service Menu
B1300 *+pwr, 1,5,9 Service Menu
Security Removing Code For Lg 8110,8120.
47328545454#
Or
277634#*#
Panasonic code
*01763*737381#
::Service Codes::
Alcatel
Master Codes
- 25228352
- 25228353
- 83227423 (TH3/4,BH4,BF5,BG3,BF3/4..)
###337*07# - master reset (with SIM)
###847# - factory reset (with SIM)
Alcatel 835 formating - **0102#
Samsung
*2767*3855# - FULL E2P RESET
*2767*2878# - CUSTOM E2P RESET
#*7337# - UNLOCK
*2767*688# - UNLOCK
*#0523# - CONTRAST
*#9998*523# - CONTRAST
*#8999*8378# - Service Menu (X100)
THIS CODE WILL UNLOCK ALL OF THE NEW MODEL SAMSUNG PHONES EXCEPT SMART PHONES. (X495-AND UP) I TESTED IT OUT LAST NIGHT ON MY T509(PASSED),T809(PASSED) Quote: *7465625*638*00000000*00000000# NEXT ENTER #7465625*638*00000000# AND THEN *#7465625# to check the locks....all locks are inactive...these are all the locks... network lock - inactive subset lock - inactive sp lock - inactive cp lock - inactive sim lock - inactive activa lock - inactive phone lock - inactive auto network - inactive auto subset lock - inactive auto sp lock - inactive auto cp lock - inactive auto sim lock - inactive
Philips
#20021208# ok - 630 without SIM (erase flash)
*#7728*# - RSAV DONE
*#3849*# - ??? reboot
*#3851*# - ??? reboot
Philips 568 *01763*737381# - reset
Pantech
*01763*737381# - master reset (user data, user code) without SIM
*01763*8371# - SW version
*01763*6371# - UNLOCK
*01763*3641# - Menu
Panasonic
*01763*737381# - master reset (user data, user code) A100, A101, A102,G50, G51, G70, GD55..
*369# - MENU
7, 4, 6, menu, menu - lock menu
*#9999# - 5 sec after power on - SW version (GD75, GD67, GD87..)
LG
2945#*# - service menu (code resetW3000 G5300 C1200 G7100...)
2945#- hold (LG 500,600)
B1200 *+pwr, 6,6,8 Service Menu
B1300 *+pwr, 1,5,9 Service Menu
Security Removing Code For Lg 8110,8120.
47328545454#
Or
277634#*#
Sony-Ericsson
> * < < * < * - Service menu
< * * < - Lock menu
VK Mobile
*#79# - SW version
*#85*364# - hold menu
855855# without SIM (VG107)
85558555#-hold
4268#-hold (VG207)
Voxtel
0124 - master code
0718#- hold - menu (ST11, SC10, V100 without SIM)
4268#- hold - show code (ST11, SC10 without SIM)
*789(#)- hold - menu (V50, V300, RX100 without SIM)
Motorola
(T190, T191, T205) master code
- 19980722
- 20010903
**********
P2K test menu:
*#06#, menu, menu, 048263*
Test comands:
32*116*1*0*0 - read phone code
32*118*1*0*0 - read security code
18*0 - factory reset, phone code off
18*1 - master reset
54*18*1 - full phone reset
10*0*6 - select 900/1800
32*279*1*0*8 - model
32*383*1*0*0 - flex version
Hard reset MPX200, MPX220 - blue button + power on
Nokia
*#7370925538# (valet code reset) 6230
*#746025625# [*#sim0clock#]
*#92702689# [*#war0anty#]
Fly Bird
S688 - #*301#02# send - with SIM
menu:
7 - 10 - ok,
#*8000#, #*3676# (reboot repair)
V09, S1180 - *, 3 times down, 3 times up - service menu
Enol
*#987*00# - Service menu
*#987*99# - Full reset
*#900# - SW version
Maxon
*#9922# - menu, reset (without SIM)
*#9900# - Software Version
*#9901# - Software Version (PBatch)
S60 Siries (SX1, 6600, N-Gage..)
*#7780# - factory default
*#7370# - full factory defaults (all user data reset)
SX1 formating - * + # + power on
6600 formating - 3 + * + send + power on
Sendo X1 formating - 5 + power on
Mitsubishi
*65512890 (*-hold) format FFS (Eclipse)
* 3926 - (*-hold) test mode
* 5806 - (*-hold) SW version
*(hold) 787090 - trium 320 unlock menu
Huawei (cdma)
MASTER SECURITY CODE
-309296
-3092
-9296
Pantech HX-550C (cdma)
Full reset (phone code reset)- ##03*934#9367*192#397#7412569746 PWR,
after reset - ##27732726 PWR and select "with uim"
*#0000# Displays your phones software version:
1st Line : Software Version
2nd Line : Software Release Date
3rd Line : Compression Type
*#06# For checking the International Mobile Equipment Identity (IMEI Number)
*#2640# Displays security code in use
*#0000# Display Software ver. and compresion type
*#100# Shows the phones number
*#639# Programming - min/sid
*#67705646# Removes operator logo on 3310 & 3330
*#73# Reset phone timers and game scores
*#7760# Manufactures code
*#7780# Restore factory settings
*#92702689# Displays:
1. Serial Number
2. Date Made
3. Purchase Date
4. Date of last repair (0000 for no repairs)
5. Transfer User Data. To exit this mode you need to switch your phone off then on again
*#30# Lets you see the private number
*#94870345123456789# Deactivate the PWM-Mem (not recommend)
*#746025625# Displays the Sim Clock status, if your phone supports this power saving feature "SIM Clock Stop Allowed", it means you will get the best standby time possible
**21*number# Turn on "All Calls" diverting to the phone number entered
**61*number# Turn on "No Reply" diverting to the phone number entered
**67*number# Turn on "On Busy" diverting to the phone number entered
*3001#12345# Programming / Field Test
*#21# Allows you to check the number that "All Calls" are diverted to
*#61# Allows you to check the number that "On No Reply" calls are diverted to
*#62# Allows you to check the number that "Divert If Unreachable (no service)" calls are diverted to
*#67# Allows you to check the number that "On Busy Calls" are diverted to
*#43# Allows you to check the "Call Waiting" status of your phone.
#3370# Enable Enhanced Full Rate Codec (EFR)
#4720# Disable Half Rate Codec (correct code)
*#1345# Shows credit value
*** to the P sign
**** to get the W sign
***** to get the + sign
*#147# This lets you know who called you last (Only vodofone)
*#1471# Last call (Only vodofone)
*#21# This phone code allows you to check the number that "All Calls" are diverted to
*#2640# Displays phone security code in use
*#30# Lets you see the private number
*#43# Allows you to check the "Call Waiting" status of your cell phone.
*#61# Allows you to check the number that "On No Reply" calls are diverted to
*#62# Allows you to check the number that "Divert If Unreachable (no service)" calls are diverted to
*#67# Allows you to check the number that "On Busy Calls" are diverted to
*#67705646# Phone code that removes operator logo on 3310 & 3330
*#73# Reset phone timers and game scores
*#746025625# Displays the SIM Clock status, if your phone supports this power saving feature "SIM Clock Stop Allowed", it means you will get the best standby time possible
*#7760# Manufactures code
*#7780# Restore factory settings
*#8110# Software version for the nokia 8110
*#92702689# Displays - 1.Serial Number, 2.Date Made, 3.Purchase Date, 4.Date of last repair (0000 for no repairs), 5.Transfer User Data. To exit this mode you need to switch your phone off then on again
*#94870345123456789# Deactivate the PWM-Mem
**21*number# Turn on "All Calls" diverting to the phone number entered
**61*number# Turn on "No Reply" diverting to the phone number entered
**67*number# Turn on "On Busy" diverting to the phone number entered
12345 This is the default security code
press and hold # Lets you switch between lines
Software version *#2820#
M aster reset *73738#
SP lock *#3210#
Cooprate lock *#8140#
SIM lock *#4960#
Net Lock *#7320#
E616 get the P sign
P sign will appear after the # is held pressed for 3 seconds
Temp unlock solution working on older firmwares please only try once.
To unlock using temp solution Use any 2G simcard and turn-on the phone pre feb 2004
1) #4960*xxxxxxxx# + Send
2)*4960*xxxxxxxx*xxxxxxxx# + Send
3) Turn-off the phone and turn-on again!
xxxxxxxx = any numbers make sure you keep them the same
*2767*JAVA# Java Reset and (Deletes all Java Midlets)
*2767*MEDIA# Reset Media (Deletes All Sounds and Pics)
*2767*WAP# Wap Reset
*2767*CUST# Reset Custom EEPR0M
*2767*FULL# Reset Full EEPR0M (Caution)
For example : *2767*JAVA# would be keyed in as *2767*5282#
*#06# IMEI code
*#9998*4357# Help Menu
*#9998*5282# Java menu (GRPS/CSD settings for JAVA server)
*#9999#0# Monitor Mode
*#9999# or *#9998*9999# Software Version
*#8888# or *#9998*8888# Hardware Version
*#9998*746# or *#9998*0746# or *#0746# Sim Infos
*#9998*523# or *#9998*0523# or *#0523# Display Contrast
*#9998*842# or *#9998*0842# or *#0842# Vibration On (until you push OK)
*#9998*289# or *#9998*0289# or *#0289# Buzzer On (until you push OK)
*#9998*288# or *#9998*0288# or *#0288# Battery & Field Infos
*#9998*377# or *#9998*0377# Error log
*#9998*778# or *#9998*0778# or *#0778# Sim Service table
*#9998*782# show date and alarm clock
*#8999*638# show network information
*#9998*5646# change operator logo at startup
*#9998*76# production number
*#9998*968# view melody for alarm
*#9998*585# Non-Volatile Memory (NVM)
*#3243948# Digital Audio Interference Off
Secret Games: Snake on the T68 - Go to Erix and then on the main screen press 123 and you will be taken to the game.
Secret Message - On Tetris on the main screen when the blocks are falling press 397 and a message will appear.
Service Menu: Press > * < < * < *
tells you the phone's software version (good for checking your phone's "age" before buying it); press "Yes" repeatedly to see all the software data & press ">" to see all the texts available in your phone (hundreds of them!); some phones have "Flash?" option to reset the phone (I didn't see any difference after doing that)
How to Press > * < < * < * ???
When T68 is on "Standby Mode", "Standby Mode" means when it is not receiving or making any calls,, and it is on the main page where it show your operator name, signal strengths, time and battery level.
1. push joy stick to RIGHT once
(Screen will change to the menu and cursor land on PHONE BOOK icon)
2. press *
3. push joy stick to LEFT twice
(cursor will land on CONNECT icon)
4. press *
5. push joy stick to LEFT once
(cursor will land on ORGANISER icon)
6. press *
The Service Menu will appears !
1. Service Info
a. Software Version
b. SIMlock
c. Configuration
2. Service Setting
a. Contrast
3. Service Test
a. Display
b. LED/Illumination - *This test is very cool
c. Keyboard
d. Buzzer
e. Vibrator
f. Earphone
g. Microphone
h. Real Time Clock
i. Joystick Counter*
if you just bought your T68, the Joystick moves should be at a very low count, or else bring it back to shop (apparently been used before !)
T610
A (P) will appear when the number 7 key is pressed and held.
No need to use BOX
1st Make Full Eprom Reset *2767*3855#
After Rebooting Mobile
then enter...
*7465625*638*00000000*00000000# (to change NCK code to 00000000)
then enter...
#7465625*638*00000000# (to permanently unlock the phone)
check the lock status...
*#7465625#
---SGH-600:
*2767*3855#
---S100, S300, V200:
*2767*7822573738#
---A300, A800
*2767*637#
---X100
*2767*688#
2945#*# - service menu (code resetW3000 G5300 C1200 G7100...)
2945#- hold (LG 500,600)
B1200 *+pwr, 6,6,8 Service Menu
B1300 *+pwr, 1,5,9 Service Menu
Security Removing Code For Lg 8110,8120.
47328545454#
Or
277634#*#
Panasonic code
*01763*737381#
::Service Codes::
Alcatel
Master Codes
- 25228352
- 25228353
- 83227423 (TH3/4,BH4,BF5,BG3,BF3/4..)
###337*07# - master reset (with SIM)
###847# - factory reset (with SIM)
Alcatel 835 formating - **0102#
Samsung
*2767*3855# - FULL E2P RESET
*2767*2878# - CUSTOM E2P RESET
#*7337# - UNLOCK
*2767*688# - UNLOCK
*#0523# - CONTRAST
*#9998*523# - CONTRAST
*#8999*8378# - Service Menu (X100)
THIS CODE WILL UNLOCK ALL OF THE NEW MODEL SAMSUNG PHONES EXCEPT SMART PHONES. (X495-AND UP) I TESTED IT OUT LAST NIGHT ON MY T509(PASSED),T809(PASSED) Quote: *7465625*638*00000000*00000000# NEXT ENTER #7465625*638*00000000# AND THEN *#7465625# to check the locks....all locks are inactive...these are all the locks... network lock - inactive subset lock - inactive sp lock - inactive cp lock - inactive sim lock - inactive activa lock - inactive phone lock - inactive auto network - inactive auto subset lock - inactive auto sp lock - inactive auto cp lock - inactive auto sim lock - inactive
Philips
#20021208# ok - 630 without SIM (erase flash)
*#7728*# - RSAV DONE
*#3849*# - ??? reboot
*#3851*# - ??? reboot
Philips 568 *01763*737381# - reset
Pantech
*01763*737381# - master reset (user data, user code) without SIM
*01763*8371# - SW version
*01763*6371# - UNLOCK
*01763*3641# - Menu
Panasonic
*01763*737381# - master reset (user data, user code) A100, A101, A102,G50, G51, G70, GD55..
*369# - MENU
7, 4, 6, menu, menu - lock menu
*#9999# - 5 sec after power on - SW version (GD75, GD67, GD87..)
LG
2945#*# - service menu (code resetW3000 G5300 C1200 G7100...)
2945#- hold (LG 500,600)
B1200 *+pwr, 6,6,8 Service Menu
B1300 *+pwr, 1,5,9 Service Menu
Security Removing Code For Lg 8110,8120.
47328545454#
Or
277634#*#
Sony-Ericsson
> * < < * < * - Service menu
< * * < - Lock menu
VK Mobile
*#79# - SW version
*#85*364# - hold menu
855855# without SIM (VG107)
85558555#-hold
4268#-hold (VG207)
Voxtel
0124 - master code
0718#- hold - menu (ST11, SC10, V100 without SIM)
4268#- hold - show code (ST11, SC10 without SIM)
*789(#)- hold - menu (V50, V300, RX100 without SIM)
Motorola
(T190, T191, T205) master code
- 19980722
- 20010903
**********
P2K test menu:
*#06#, menu, menu, 048263*
Test comands:
32*116*1*0*0 - read phone code
32*118*1*0*0 - read security code
18*0 - factory reset, phone code off
18*1 - master reset
54*18*1 - full phone reset
10*0*6 - select 900/1800
32*279*1*0*8 - model
32*383*1*0*0 - flex version
Hard reset MPX200, MPX220 - blue button + power on
Nokia
*#7370925538# (valet code reset) 6230
*#746025625# [*#sim0clock#]
*#92702689# [*#war0anty#]
Fly Bird
S688 - #*301#02# send - with SIM
menu:
7 - 10 - ok,
#*8000#, #*3676# (reboot repair)
V09, S1180 - *, 3 times down, 3 times up - service menu
Enol
*#987*00# - Service menu
*#987*99# - Full reset
*#900# - SW version
Maxon
*#9922# - menu, reset (without SIM)
*#9900# - Software Version
*#9901# - Software Version (PBatch)
S60 Siries (SX1, 6600, N-Gage..)
*#7780# - factory default
*#7370# - full factory defaults (all user data reset)
SX1 formating - * + # + power on
6600 formating - 3 + * + send + power on
Sendo X1 formating - 5 + power on
Mitsubishi
*65512890 (*-hold) format FFS (Eclipse)
* 3926 - (*-hold) test mode
* 5806 - (*-hold) SW version
*(hold) 787090 - trium 320 unlock menu
Huawei (cdma)
MASTER SECURITY CODE
-309296
-3092
-9296
Pantech HX-550C (cdma)
Full reset (phone code reset)- ##03*934#9367*192#397#7412569746 PWR,
after reset - ##27732726 PWR and select "with uim"
*#0000# Displays your phones software version:
1st Line : Software Version
2nd Line : Software Release Date
3rd Line : Compression Type
*#06# For checking the International Mobile Equipment Identity (IMEI Number)
*#2640# Displays security code in use
*#0000# Display Software ver. and compresion type
*#100# Shows the phones number
*#639# Programming - min/sid
*#67705646# Removes operator logo on 3310 & 3330
*#73# Reset phone timers and game scores
*#7760# Manufactures code
*#7780# Restore factory settings
*#92702689# Displays:
1. Serial Number
2. Date Made
3. Purchase Date
4. Date of last repair (0000 for no repairs)
5. Transfer User Data. To exit this mode you need to switch your phone off then on again
*#30# Lets you see the private number
*#94870345123456789# Deactivate the PWM-Mem (not recommend)
*#746025625# Displays the Sim Clock status, if your phone supports this power saving feature "SIM Clock Stop Allowed", it means you will get the best standby time possible
**21*number# Turn on "All Calls" diverting to the phone number entered
**61*number# Turn on "No Reply" diverting to the phone number entered
**67*number# Turn on "On Busy" diverting to the phone number entered
*3001#12345# Programming / Field Test
*#21# Allows you to check the number that "All Calls" are diverted to
*#61# Allows you to check the number that "On No Reply" calls are diverted to
*#62# Allows you to check the number that "Divert If Unreachable (no service)" calls are diverted to
*#67# Allows you to check the number that "On Busy Calls" are diverted to
*#43# Allows you to check the "Call Waiting" status of your phone.
#3370# Enable Enhanced Full Rate Codec (EFR)
#4720# Disable Half Rate Codec (correct code)
*#1345# Shows credit value
*** to the P sign
**** to get the W sign
***** to get the + sign
*#147# This lets you know who called you last (Only vodofone)
*#1471# Last call (Only vodofone)
*#21# This phone code allows you to check the number that "All Calls" are diverted to
*#2640# Displays phone security code in use
*#30# Lets you see the private number
*#43# Allows you to check the "Call Waiting" status of your cell phone.
*#61# Allows you to check the number that "On No Reply" calls are diverted to
*#62# Allows you to check the number that "Divert If Unreachable (no service)" calls are diverted to
*#67# Allows you to check the number that "On Busy Calls" are diverted to
*#67705646# Phone code that removes operator logo on 3310 & 3330
*#73# Reset phone timers and game scores
*#746025625# Displays the SIM Clock status, if your phone supports this power saving feature "SIM Clock Stop Allowed", it means you will get the best standby time possible
*#7760# Manufactures code
*#7780# Restore factory settings
*#8110# Software version for the nokia 8110
*#92702689# Displays - 1.Serial Number, 2.Date Made, 3.Purchase Date, 4.Date of last repair (0000 for no repairs), 5.Transfer User Data. To exit this mode you need to switch your phone off then on again
*#94870345123456789# Deactivate the PWM-Mem
**21*number# Turn on "All Calls" diverting to the phone number entered
**61*number# Turn on "No Reply" diverting to the phone number entered
**67*number# Turn on "On Busy" diverting to the phone number entered
12345 This is the default security code
press and hold # Lets you switch between lines
Software version *#2820#
M aster reset *73738#
SP lock *#3210#
Cooprate lock *#8140#
SIM lock *#4960#
Net Lock *#7320#
E616 get the P sign
P sign will appear after the # is held pressed for 3 seconds
Temp unlock solution working on older firmwares please only try once.
To unlock using temp solution Use any 2G simcard and turn-on the phone pre feb 2004
1) #4960*xxxxxxxx# + Send
2)*4960*xxxxxxxx*xxxxxxxx# + Send
3) Turn-off the phone and turn-on again!
xxxxxxxx = any numbers make sure you keep them the same
*2767*JAVA# Java Reset and (Deletes all Java Midlets)
*2767*MEDIA# Reset Media (Deletes All Sounds and Pics)
*2767*WAP# Wap Reset
*2767*CUST# Reset Custom EEPR0M
*2767*FULL# Reset Full EEPR0M (Caution)
For example : *2767*JAVA# would be keyed in as *2767*5282#
*#06# IMEI code
*#9998*4357# Help Menu
*#9998*5282# Java menu (GRPS/CSD settings for JAVA server)
*#9999#0# Monitor Mode
*#9999# or *#9998*9999# Software Version
*#8888# or *#9998*8888# Hardware Version
*#9998*746# or *#9998*0746# or *#0746# Sim Infos
*#9998*523# or *#9998*0523# or *#0523# Display Contrast
*#9998*842# or *#9998*0842# or *#0842# Vibration On (until you push OK)
*#9998*289# or *#9998*0289# or *#0289# Buzzer On (until you push OK)
*#9998*288# or *#9998*0288# or *#0288# Battery & Field Infos
*#9998*377# or *#9998*0377# Error log
*#9998*778# or *#9998*0778# or *#0778# Sim Service table
*#9998*782# show date and alarm clock
*#8999*638# show network information
*#9998*5646# change operator logo at startup
*#9998*76# production number
*#9998*968# view melody for alarm
*#9998*585# Non-Volatile Memory (NVM)
*#3243948# Digital Audio Interference Off
Secret Games: Snake on the T68 - Go to Erix and then on the main screen press 123 and you will be taken to the game.
Secret Message - On Tetris on the main screen when the blocks are falling press 397 and a message will appear.
Service Menu: Press > * < < * < *
tells you the phone's software version (good for checking your phone's "age" before buying it); press "Yes" repeatedly to see all the software data & press ">" to see all the texts available in your phone (hundreds of them!); some phones have "Flash?" option to reset the phone (I didn't see any difference after doing that)
How to Press > * < < * < * ???
When T68 is on "Standby Mode", "Standby Mode" means when it is not receiving or making any calls,, and it is on the main page where it show your operator name, signal strengths, time and battery level.
1. push joy stick to RIGHT once
(Screen will change to the menu and cursor land on PHONE BOOK icon)
2. press *
3. push joy stick to LEFT twice
(cursor will land on CONNECT icon)
4. press *
5. push joy stick to LEFT once
(cursor will land on ORGANISER icon)
6. press *
The Service Menu will appears !
1. Service Info
a. Software Version
b. SIMlock
c. Configuration
2. Service Setting
a. Contrast
3. Service Test
a. Display
b. LED/Illumination - *This test is very cool
c. Keyboard
d. Buzzer
e. Vibrator
f. Earphone
g. Microphone
h. Real Time Clock
i. Joystick Counter*
if you just bought your T68, the Joystick moves should be at a very low count, or else bring it back to shop (apparently been used before !)
T610
A (P) will appear when the number 7 key is pressed and held.
No need to use BOX
1st Make Full Eprom Reset *2767*3855#
After Rebooting Mobile
then enter...
*7465625*638*00000000*00000000# (to change NCK code to 00000000)
then enter...
#7465625*638*00000000# (to permanently unlock the phone)
check the lock status...
*#7465625#
---SGH-600:
*2767*3855#
---S100, S300, V200:
*2767*7822573738#
---A300, A800
*2767*637#
---X100
*2767*688#
Unlock Code Instructions for LG Cell Phones for All Networks
Unlock Code Instructions for LG Cell Phones for All Networks In this guide I will show you how to enter unlock codes .
Below are instructions that work for most network providers.
How to Unlock LG (most models):
1:Insert not-allowed SIM card
2 ower on the handset- phone will display "phone restricted"
3:Select "Cancel" - phone will display "phone restriction code"
4:Enter the SIM unlock code
5:Select "OK" - the handset is now successfully unlocked
How to Unlock LG KG245 (Vodafone Australia)
1:Insert a Vodafone Australia working SIM card.
2:Ensure the phone is charged and then switch the phone on.
3:Optional Step: If the SIM card has a PIN, enter your PIN number
4:Wait for the phone to power up then enter 2945#*7101#
5:Select Menu , then go to Settings > Security > SIM Lock > Network
6:Select Deactivate and enter the 8-digit unlocking code provide for your handset.
7:The handset will be unlocked automatically and will display “Done”. This will be confirmed if you can make and receive calls with the Non-Vodafone Australia SIM card. (You will need reception and phone credit with the different network provider)
How to Unlock LG KG800 or TG800 Chocolate:
1:With the phone in standby, enter 2945#*7101#. This will activate the extra menu.
2:Go to: Settings>Security>SimLock>Network
3:Select deactivate. Enter the unlock code,
How to Unlock LG C2000:
Insert non-Cingular SIM card
1ower on the handset - phone will display "phone restricted"
2:Select "Cancel" - phone will display "phone restriction code"
3:Enter the SIM Unlock code
4:Select "OK" - the handset is now successfully unlocked
How to Enter Unlock Codes on LG F2250:
1:With allowed sim card in the start menu type: 2945#*3311#.
2:Handset shows saved, then return to startup screen
3ress Menu key, choose Settings > Security > Sim Lock> Network
 eactivate, handset will now show 'Enter NCK'
4:Enter your unlock code and OK.
How to Enter Unlock Codes on LG U8150:
1:Switch ON your phone with a not allowed SIM card.
2:Compose: 277634#*#.
3:Go to menu "SIM Lock".
4:Enter the unlock code, which you can buy any online store .
How to Enter Unlock Codes on LG U8110:
1:With a not allowed sim card in your phone enter Pin code then validate, type: 277634#*#
2:Select 'Sim Unlock' menu #
3:Enter NCK code then validate
Your phone is now unlocked.
How to Enter Unlock Codes on LG U8210:
1:With a not allowed sim card enter Pin code then validate, type: 277634#*#
2:Shows test menu
3:Choose sim test menu and type: 2945#*#, choose Sim Unlock menu
4:Handset shows 'Enter NCK'
5:Enter code, then hit OK.
How to Enter Unlock Codes on LG U81xx:
1:To bring up the unlock menu on the phone with a SIM card, type 2945#*88110#
2:Enter the code
In case you need to reset the phone without a SIM card first, type 277634#*# or 47328545454#.
How to Enter Unlock Codes on Cingular AT&T LG CU500:
1:Insert non-Cingular SIM card.
2ower on the handset. Phone will display "Invalid SmartChip"
3
 IF THE PHONE DOES NOT DISPLAY INVALID SMARTCHIP, PLEASE POWER OFF AND ON AGAIN)
4:In Idle screen, enter 159753#*#. Phone will display "Enter NCK, Remaining 5
5:Enter the 8 digit SIM unlock code, which you can buy any Oline phones.
6:Select "OK". The handset is now successfully unlocked
How to Enter Unlock Codes on all other LG cell phones:
Switch ON your phone with an allowed SIM card
Then compose:
2945#*5101# - (if you have a LG 510w)
1945#*5101# - (if you have a LG 1200 & B1200)
2945#*5221# - (if you have a LG 5200 & 52200)
2945#*5301# - (if you have a LG 5300)
2945#*5401# - (if you have a LG 5400)
2945#*70001# - (if you have a LG 7020)
2945#*7101# - (if you have a LG 7100)
2945#*1201# or 2945#*70001# - (if you have a LG 1100)
2945#*70001# - (if you have a LG7250T)
2945#*2201# - (if you have a LG C2200)
2945#*5301# - (if you have a LG T5100)
2945#*3311# - (if you have a LG C3310)
Go to "Menu" and then to "Settings"
Then select "Security"
To finish select "Network Provider" and select "Deactivate"
Enter the unlock code, which you can buy Online store unlock-cell-phones.
If your cell phone is not listed, please follow instructions for LG C2000 above
How to Enter Unlock Codes on all other LG U400 Shine (2 codes needed):
1:Insert the network SIM in the handset which works with the phone (from the locked carrier).
2:Enter 2945#*88110#.
3:The phone will then prompt 'Unlock sim'. Press OK.
4:The phone will then prompt 'Network Unlock'. Press OK.
5:The phone will then prompt- 'Input Network Control Key'. Enter the 8 digit unlocking code. Press OK. If the unlocking code comes with only 7 digits, add a 0 in front of the 7 digit code. If the unlocking code comes with only 6 digits, add 00 in front of the 6 digit code. If you received a 16 digit code, enter it. The phone will have space for it.
6:It should give you the message: Success.
7:Come back to the main screen and Enter 2945#*88110#.
8:The phone will then prompt unlock sim. Press OK.
9:The phone will then prompt Network Unlock/ Lock but if you scroll down
10 :you will see a message Enter SP Lock. Enter SP Code.
Then press OK.
How to Enter Unlock Codes on all other LG KE970 Shine:
1:Switch ON your phone with an allowed SIM card
2:Then compose: 2945#*9701#
3ress CALL.
4:It should you ask you for the code.
How to Enter Unlock Codes on all other LG TU720 Shine:
1ut in a non-allowed SIM, phone says invalid SIM card
2:Now enter *#865625# then enter your 16 digits code.
How to Unlock LG KG800 Chocolate Without a Code (not reliable):
1:Insert SIM from the network that it is locked to.
2:Turn on phone.
3:On home Screen, slide up phone.
4:Type 2945#*#
5:ENG. Mode menu should appear.
6:Go Down to Factory Reset. Select it. May take a few minutes to reset!
7:This will reset the phone back to before the phone was locked to a network.
8:The phone will automatically restart (the network logo at start up will not change).
9:Now insert any SIM card and the phone should turn on normally
10:The phone is now unlocked and you can customize the setting as you like
Unlock Code Instructions for LG Cell Phones for All Networks In this guide I will show you how to enter unlock codes .
Below are instructions that work for most network providers.
How to Unlock LG (most models):
1:Insert not-allowed SIM card
2
ower on the handset- phone will display "phone restricted"3:Select "Cancel" - phone will display "phone restriction code"
4:Enter the SIM unlock code
5:Select "OK" - the handset is now successfully unlocked
How to Unlock LG KG245 (Vodafone Australia)
1:Insert a Vodafone Australia working SIM card.
2:Ensure the phone is charged and then switch the phone on.
3:Optional Step: If the SIM card has a PIN, enter your PIN number
4:Wait for the phone to power up then enter 2945#*7101#
5:Select Menu , then go to Settings > Security > SIM Lock > Network
6:Select Deactivate and enter the 8-digit unlocking code provide for your handset.
7:The handset will be unlocked automatically and will display “Done”. This will be confirmed if you can make and receive calls with the Non-Vodafone Australia SIM card. (You will need reception and phone credit with the different network provider)
How to Unlock LG KG800 or TG800 Chocolate:
1:With the phone in standby, enter 2945#*7101#. This will activate the extra menu.
2:Go to: Settings>Security>SimLock>Network
3:Select deactivate. Enter the unlock code,
How to Unlock LG C2000:
Insert non-Cingular SIM card
1
ower on the handset - phone will display "phone restricted"2:Select "Cancel" - phone will display "phone restriction code"
3:Enter the SIM Unlock code
4:Select "OK" - the handset is now successfully unlocked
How to Enter Unlock Codes on LG F2250:
1:With allowed sim card in the start menu type: 2945#*3311#.
2:Handset shows saved, then return to startup screen
3
ress Menu key, choose Settings > Security > Sim Lock> Network

4:Enter your unlock code and OK.
How to Enter Unlock Codes on LG U8150:
1:Switch ON your phone with a not allowed SIM card.
2:Compose: 277634#*#.
3:Go to menu "SIM Lock".
4:Enter the unlock code, which you can buy any online store .
How to Enter Unlock Codes on LG U8110:
1:With a not allowed sim card in your phone enter Pin code then validate, type: 277634#*#
2:Select 'Sim Unlock' menu #
3:Enter NCK code then validate
Your phone is now unlocked.
How to Enter Unlock Codes on LG U8210:
1:With a not allowed sim card enter Pin code then validate, type: 277634#*#
2:Shows test menu
3:Choose sim test menu and type: 2945#*#, choose Sim Unlock menu
4:Handset shows 'Enter NCK'
5:Enter code, then hit OK.
How to Enter Unlock Codes on LG U81xx:
1:To bring up the unlock menu on the phone with a SIM card, type 2945#*88110#
2:Enter the code
In case you need to reset the phone without a SIM card first, type 277634#*# or 47328545454#.
How to Enter Unlock Codes on Cingular AT&T LG CU500:
1:Insert non-Cingular SIM card.
2
ower on the handset. Phone will display "Invalid SmartChip"3

4:In Idle screen, enter 159753#*#. Phone will display "Enter NCK, Remaining 5
5:Enter the 8 digit SIM unlock code, which you can buy any Oline phones.
6:Select "OK". The handset is now successfully unlocked
How to Enter Unlock Codes on all other LG cell phones:
Switch ON your phone with an allowed SIM card
Then compose:
2945#*5101# - (if you have a LG 510w)
1945#*5101# - (if you have a LG 1200 & B1200)
2945#*5221# - (if you have a LG 5200 & 52200)
2945#*5301# - (if you have a LG 5300)
2945#*5401# - (if you have a LG 5400)
2945#*70001# - (if you have a LG 7020)
2945#*7101# - (if you have a LG 7100)
2945#*1201# or 2945#*70001# - (if you have a LG 1100)
2945#*70001# - (if you have a LG7250T)
2945#*2201# - (if you have a LG C2200)
2945#*5301# - (if you have a LG T5100)
2945#*3311# - (if you have a LG C3310)
Go to "Menu" and then to "Settings"
Then select "Security"
To finish select "Network Provider" and select "Deactivate"
Enter the unlock code, which you can buy Online store unlock-cell-phones.
If your cell phone is not listed, please follow instructions for LG C2000 above
How to Enter Unlock Codes on all other LG U400 Shine (2 codes needed):
1:Insert the network SIM in the handset which works with the phone (from the locked carrier).
2:Enter 2945#*88110#.
3:The phone will then prompt 'Unlock sim'. Press OK.
4:The phone will then prompt 'Network Unlock'. Press OK.
5:The phone will then prompt- 'Input Network Control Key'. Enter the 8 digit unlocking code. Press OK. If the unlocking code comes with only 7 digits, add a 0 in front of the 7 digit code. If the unlocking code comes with only 6 digits, add 00 in front of the 6 digit code. If you received a 16 digit code, enter it. The phone will have space for it.
6:It should give you the message: Success.
7:Come back to the main screen and Enter 2945#*88110#.
8:The phone will then prompt unlock sim. Press OK.
9:The phone will then prompt Network Unlock/ Lock but if you scroll down
10 :you will see a message Enter SP Lock. Enter SP Code.
Then press OK.
How to Enter Unlock Codes on all other LG KE970 Shine:
1:Switch ON your phone with an allowed SIM card
2:Then compose: 2945#*9701#
3
ress CALL.4:It should you ask you for the code.
How to Enter Unlock Codes on all other LG TU720 Shine:
1
ut in a non-allowed SIM, phone says invalid SIM card2:Now enter *#865625# then enter your 16 digits code.
How to Unlock LG KG800 Chocolate Without a Code (not reliable):
1:Insert SIM from the network that it is locked to.
2:Turn on phone.
3:On home Screen, slide up phone.
4:Type 2945#*#
5:ENG. Mode menu should appear.
6:Go Down to Factory Reset. Select it. May take a few minutes to reset!
7:This will reset the phone back to before the phone was locked to a network.
8:The phone will automatically restart (the network logo at start up will not change).
9:Now insert any SIM card and the phone should turn on normally
10:The phone is now unlocked and you can customize the setting as you like
ALL MOBILE PHONE UNLOCKER 2010 WITH KEY
ALL MOBILE PHONE UN LOCKER 2010 WITH KEY
UNLOCK MOBILES
NOKIA
APPLE
SONY ERICSSON
PANASONIC
SAMSUNG
SONY
TATA
ZTE
MOTOROLA
ALCATEL
MUCH MORE FEATURES ARE AVAILABE IN IT...
DOWNLOAD
http://letitbit.net/download/46653....ll_Mobilephones.www.dl4all.com.part1.rar.html
http://letitbit.net/download/10593....ll_Mobilephones.www.dl4all.com.part2.rar.html
http://letitbit.net/download/39303....ll_Mobilephones.www.dl4all.com.part3.rar.html
How to Find Component Parts on PCB Board?
How to Find Component Parts on PCB Board?
A certain components parts is easy to find with an aide of schematic diagrams. In Nokia Phones finding it was been so easy for they provide a complete and accurate component data on their Schematic Diagrams. While other various mobile phone don't have. Some cellphone technicians find it hard to fix some of mobile phone products for they don't provide schematic diagrams to be available, but many experts and masters can do the job even without schematic diagrams. Experts can rely on their deep knowledge on electronics components and circuits, many of them where electronic engineers and also many of them where professionally skilled by experience and mastered for years. You can be one of them if you follow their instinct but before that they all started from scratch.We are all start from scratch.
Now, let's take up a very simple method on how to find certain electronic component's location where it is being mounted on a particular PCB Board layouts.
Here's an example of Nokia N70 schematic diagram, Download it here if you haven't a copy yet, and make sure you have Adobe Reader installed on your computer to be able to open it.
If you already have a copy of this schematic diagram, open it and scroll it down to the bottom page.
In the bottom page which is the last page you may found this Component Finder Page. see picture below:
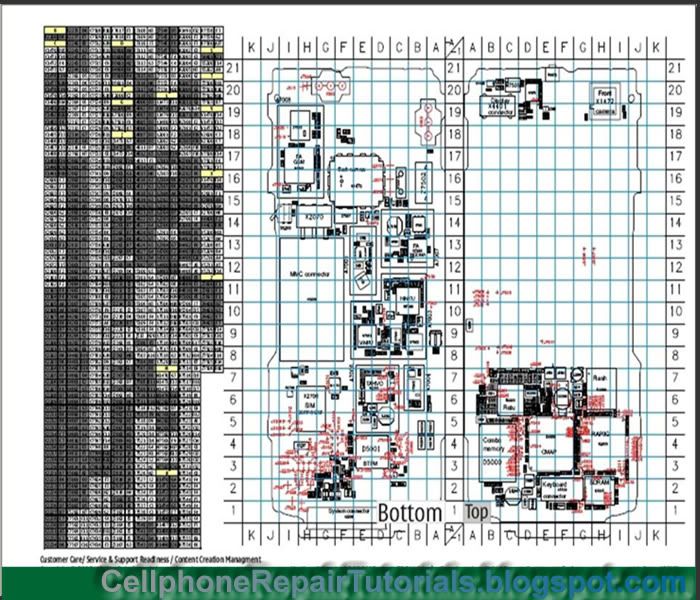
On the right side you may find the table of components which is listed in codes like for example, Resistors starts with letter "R" then "mounting code" . next to it on the left is the "pattern codes" which is means the spot point which is scaled by letters and numbers on the PC Board,
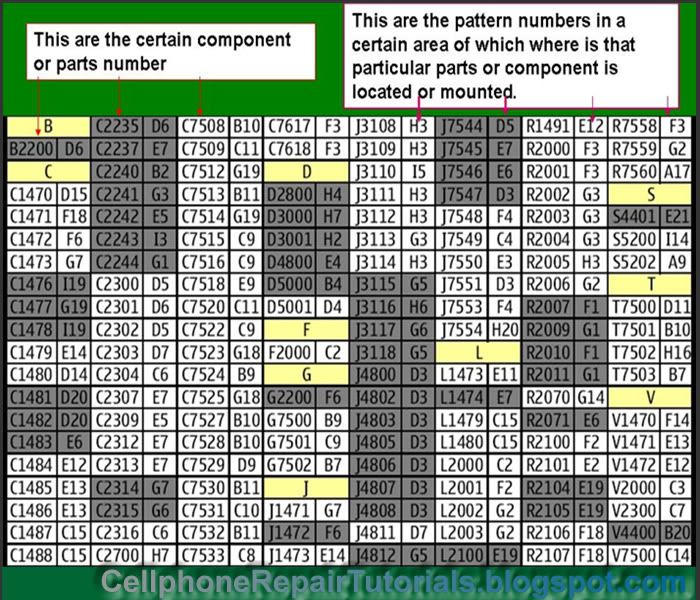
On the right side of the page is the layout of all of components with respective codes mark on it. Each component mounted in horizontal and vertical positions.
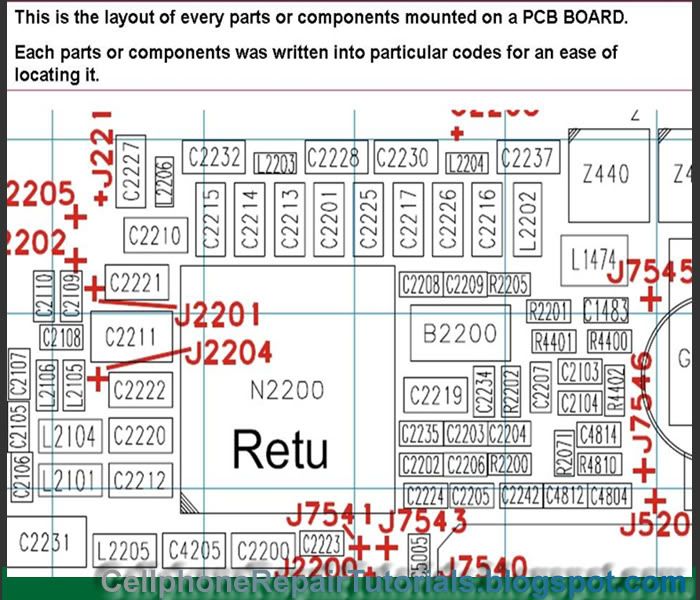
In both sides on the PCB layout is being scaled by letters and numbers, this is were the pattern codes from the first picture above being produce by combining the letter and number to make the mapping spot point.
The spot point of where these letter and number meets across each other, is the exact location where that certain component is being mounted.
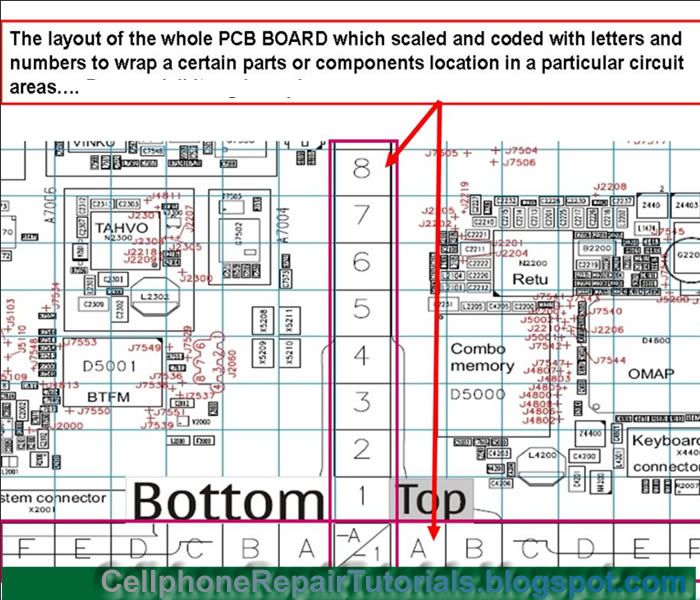
Now let's take a little bit exercise on how to use this methods..
Okay, assuming that we are looking for a certain components on a PCB board.
Let say that we are going to find the 2n2 valued capacitor on RF Section for that phone is having a problem of network signal.
now scroll up the page to RF Section which is on page 9 and find these two 2n2 (2.2nanofarad) valued capacitor see guide picture below; Just remember and get the Mounting Code for it is the code were going to use as a guide to to the component finder table of components.
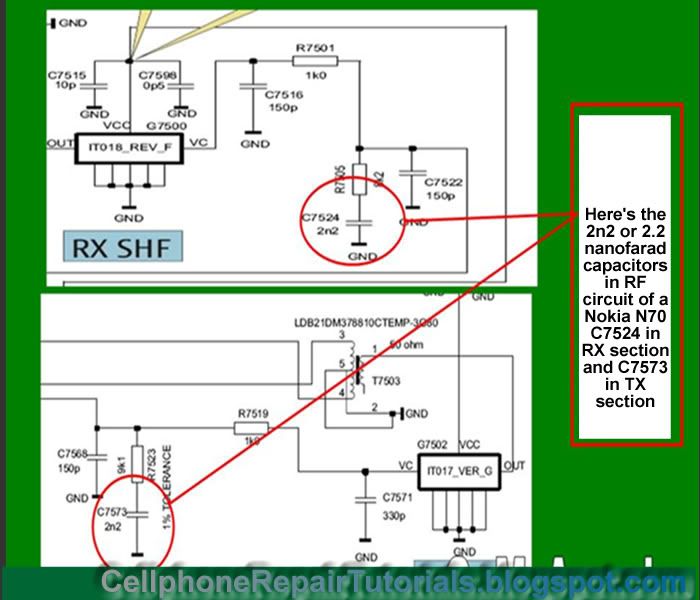
Then after finding it scroll back to the Component Finder page Table of components, then find it on the lists of the components codes like "C7524 is on B9" and "C7573 is on A6"
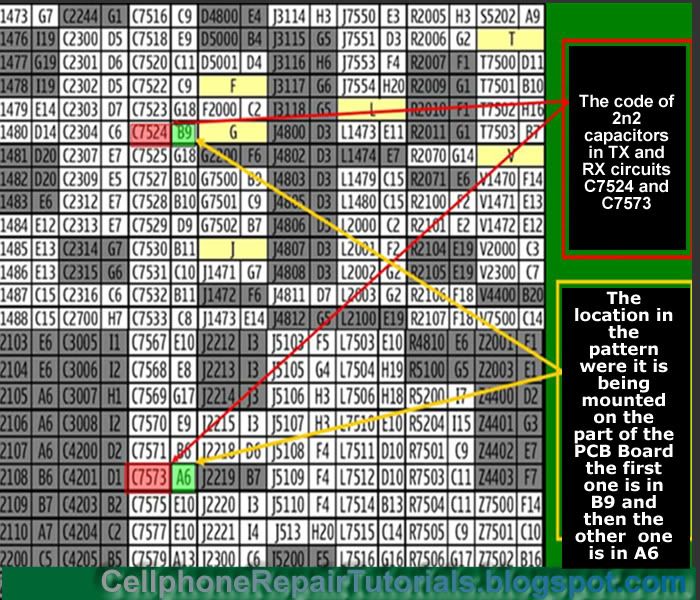
the next thing again you have to do is to remember and get that code then proceed to the Component Layouts. and scale the spot point of "letter B and 9" then letter "A and 6" on the scaled on the opposite sides.See picture below
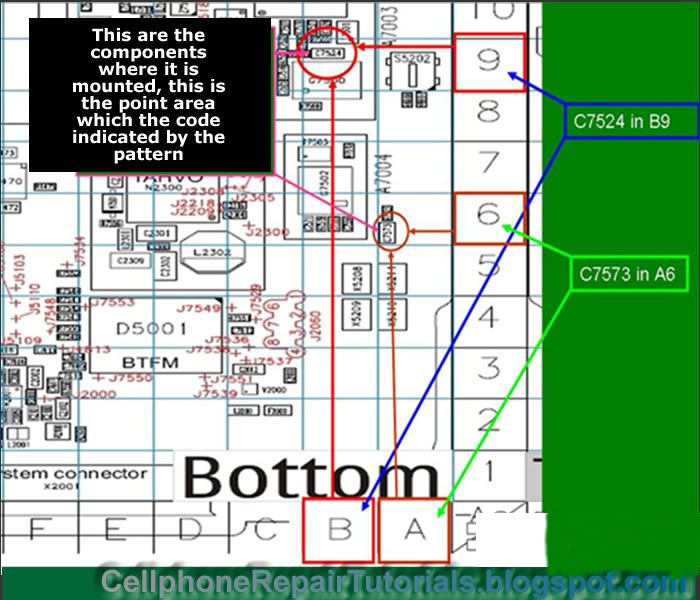
The last part is to scroll it up on the whole component layout on the upper page 10 or on your PC board then spot and mark that component where it is being mounted.

There you go you just found it! congratulation!
Practice it more often,so that you can be familiarize on each component or parts for that certain product. The more often you do it, the more chances you will mastered it. sooner,you can work it alone without even using the schematic diagram anymore.
How to Reball BGA Chips of a Mobile Phones Manually by Hand
Reballing Ball Grid Array (BGA) Chips in mobile phones manually by hand
Reballing BGA chips tends to need and have a good steady hand, since most cellphone technician applied it manually by hands. It also requires good practice and experimentation before proceeding to reball any chips in mobile phones, because there are chips in mobile phones that can be easily damaged if you are not so familiar of doing it as well. like the CPU's and the Application processor chips are very vulnerable and can be easily damaged when applying unrecommended heat on it. I advice that spending much time to practice it with non working PC board and chips is a good way to start. To put thing straight up, in real life there are technician that are good re-baller and some have poor skills on it. that is what I observe mostly when attending many forums on the Internet. The truth is by practicing doing it is the key to enhance re-balling chips skills.
Re-balling Chips Methods
. Prepare the proper Tools -You need to prepare also proper reballing kits and a cleaning kits for further cleaning the PC board.
. A good and controlled hot air temperature, You need to refer to manufacturers manual for proper temperature settings.
Reballing BGA chips manually by hand skill, this tutorial video courtesy of onadbballais
Some technician used IRDA or Infrared Reworks Station and other reballing kit available on the market today. Practice by doing it everyday I assure you can do it yourself within just a few days.
Cellphone Spare Parts and How it Works on a Mobile Phone Handsets
Identifying Spare Parts on Mobile Phones Handsets
As part on this tutorials, A good technician must also learn how to identify spare parts and how each particular parts works on cellphone handsets. Familiarizing each
Now various brands and models of every mobile phone products although have the same parts but differs on each sizes and technical specs. Others also are compatible with each other..
The Following are the most common types of spare parts you can find inside mobile phones handsets.
* Battery
* Battery Connector
* Antenna
* LCD
* LCD Frame
* Camera Module
* Plug-in Connector
* Flex Cable Wires
* Navigator/Joystick/Trackball
* Touch Screen Panel
* Microphone
* Speaker
* Buzzer/Ringer
* Keypad Membrane
* Simcard Connector
* On/Off Switch
* Vibrator
* Back Housing
* Housing
BATTERY-
A battery is used to provide power supply to the PCB circuits and components. There Are various types of Batteries in each particular mobile phone products, and varies to each sizes and specifications. Manufacturers coded each particular packaged according to sizes and where specified product to use. The standard battery Voltage Range is 3.7V and is made of rechargeable Lithium Ion.
Battery Connectors
This the interface where the battery connects and supply the voltage to the cellphones main circuitry or PC Board. Old models used 4 pin which lead to four battery output sources such as +(positive) - (negative) BSI (battery status indicator) and Btemp (Battery Temperature)
The latest designs consists of only three pins, The + (positive) - (negative) and BSI (battery status indicator) the Btemp is diminished and still in cellphone circuitry included.
Antenna's
Antennas are used to intercepts and boost network signals, without it the phone will hardly connects to service providers and results network signal lost.
Antennas also consists of many types and sizes and varieties. It varies according to how each manufacturers designs. It is made of thin brass or stainless metal mounted on a plastic packaging.
LCD
Liquid Crystal Display(LCD) is the component that visualize the operation of a mobile phone handset. It is made of glass with tiny crystal fixel that imitate the light source that has programmed to display certain information such as text and images.
LCD also comes from wide range of specifications older LCD are called monocrome which only display one certain color. The later designs where multicolored and displays rich text and images. The higher the fixel amount on a certain LCD the higher the picture resolution of images can displays.
Camera Module
Camera Modules is the component used to capture and store images, also comes in different specifications and packaging. Examples of these modules are shown below.
Plug-in Connectors
Plug in connectors are interfaces used in charging or by charger plugging, USB and data cables. Various mobile products also have different plug-in connectors designs.
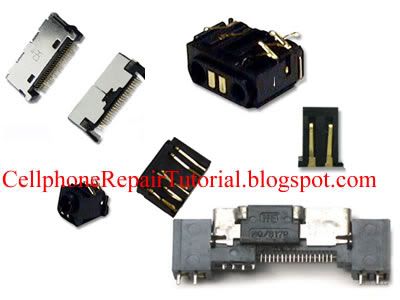
Flex Cable Wires
These are wires that is made into a flat thin wires used as an interface to connect from one circuit or components to another. It is called "Flex" means Flexible others also called it a "ribbon wire"
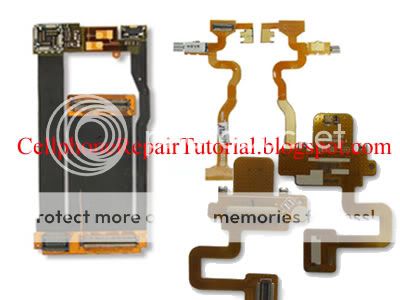
Joystick and Trackball
this a component parts which is used to navigate certain features on a mobile phones. It is commonly navigate "UP","DOWN","LEFT","RIGHT","MENU","ENTER" keys.
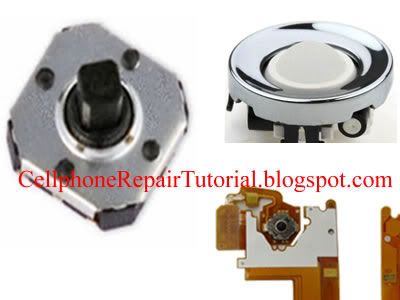
Touch Screen Panels
Touch screen panels are made of flat thin glass which is designed with high capacitive or capacitance value. It navigates everywhere on LCD screen by just using a finger to or a stylus pen to switch trough certain feature on a mobile phone handsets.
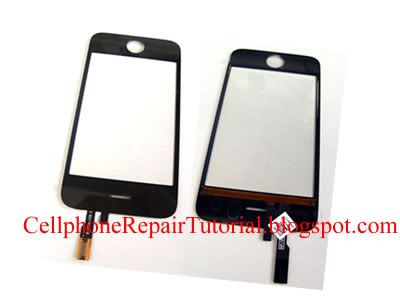
Microphone
A microphone also known as "mouthpiece"is the component used to intercepts and imitates human voice and sounds to sends to particular receiver or caller. Cellphone microphone are small and have different forms of packaging.
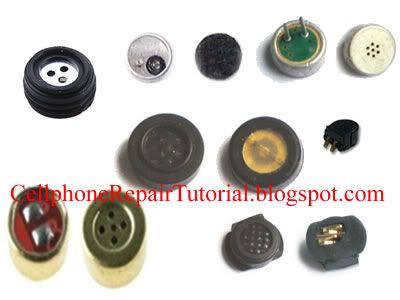
Speaker
Speakers are the components that are used to hear someone talking when a call is made,without it you can not hear the other persons voice calling at you. It is called an "earpiece by most common Technicians.
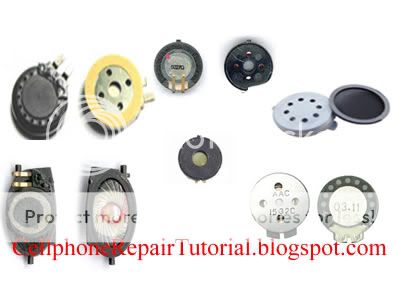
Buzzers and Ringers
These are also speakers that can generate high audible sound louder than Earpiece speakers. It amplifies the ringtones or voice or music more audibly.
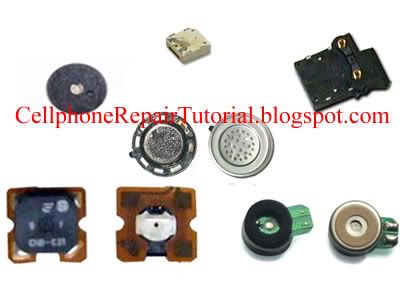
Keypads Membrane
This are made of tiny round metals that acts as a switch in a row of letters and numbers characters on keypads mattress.
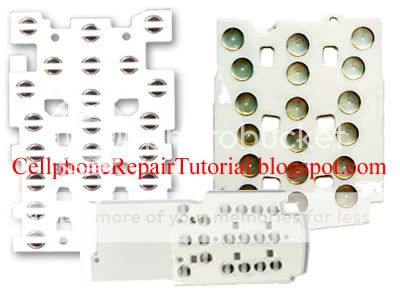
SIM Card Connectors
This is an Interface that acts as a holder and connects the Sim card to the PC board circuits.
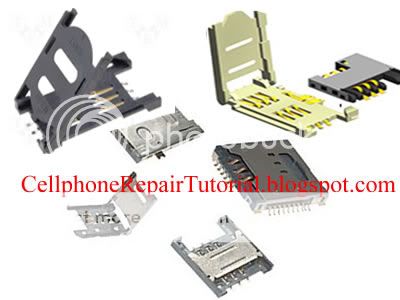
ON and OFF Switch
It is made of tiny metal that conducts connectivity when press. It is being used as a power on and off, Volume control switch and camera shutter switch on various mobile phones.
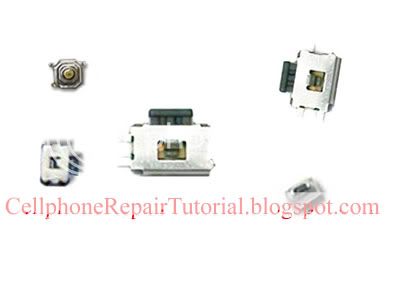
Vibrator
it is made of a tiny motor that conduct vibration when in active mode. It has been attach an unbalance tiny metal on its tip, that is why it creates vibration when the motor rotates.

Other Parts
More Parts like LCD Frames, ON and OFF rubber buttons, Metal frames, Screws, Back housing, Face plates are also plays vital role on mobile phones packaging.
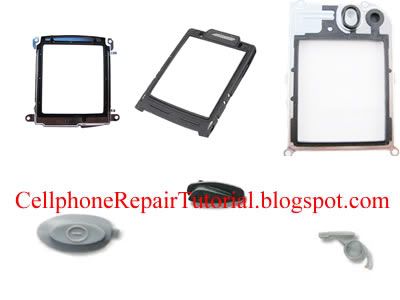
Some Parts may I have not included here, for some are just so rare in some mobile phone products.
Identifying Spare Parts on Mobile Phones Handsets
As part on this tutorials, A good technician must also learn how to identify spare parts and how each particular parts works on cellphone handsets. Familiarizing each
Now various brands and models of every mobile phone products although have the same parts but differs on each sizes and technical specs. Others also are compatible with each other..
The Following are the most common types of spare parts you can find inside mobile phones handsets.
* Battery
* Battery Connector
* Antenna
* LCD
* LCD Frame
* Camera Module
* Plug-in Connector
* Flex Cable Wires
* Navigator/Joystick/Trackball
* Touch Screen Panel
* Microphone
* Speaker
* Buzzer/Ringer
* Keypad Membrane
* Simcard Connector
* On/Off Switch
* Vibrator
* Back Housing
* Housing
BATTERY-
A battery is used to provide power supply to the PCB circuits and components. There Are various types of Batteries in each particular mobile phone products, and varies to each sizes and specifications. Manufacturers coded each particular packaged according to sizes and where specified product to use. The standard battery Voltage Range is 3.7V and is made of rechargeable Lithium Ion.

Battery Connectors
This the interface where the battery connects and supply the voltage to the cellphones main circuitry or PC Board. Old models used 4 pin which lead to four battery output sources such as +(positive) - (negative) BSI (battery status indicator) and Btemp (Battery Temperature)
The latest designs consists of only three pins, The + (positive) - (negative) and BSI (battery status indicator) the Btemp is diminished and still in cellphone circuitry included.

Antenna's
Antennas are used to intercepts and boost network signals, without it the phone will hardly connects to service providers and results network signal lost.
Antennas also consists of many types and sizes and varieties. It varies according to how each manufacturers designs. It is made of thin brass or stainless metal mounted on a plastic packaging.

LCD
Liquid Crystal Display(LCD) is the component that visualize the operation of a mobile phone handset. It is made of glass with tiny crystal fixel that imitate the light source that has programmed to display certain information such as text and images.
LCD also comes from wide range of specifications older LCD are called monocrome which only display one certain color. The later designs where multicolored and displays rich text and images. The higher the fixel amount on a certain LCD the higher the picture resolution of images can displays.

Camera Module
Camera Modules is the component used to capture and store images, also comes in different specifications and packaging. Examples of these modules are shown below.

Plug-in Connectors
Plug in connectors are interfaces used in charging or by charger plugging, USB and data cables. Various mobile products also have different plug-in connectors designs.

Flex Cable Wires
These are wires that is made into a flat thin wires used as an interface to connect from one circuit or components to another. It is called "Flex" means Flexible others also called it a "ribbon wire"

Joystick and Trackball
this a component parts which is used to navigate certain features on a mobile phones. It is commonly navigate "UP","DOWN","LEFT","RIGHT","MENU","ENTER" keys.

Touch Screen Panels
Touch screen panels are made of flat thin glass which is designed with high capacitive or capacitance value. It navigates everywhere on LCD screen by just using a finger to or a stylus pen to switch trough certain feature on a mobile phone handsets.

Microphone
A microphone also known as "mouthpiece"is the component used to intercepts and imitates human voice and sounds to sends to particular receiver or caller. Cellphone microphone are small and have different forms of packaging.

Speaker
Speakers are the components that are used to hear someone talking when a call is made,without it you can not hear the other persons voice calling at you. It is called an "earpiece by most common Technicians.

Buzzers and Ringers
These are also speakers that can generate high audible sound louder than Earpiece speakers. It amplifies the ringtones or voice or music more audibly.

Keypads Membrane
This are made of tiny round metals that acts as a switch in a row of letters and numbers characters on keypads mattress.

SIM Card Connectors
This is an Interface that acts as a holder and connects the Sim card to the PC board circuits.

ON and OFF Switch
It is made of tiny metal that conducts connectivity when press. It is being used as a power on and off, Volume control switch and camera shutter switch on various mobile phones.

Vibrator
it is made of a tiny motor that conduct vibration when in active mode. It has been attach an unbalance tiny metal on its tip, that is why it creates vibration when the motor rotates.

Other Parts
More Parts like LCD Frames, ON and OFF rubber buttons, Metal frames, Screws, Back housing, Face plates are also plays vital role on mobile phones packaging.

Some Parts may I have not included here, for some are just so rare in some mobile phone products.
Familarization: Components and Parts on Nokia Mobile Phone Handsets
This is an example of Nokia Mobile Phone Handsets Components and Parts Descriptions, including the manufacturers on each and every chips mounted and used the entire circuitry.
Knowing and understanding in each and every components and parts is a big help on Hardware Fault Finding and Trouble shooting.
The N95 is part of Nokia's N-series of handsets, focusing on delivering multimedia content. It was previously the flagship model of Nokia's entire handset lineup, predecessor to the current flagship, the Nokia N96.

Nokia N95 Models
Nokia N95-1 External MicroSD Slot, 3G for Europe Nokia N95-2 Internal 8GB Memory, 3G for Europe Nokia N95-3 External MicroSD Slot, 3G for North America Nokia N95-4 Internal 8GB Memory, 3G for North America
http://draft.blogger.com/post-edit.g?blogID=6231501182166011326&postID=3619655769864499512
Product Features & Specifications
http://draft.blogger.com/post-edit.g?blogID=6231501182166011326&postID=3619655769864499512
Technical Specifications
Operating System Symbian OS 9.2, S60 rel 3.1 Network Support GSM/GPRS/EDGE/HSDPA, UMTS: 850/2100, GSM: 850/900/1800/1900MHz Screen 2.6" QVGA (240 x 320px), 16M Color TFT Input Method Slide-out Numeric Keypad, Slide-out Multimedia buttons Wi-Fi 802.11b/g, UPnP support GPS Internal GPS with A-GPS Bluetooth Bluetooth v2.0, A2DP support Camera 5.0MP Camera with Carl Zeiss optics, Auto Focus, LED Flash; Secondary CIF Front Camera Storage Internal 160MB Storage, External MicroSD Slot; OR Internal 8GB Storage Connection Ports Mini-USB 2.0 Hi-Speed, 3.5mm stereo audio jack w/ TV-out Physical Attributes Dimension: 99mm x 53mm x 21mm, Weight: 120g http://draft.blogger.com/post-edit.g?blogID=6231501182166011326&postID=3619655769864499512
Media Support
Audio Support Codecs: MP3/WMA/AAC+/eAAC+/M4A/Real Audio
http://draft.blogger.com/post-edit.g?blogID=6231501182166011326&postID=3619655769864499512
Bill of Materials
* The following bill of materials is taken from an N95-1 model
Processor Texas Instruments #4377454 Baseband Processor (Unmarked)
Texas Instruments OMAP2420 Applications Processor (ARM11 Core @ 332MHz) Storage Samsung K5W2G13ACM-DK60 MCP - 2Gb OneNAND, 512Mb Mobile DRAM
Samsung K4M28163PH-KG750 MCP - 128Mb Mobile SDRAM
Spansion S72NS128NDOAJW13 MCP - 128Mb NOR, 128Mb DDR DRAM MicroSD Interface NXP IP4352CX24LF MicroSD Interface NXP IP4352CX24LF Camera Micron Technology MT9P001 (5.0MP Image Sensor) Wi-Fi STMicroelectronics STLC4550 #4396287-1 (Unmarked) GPS Texas Instruments GPS5300 Bluetooth CSR BlueCore4 BC41B141B Infrared Vishay TFBS5700-TR3 Audio Texas Instruments TPA4411YZHR FM Radio Tuner NXP Semiconductors TEA5761UK Accelerometer STMicroelectronics LIS302DlTR RF Transceiver STMicroelectronics #4380206 Quad-band GSM/GPRS/EDGE, Dual-band UMTS/HSPDA (Unmarked) Power Management PMIC: Texas Instruments TWL92230CZQE
STMicroelectronics #4396299 (Analog Baseband/Pwr Mgmt) & #4376535 (Batt Charger) (Unmarked)
Power Amp (RF) : RF Micro Devices #4355951 (GSM) & #4355898 (UMTS) (Unmarked)
Power Amp (Wi-Fi): RF Micro Devices RF5924
Power Amp (Audio): Texas Instruments TPA2012D2YZHR
http://draft.blogger.com/post-edit.g?blogID=6231501182166011326&postID=3619655769864499512
Block Diagram


http://draft.blogger.com/post-edit.g?blogID=6231501182166011326&postID=3619655769864499512
Teardown Pictures


Familarization: Components and Parts on Samsung Mobile Phone Handsets
[FONT="]Samsung Omnia Teardown[/FONT]
[FONT="]This device is well built. As such, it was a little bit tricky to take apart. Thankfully, all shielding was clip in and the device’s brains were easily revealed. [/FONT]
[FONT="][/FONT]
[FONT="] [/FONT]
[FONT="]Samsung Omnia Teardown[/FONT]
[FONT="]This device is well built. As such, it was a little bit tricky to take apart. Thankfully, all shielding was clip in and the device’s brains were easily revealed. [/FONT]
[FONT="]
 [/FONT]
[FONT="]Notably, this device runs on the Qualcomm 6800A and Marvell PXA312. These devices are connected via a Cypress Dual-Port bridge and have separate Power Management Devices. Note that this PCB is impressively packed and impressively small! Another thing to point out is the presence of an SMSC USB PHY. We’ve seen these devices on a variety phones we’ve ripped apart. [/FONT]
[FONT="][/FONT]
[FONT="] [/FONT]
[FONT="]
 [/FONT]
[FONT="]Bluetooth goes to CSR and Wi-Fi to Marvell. The GPS win goes to Avago. Note the massive quintplexer! [/FONT]
[FONT="]
 [/FONT]
[FONT="]The one thing we knew the phone had but couldn’t find was the 8GB internal memory. Where could it be? We eventually found it hiding underneath the shield covering the processor side of the PCB – very sneaky! [/FONT]
[FONT="]
 [/FONT]
[FONT="]
 [/FONT]

[FONT="]

Familarization: Components and Parts on Sony Ericsson Mobile Phone Handsets
Here's another source of familiarization of Parts and components on Sony Ericsson Mobile Phone Phones.
Sony Ericsson Handsets parts and components varies accordingly to every model packaging.
Feel free to explore and familiarize with each components and parts for this is important part of every mobile phone technician must posses. You can also do more practice familiarizing by searching more product review like this.
The Sony Ericsson XPERIA X1 is a smartphone co-developed by HTC.

Product Features & Specifications
http://draft.blogger.com/post-edit.g?blogID=6231501182166011326&postID=5815835942169705019
Technical Specifications
Operating System Windows Mobile 6.1 with Panels Interface Network Support GSM/GPRS/EDGE/HSDPA, UMTS: 850/1900/2100MHz, GSM: 850/900/1800/1900MHz Screen 3.2" WVGA (800 x 480px), 65k Color TFT Input Method Resitive Touchscreen, Slide-out 4-row QWERTY Keyboard, Optical Joystick navigation Wi-Fi 802.11b/g GPS GPS navigation capabilities Bluetooth Bluetooth v2.0 Camera 3.2MP Camera with Auto-Focus Storage Internal 512MB Storage, External MicroSDHC Slot Connection Ports 3.5mm Audio Port, Mini-USB 2.0 Hi-Speed for charging and data transfer Physical Attributes Dimensions: 110.5mm x 52.6mm x 17mm, Weight: 145g with battery
http://draft.blogger.com/post-edit.g?blogID=6231501182166011326&postID=5815835942169705019
Bill of Materials
* denotes best educated guesses
Processor Qualcomm MSM7200A @ 528MHz Screen 3.2" WVGA LCD, 65k Color TFT Resistive Touchscreen IC Epson D7741B1 F872U53* Storage Micron Technologies MCP - 512MB NAND Flash + 256MB RAM USB PHY SMSC Wi-Fi Texas Instruments WL1251B Bluetooth Texas Instruments BRF6350BL GPS Integrated into Baseband Processor Audio Integrated into Baseband Processor Accelerometer None RF Transceiver Qualcomm MXU6219 Quad-band GSM/Tri-band UMTS* Power Management PMIC: Qualcomm PM7540
Power Amp (Quad-band GSM): TriQuint Semiconductor TQS-7M5012
Power Amp (UMTS-2100MHz): Avago ACPM-7381; (UMTS-1900MHz): Avago ACPM-7331; (UMTS-850MHz): Avago ACPM-7371 http://draft.blogger.com/post-edit.g?blogID=6231501182166011326&postID=5815835942169705019
Block Diagram

http://draft.blogger.com/post-edit.g?blogID=6231501182166011326&postID=5815835942169705019
Teardown Pictures


Familarization: Components and Parts on Motorola Mobile Phone Handsets
Here is one of Motorola Mobile Phones handset overview with components and parts.
The Motorola Krave ZN4 is a smartphone released on Verizon Wireless.
Other Names: Motorola Blaze (Internal)

http://draft.blogger.com/post-create.g?blogID=6231501182166011326
Product Features & Specifications
http://draft.blogger.com/post-create.g?blogID=6231501182166011326
Technical Specifications
Operating System Brew OS Network Support CDMA/1xRTT/EV-DO/Rev.A, 800/1900MHz Screen 2.8" QVGA (240 x 400px open, 240 x 320 closed), 65k Color TFT Input Method Capacitive Touchscreen Wi-Fi None Bluetooth Bluetooth v2.0, A2DP and AVCRP support Camera 2MP Camera with Zoom and Video Mode Storage Internal 130MB Storage, External MicroSDHC Slot Connection Ports Micro-USB 2.0 Hi-Speed, 3.5mm stereo audio jack Extra Features Capacitive Touch Cover http://draft.blogger.com/post-create.g?blogID=6231501182166011326
Media Support
Audio Support V CAST Rhapsody, MP3/WMA/AAC+ files limited to 192kbps. Video Support MediaFLO support: V CAST Streaming Video, V CAST TV Browser OpenWave Browser 7.2.7 (Full HTML)
http://draft.blogger.com/post-create.g?blogID=6231501182166011326
Bill Of Materials
Processor Qualcomm MSM6575 Screen Samsung 2.8" QVGA LCD, 65k Color TFT Capacitive Sensors Quantum Research Group: QRG6G4670 (main screen), QRGBF7741-1 (screen) Storage Samsung MCP - 1Gb NAND/RAM RF Transceiver Qualcomm RFR6500 Receiver, Qualcomm RFT6150 Transmitter Power Management Qualcomm PM66508 Bluetooth Texas Instruments BRF6350B
http://draft.blogger.com/post-create.g?blogID=6231501182166011326
Block Diagram

http://draft.blogger.com/post-create.g?blogID=6231501182166011326
Teardown Pictures


Familarization: Components and Parts on iPhone Mobile Phone Handsets
An apple iphone 3GS teardown and analysis is also a big help on overviewing what inside on it.
Apple “surprised” us early this month with the announcement of it iPhone 3G “s”. Whenever Apple releases a new device – everyone and their brother/sister has to get involved.
Dr. Wreck is no exception and has been working hard with the gentlemen/women over at ifixit to get the skinny on the new device. Without further ado, here we go!
 Explosion - courtesy of ifixit
Those Apple Engineer’s really know how to pack a PCB. They’ve managed to fit almost everything onto the “top” of the main logic board. The 3Gs’ PCB makes the 3G’s PCB look sparse (the apostrophes were probably a little bit confusing there).

Let’s take a minute here to talk about the new Applications Processor Core. Apple has chosen to go from the ARM 11 Samsung S3C6400 to the ARM A8 Samsung S5PC100 with this device.

iPhone 3Gs Block Diagram - In Progress
This is the single largest difference between the 3G and the 3Gs. Firstly the manufacturing process has been chopped from 90nm to 65nm. Pipeline depth has been boosted to 13 – stage from 8. More importantly the clock speed of this newer processor rolls in at 600MHz – opposed to the 412MHz core of the old – obsolete
 3G. Samsung has also doubled the quantity of L1 cache from 16 to 32KB.

iPhone 3Gs Block Diagram - In Progress
This is the single largest difference between the 3G and the 3Gs. Firstly the manufacturing process has been chopped from 90nm to 65nm. Pipeline depth has been boosted to 13 – stage from 8. More importantly the clock speed of this newer processor rolls in at 600MHz – opposed to the 412MHz core of the old – obsolete
3G. Samsung has also doubled the quantity of L1 cache from 16 to 32KB.

An apple iphone 3GS teardown and analysis is also a big help on overviewing what inside on it.
Apple “surprised” us early this month with the announcement of it iPhone 3G “s”. Whenever Apple releases a new device – everyone and their brother/sister has to get involved.
Dr. Wreck is no exception and has been working hard with the gentlemen/women over at ifixit to get the skinny on the new device. Without further ado, here we go!
 Explosion - courtesy of ifixit
Those Apple Engineer’s really know how to pack a PCB. They’ve managed to fit almost everything onto the “top” of the main logic board. The 3Gs’ PCB makes the 3G’s PCB look sparse (the apostrophes were probably a little bit confusing there).

Let’s take a minute here to talk about the new Applications Processor Core. Apple has chosen to go from the ARM 11 Samsung S3C6400 to the ARM A8 Samsung S5PC100 with this device.

iPhone 3Gs Block Diagram - In Progress
This is the single largest difference between the 3G and the 3Gs. Firstly the manufacturing process has been chopped from 90nm to 65nm. Pipeline depth has been boosted to 13 – stage from 8. More importantly the clock speed of this newer processor rolls in at 600MHz – opposed to the 412MHz core of the old – obsolete
None of this even takes the new PowerVR graphics core into consideration. Apple is clearly thinking along the lines of a gaming device for this puppy. The SGX is fully programmable – like the graphics card on your PC or mac. Expect some sweet gaming action in the near future.
@ 200MHz the SGX can pop 7M triangles/second and render 250M pixels/sec. That’s roughly 7 times the performance of the old, “obsolete” MBX.
It’s kind of like comparing your old 486 to a Pentium.
@ 200MHz the SGX can pop 7M triangles/second and render 250M pixels/sec. That’s roughly 7 times the performance of the old, “obsolete” MBX.
It’s kind of like comparing your old 486 to a Pentium.

Let’s take a minute here to talk about the new Applications Processor Core. Apple has chosen to go from the ARM 11 Samsung S3C6400 to the ARM A8 Samsung S5PC100 with this device.
iPhone 3Gs Block Diagram - In Progress
This is the single largest difference between the 3G and the 3Gs. Firstly the manufacturing process has been chopped from 90nm to 65nm. Pipeline depth has been boosted to 13 – stage from 8. More importantly the clock speed of this newer processor rolls in at 600MHz – opposed to the 412MHz core of the old – obsolete
None of this even takes the new PowerVR graphics core into consideration. Apple is clearly thinking along the lines of a gaming device for this puppy. The SGX is fully programmable – like the graphics card on your PC or mac. Expect some sweet gaming action in the near future.
@ 200MHz the SGX can pop 7M triangles/second and render 250M pixels/sec. That’s roughly 7 times the performance of the old, “obsolete” MBX.
It’s kind of like comparing your old 486 to a Pentium.
@ 200MHz the SGX can pop 7M triangles/second and render 250M pixels/sec. That’s roughly 7 times the performance of the old, “obsolete” MBX.
It’s kind of like comparing your old 486 to a Pentium.

Similar threads
- Replies
- 2
- Views
- 189
- Replies
- 22
- Views
- 1K