Podi Tricks tikak*

Supunqw

Well-known member
  • Jul 18, 2009
    5,620
    500
    113
    34
    නිගම්බු 7
    Creating a Shutdown/Reboot Icon

    To create a shutdown shortcut on the desktop:

    1. Right click on an open area of the desktop
    2. Select New / Shortcut
    3. Enter in "shutdown -s -t 00" - no quotes
    4. Press the Next button
    5. For the name, enter in anything you like. Ex : ShutDown. Click on the Finish button.

    For a reboot, enter "shutdown -r -t 00" - no quotes

    Enjoy
     

    Supunqw

    Well-known member
  • Jul 18, 2009
    5,620
    500
    113
    34
    නිගම්බු 7
    Hacking Windows Vista Computer Properties

    ok here i am going to shoe you how to Hack Windows Vista Computer Properties

    2e216w2.png


    Heres how you do it.....

    1.Click Start Then Run And then Type "regedit"


    Now click "HKEY_LOCAL_MACHINE" adn then "SOFTWARE"

    10gbvv4.png


    Now go down and click on "Microsoft"

    nzj2wz.png


    Now scroll all the way down to "Windows" and then Click "CurrentVersion"


    2zfrgb4.png


    Now go down to "OEMInformation" , as you can see i already have the Manufacturer ,logo and model , if you dont here is how to make it...........


    f0ci6t.png


    Just right click...and then "New" and then "String Value" and call it either "Manufacturer ,logo and model" you need to make a new one for all 3.

    Now that you have the 3..........Double Click either Manufacturer or model and enter a name of your choise


    1zlzryb.png


    Now for the logo............

    it has to be a 150 x 150 BMP file......if it is not 150 x 150 it will automaticly get resized.


    2cdy3ja.png


    I saved mine just in my C drive for easy access....type in the file laction including the file extention (.bmp) and click ok....

    Now when you open system Properties it will look like you have told it to


    2e216w2.png


    Have fun!
     

    Supunqw

    Well-known member
  • Jul 18, 2009
    5,620
    500
    113
    34
    නිගම්බු 7
    How to find almost everything using google

    This is a tutorial to teach you how to find what you need(games,cracked programs,ebooks,movies etc.) without downloading any software, you just use google.Also this can help you to find from your favourite host.(rapidshare,megaupload etc.)
    So let's say you want a game named 12345 and you want it from rapidshare.
    1.Go to google
    2.Type 12345
    3.Leave a space and type rapidshare.com/files
    4.Click search
    5.See the result

    How this works:
    Google show you pages that the 12345 game exist and the links to download it are from rapidshare.

    Also:
    If you need links from megaupload type megaupload.com/?d= instead of rapidshare.com/files
     
    • Like
    Reactions: nadman

    Supunqw

    Well-known member
  • Jul 18, 2009
    5,620
    500
    113
    34
    නිගම්බු 7
    How to embed FLV to web page

    Many video fans always have the question mark in their mind. How to watch our own FLV in the web page? It is very difficult, isn’t? Actually it is not as hard as many people thought of this matter. As long as you use the appropriate tool and know the steps, it is very simple!
    Tips we need to know:

    1. Convert FLV to SWF.
    We know FLV can not be played directly in the web page. It must be embed into a player. Here the player indicates the SWF files. With the player, you can start playing video, pause the video playback, play the video with full screen or adjust the volume.

    1. Generate HTML for output.
    To play FLV video, HTML file is the must. It is the carrier to contain the video and play it in the web page. You can directly use this generated HTML or use the codes which show us by clicking “View” and selecting “Original Source”.

    1. Capture a picture as the thumbnail.
    A still picture is needed. This image will be displayed when the video is paused or before it is played. If there is no thumbnail, it will show the black screen when it is not playing. Therefore, we must find a tool to capture a still image as the thumbnail to decorate the player.
    Then how to get these files such as SWF, HTML and a picture? Use Moyea Flash Video MX Pro and it can help you create all the files you need. It can convert AVI, MEPG, MP4, WMV, MOV and even FLV to SWF or FLV. Now let’s see how to use this powerful tool.

    1. Run and install Moyea Flash Video MX Pro.

    embed_flv_web_1.jpg


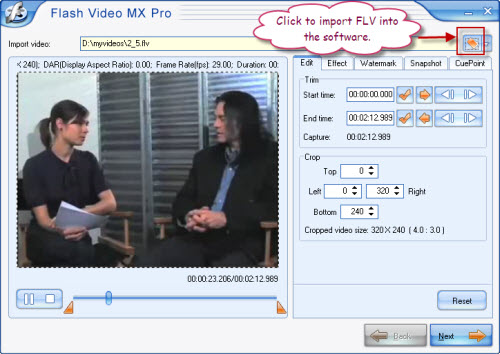
    1. Load FLV to the program.
    Click the folder icon to input FLV.
    embed_flv_web_2.jpg

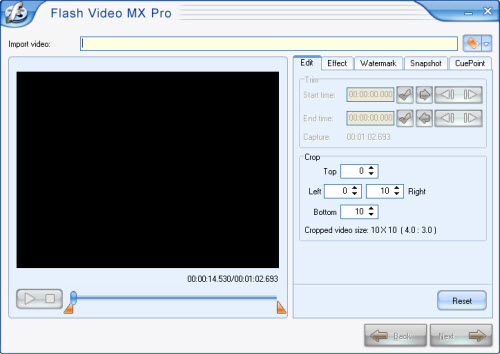
    In this interface you can do editing for your FLV file.

    1. Trim and crop the video in “Edit” tab.
    2. Adjust the video effects like brightness, contrast, volume and so on in “Effect” tab.
    3. Add a picture or text to the video the watermark in “Watermark” tab.
    4. Capture a still image as the thumbnail in “Snapshot” tab.
    5. Add the CuePoint to make the subtitle.


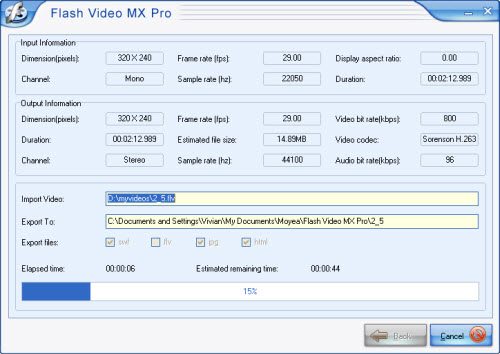
    1. Configure the output settings.
    embed_flv_web_3.jpg

    Click the folder icon in the upper of the interface to choose the output path. In “Export” box, you have three choices to create wanted files. Of three choices, generating SWF option provides three ways. You can choose the method to embed FLV into SWF file as the picture shown above. Then check the option to create HTML file.

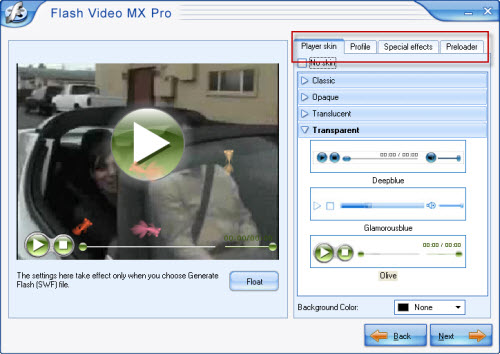
    1. Choose the player and the preloader.
    embed_flv_web_4.jpg

    Here you can choose the player style and outlook: Classic, Opaque, Translucent and Transparent. In “Preloader” tab, you can choose one you like. Then when the video is loading, you can see it. If you want to add special effects, then select in “Special effects”. Moreover, more options for configuring the player in “Profile” such as adding a link to the video.

    1. Starting output.
    Click “Start” to begin encoding SWF, HTML and exporting JPG as a picture.
    embed_flv_web_5.jpg

    After conversion is completed, the output folder will pop up automatically. You can find SWF, HTML and JPG easily. Now it is ready to embed the video into your web page.
    1. Upload the SWF file, HTML and the picture to your server if you have chosen the second method to output SWF: Embed the video in SWF and play in timeline.
    2. Adjust the video sample codes, which will be copied to the web page codes.
    <title>2_5</title>
    <center>
    <!–url’s used in the movie–>
    <!–text used in the movie–>
    <!– saved from url=(0013)about:internet –>
    <object classid=”clsid
    grin.gif
    27CDB6E-AE6D-11cf-96B8-444553540000″ codebase=”http://download.macromedia.com/pub/s...8,0,0,0″ width=”320″ height=”240″>
    <param name=”movie” value=”2_5.swf”>
    <param name=”quality” value=”high”>
    <param name=”allowScriptAccess” value=”sameDomain” />
    <param name=”allowFullScreen” value=”True” />
    <embed src=”2_5.swf” quality=”high” pluginspage=”http://www.macromedia.com/go/getflashplayer” type=”application/x-shockwave-flash” width=”320″ height=”240″ allowScriptAccess=”sameDomain” allowFullScreen=”True”>
    </embed>
    </object>
    </center>
    About the sample codes:
    In this sample codes, you can change the width or height by retyping the values. The default width and height is width=”320” height=”240“. SWF file that has been uploaded to the server can be placed where the bold character of 2_5.swf lies in. At last, copy the piece of video codes into the codes of the web page. OK, just enjoy the videos in your web page.
     

    Supunqw

    Well-known member
  • Jul 18, 2009
    5,620
    500
    113
    34
    නිගම්බු 7
    Create Your Own Drive Which Acts Like Your Personal Folder

    If want to have your personal folder in My Computer

    Do this


    Go to c drive

    Create a new folder ( say samp1 )

    now go to command prompt and type

    subst z: c:\samp1

    now go to my computer and check it..........


    icon_biggrin.gif


    to remove the drive

    go to command prompt and type

    subst z: /d

    icon_biggrin.gif


    And For Heavens Sake Those who say this is very old, please just shut your mouth. dont try to show off too much..

    Not every One knows it...

    KNOWN IS DROP, UNKNOWN IS OCEAN
    smile.gif
     

    Supunqw

    Well-known member
  • Jul 18, 2009
    5,620
    500
    113
    34
    නිගම්බු 7
    Build Bootable Windows Vista and Bootable Windows 7 USB installer

    Previously we have posted the trick to create bootable Windows vista USB drive. The install windows vista from bootable USB drive creation required a lot of manual configuration step, which windows novice user face difficulty to build the bootable Windows vista installation CD.
    However, the creating bootable USB windows vista installation or bootable USB Windows 7 installation can be done easily now with the help of NoviCorp WinToFlash, a bootable Windows USB installer creator that simplifies all the process to create Windows XP USB installer, Windows Server 2003 USB installer, and Windows Server 2008 installation USB installers. So, WinToFlash lets you easily install your Windows from a flash card, USB stick, HDD, etc to your computer or netbook.​

    It sounds a bit rare to hear people install Windows from Flash Memory ya. Actually, The concept is simple by using flash memory drive to act as the Windows installation DVD disc only. All you need is your Windows installation disc and a flash drive large enough to accommodate it. (A 4GB drive should more than cover any version of the OS.). So below are the step's to create a bootable windows on flash memory drive.​

    wintoflash-build-bootable-windows-f.jpg

    How to setup Bootable Windows USB installer with WinToFlash:


    2. Activate WinToFlash application, then it will starts up a wizard interface to select windows installation CD or DVD content source and USB drive location.​

    3. Once finish select Windows installer source and the USB drive location. Press “RUN” button to transfer Windows installer content to USB drive as bootable replacement for the optical drive.​

    Notes: if you want to install Windows from USB drive, just make your computer configuration is boots from USB media first.​

    Beside that, WinToFlash can be run as portable software and free download. It’s definitely an excellent tool to add to your USB-related utilities​
     

    Supunqw

    Well-known member
  • Jul 18, 2009
    5,620
    500
    113
    34
    නිගම්බු 7
    Open Notepad and type in the following

    [autorun]

    icon = *******.ico

    label = *******


    Change the ***** next to icon to what ever the icon is you want to use
    ie. monkey.ico

    Change the ***** next to label to whatever you want to name your USB stick
    ie. Monkeyweasels USB

    so using my examples you end up with:

    [autorun]

    icon = monkey.ico

    label = Monkeyweasels USB

    Now save this on the root of your USB Drive with the name

    autorun.inf

    Also place the icon you chose to use in the Root of your USB Drive

    Next time you plug in your USB Drive it will appear with the new icon and name

    Hide them by...

    * right-clicking both inf file and icon
    * choosing Properties...
    * then tick the box entitled Hidden and
    * Click OK