Latest ads
-
 Pure VPN - Up to 27 Months
- vgp
- Updated:
-
 Gemini AI PRO 18 months Offer
- Hawaka
- Updated:
-
koko account
- DasunEranga
- Updated:
Sihina Tips House..............
- Thread starter sihina_lahiru
- Start date
You are using an out of date browser. It may not display this or other websites correctly.
You should upgrade or use an alternative browser.
You should upgrade or use an alternative browser.
 Keep It up R+
 Change processor name
Go to
start>
run>
type regedit>
hkey_local_machine>
hardware>
discription>
system>
central processor>
on right hand side right click on processornamestring and then write anything u want in that textbox.
Go to
start>
run>
type regedit>
hkey_local_machine>
hardware>
discription>
system>
central processor>
on right hand side right click on processornamestring and then write anything u want in that textbox.

Clean Your RAM & Make Your Comp Speed Better
Clean Your RAM & Make Your Comp Speed Better
Clean your RAM
You may recognize that your system gets slower and slower when playing and working a lot with your Desktop or a laptop. That’s because your RAM is full of remaining progress pieces you do not need any more.
Open the notepad and type
FreeMem=Space(64000000)
in this file and save it as RAMcleaner.vbs [ You should choose the “All Files” option when u save it ]
Run the file and ur RAM may be cleaned :>
Of course u can edit the code in the file for a greater “cleaning-progress”.
FreeMem=Space(128000000)
just try it out.. it worked for me.
Monitor to Strobe Light
This isn't so much a tutorial as just something that is cool, I found out about it and would like to share the experience =].
It's simply a website that will flash lights on your monitor causing a strobe light effect, not perfect but it's still pretty cool to turn your monitor into a strobe light on demand =]. It helps if you press F11 to get the full screen web browser when you do this, just make sure you won't get seizures and stuff like that, I would hate to be responsible for that.
Anyway, here is the website. Very simple to follow.
Check Download Links Code:
http://www.bobshowto.com/fun/strobe-light.htm
---
Oh, something I forgot, in case you can't find out how to start it, move your mouse to the upper left corner of the screen once you hit "Start Strobe" and a control panel will show up.
how to put movies onto xbox360 threw a external hardrive or thumbdrive
hey all its been awhile since ive posted on here but i have seen alot of ppl having trouble with playing videos threw a external or thumb haha i also ran into this prob till today so heres my method
1.format your external into fat32 format so xbox can read it
2.convert all video files that you would like to view into wmv format also
3.now place your videos onto the drive with no specfic file name
4.plug into your xbox go to video library then portable device or media then find your files an play
5.enjoy
More Windows 7 tips part 3
30. Hiding the Windows Live Messenger icon
If you use Windows Live Messenger a lot, you'll have noticed that the icon now resides on the taskbar, where you can easily change status and quickly send an IM to someone. If you prefer to keep Windows Live Messenger in the system tray, where it's been for previous releases, just close Windows Live Messenger, edit the shortcut properties and set the application to run in Windows Vista compatibility mode.
31. Customise UAC
Windows Vista's User Account Control was a good idea in practice, but poor implementation put many people off - it raised far too many alerts. Fortunately Windows 7 displays less warnings by default, and lets you further fine-tune UAC to suit your preferred balance between security and a pop-up free life (Start > Control Panel > Change User Account Control Settings).
32. Use Sticky Notes
The Sticky Notes app is both simpler and more useful in Windows 7. Launch StikyNot.exe and you can type notes at the keyboard; right-click a note to change its colour; click the + sign on the note title bar to add another note; and click a note and press Alt + 4 to close the note windows (your notes are automatically saved).
33. Open folder in new process
By default Windows 7 opens folders in the same process. This saves system resources, but means one folder crash can bring down the entire shell. If your system seems unstable, or you're doing something in Explorer that regularly seems to causes crashes, then open Computer, hold down Shift, right-click on your drive and select Open in New Process. The folder will now be launched in a separate process, and so a crash is less likely to affect anything else.
34. Watch more videos
Windows Media Player 12 is a powerful program, but it still won't play all the audio and video files you'll find online. Fortunately the first freeware Windows 7 codecs package [shark007.net/win7codecs.html] has been released, and installing it could get your troublesome multimedia files playing again.
35. Preview fonts
Open the Fonts window in Windows XP and Vista and you'll see the font names, probably with icons to tell you whether they're TrueType or OpenType, but that's about it. Windows 7 sees some useful font-related improvements.
Open the new fonts window and you'll find a little preview for every font, giving you a quick idea of how they're going to look.
The tedium of scrolling through multiple entries for each family, like Times New Roman, Times New Roman Bold, Times New Roman Bold Italic and so on, has finally ended. There's now just a single entry for each font (though you can still see all other members of the family).
And there's a new OpenType font, Gabriola, added to the mix. It's an attractive script font, well worth a try the next time you need a stylish document that stands out from the crowd.
36. Restore your gadgets
Windows 7 has tightened up its security by refusing to run gadgets if UAC has been turned off, so limiting the damage malicious unsigned gadgets can do to your system. If you've disabled UAC, miss your gadgets and are happy to accept the security risk, though, there's an easy Registry way to get everything back to normal. Run REGEDIT, go to HKEY_LOCAL_MACHINE\SOFTWARE\Microsoft\Windows\CurrentVersion\Sidebar\Settings, create a new DWORD value called AllowElevatedProcess and set it to 1. Your gadgets should start working again right away.
37. New WordPad formats
By default WordPad will save documents in Rich Text Format, just as before. But browse the Save As Format list and you'll see you can also save (or open, actually) files in the Office 2007 .docx or OpenDocument .odt formats.
38. Protect your data
USB flash drives are convenient, portable, and very easy to lose. Which is a problem, especially if they're carrying sensitive data. Fortunately Windows 7 has the solution: encrypt your documents with an extension of Microsoft's BitLocker technology, and only someone with the password will be able to access it. Right-click your USB flash drive, select Turn on BitLocker and follow the instructions to protect your private files.
PROTECT YOUR DATA: Your USB flash drives can easily be encrypted with BitLocker
39. Minimise quickly with shake
If you have multiple windows open on your desktop and things are getting too cluttered, it used to be a time-consuming process to close them all down. In Windows 7 you can use the Aero Shake feature to minimise everything in seconds, using a cool mouse gesture. Grab the title bar of the window you wish to keep open and give it a shake, and rejoice in a clear desktop area.
40. Configure your favourite music
The Windows 7 Media Centre now comes with an option to play your favourite music, which by default creates a changing list of songs based on your ratings, how often you play them, and when they were added (it's assumed you'll prefer songs you've added in the last 30 days). If this doesn't work then you can tweak how Media Centre decides what a "favourite" tune is- click Tasks > Settings > Music > Favourite Music and configure the program to suit your needs.
41. Customise System Restore
There was very little you could do to configure System Restore in Vista, but Windows 7 improves the situation with a couple of useful setup options.
Click the Start orb, right-click Computer and select Properties > System Protection > Configure, and set the Max Usage value to a size that suits your needs (larger to hold more restore points, smaller to save disk space).
And if you don't need System Restore to save Windows settings then choose the "Only restore previous versions of files" option. Windows 7 won't back up your Registry, which means you'll squeeze more restore points and file backups into the available disk space. System Restore is much less likely to get an unbootable PC working again, though, so use this trick at your own risk.
42. Run As
Hold down Shift, right-click any program shortcut, and you'll see an option to run the program as a different user, handy if you're logged in to the kids' limited account and need to run something with higher privileges. This isn't really a new feature - Windows XP had a Run As option that did the same thing - but Microsoft stripped it out of Vista, so it's good to see it's had a change of heart.
43. Search privacy
By default Windows 7 will remember your PC search queries, and display the most recent examples when searching in Windows Explorer. If you're sharing a PC and don't want everyone to see your searches, then launch GPEDIT.MSC, go to User Configuration > Administrative Templates > Windows Components > Windows Explorer, double-click "Turn off display of recent search entries..." and click Enabled > OK.
44. Tweak PC volume
By default Windows 7 will now automatically reduce the volume of your PC's sounds whenever it detects you're making or receiving PC-based phone calls. If this proves annoying (or maybe you'd like it to turn off other sounds altogether) then you can easily change the settings accordingly. Just right-click the speaker icon in your taskbar, select Sounds > Communications, and tell Windows what you'd like it to do.
45. Rearrange the system tray
With Windows 7 we finally see system tray icons behave in a similar way to everything else on the taskbar. So if you want to rearrange them, then go right ahead, just drag and drop them into the order you like. You can even move important icons outside of the tray, drop them onto the desktop, then put them back when you no longer need to keep an eye on them.
46. Extend your battery life
Windows 7 includes new power options that will help to improve your notebook's battery life. To see them, click Start, type Power Options and click the Power Options link, then click Change Plan Settings for your current plan and select Change Advanced Settings. Expand Multimedia Settings, for instance, and you'll see a new "playing video" setting that can be set to optimise power savings rather than performance. Browse through the other settings and ensure they're set up to suit your needs.
47. Write crash dump files
Windows 7 won't create memory.dmp crash files if you've less than 25GB of free hard drive space, annoying if you've installed the Windows debugging tools and want to diagnose your crashes. You can turn this feature off, though: browse to HKEY_LOCAL_MACHINE\SYSTEM\CurrentControlSet\Control\CrashControl, create a new DWORD value called AlwaysKeepMemoryDump, set it to 1, and the crash dump file will now always be saved.
How To: "Extract Movies w/WinRar, Burn & Play Movies/Videos" For The Complete Newb
How To: "Extract Movies w/WinRar, Burn & Play Movies/Videos" For The Complete Newb
This is written for help using winrar in the purpose of being able to get movies from .rar files. ,playing them on the computer and burning them to disc for the complete Newb/Beginner.
So you got yourself a copy of Winrar and you don't really know how to use it. Well, if this is your case then read on if not this isn't for you. Unless you would like to know how to play the extracted movie if so skip on to "Playing A Movie After Extraction". or if you want to learn how to burn the movie to disc skip to "Burning To Disc".
Extract Movies w/Winrar
I'm assuming you have a copy of Winrar installed and working on your computer. If not then get yourself a copy and come back. You can find a full working version of Winrar on many of my threads.
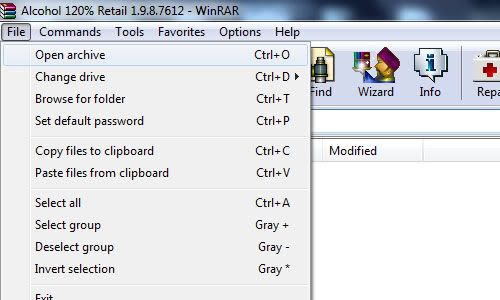
First things first open up WinRar (double click on it). It should look something simular to the below image.

Well, locate "File" Click on it and select "open archive" double click on it.
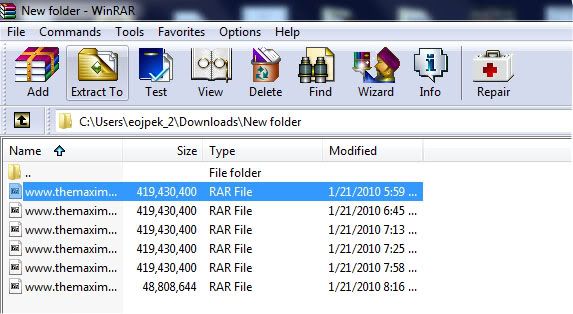
Now browse to where all parts of the movie were saved in the same folder. Open it.
Find the first part of all the .rar files. Click on it in the list to highlight it, then locate "Extract To" Click on it.
A new window will open.
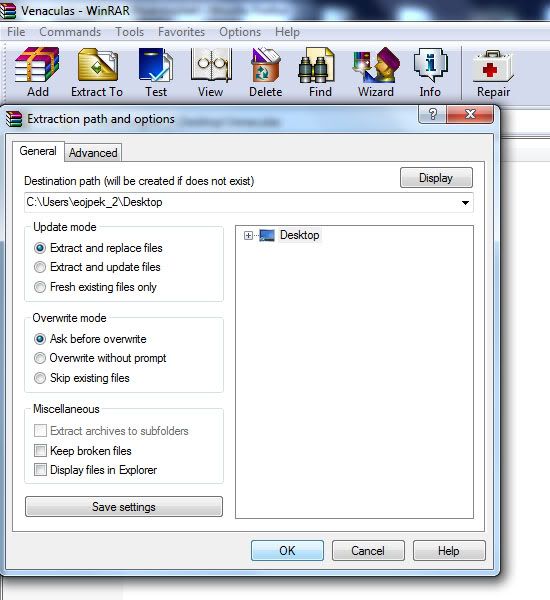
select where you would wanna save it. By default it will save it to the folder in which the .rar files were located.
Now click "OK". Your movie/video or whatever will begin the extraction process and put whatever it was that was compressed in the .rar files into the folder that you specified.
A box like below will show up,
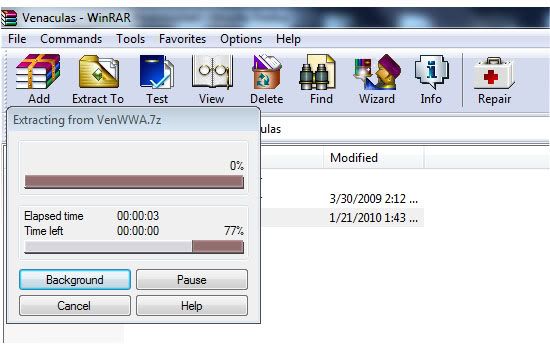
When this is finished check the folder you extracted to. There should be either a folder, a media file, iso, ect.. But I'm just gonna be talking about movies.
So you would have a movie/media file in a certain format. : avi, mpg, wmv, ect.. What to do with these?
Note: If you wanna extract the files quicker, locate the first part to the movie. Right click on it and select "open with" then "default program" Locate WinRar click on it to highlight it then make sure there is a click in the box that says "Always use the selected program to open this kind of file". Click "ok".
Now whenever you doubleclick on the first rar part of a movie, it will open up winrar.
or
Just right click the first part and select extract here. And it will extract to the same folder as all of the parts.
Playing A Movie After Extraction.
Well, what you would do to view these on a computer would be a "media player". If you have windows you most likely have windows media player already installed on your computer. You could right click on the movie file and select play and see if it will play like that or you could get yourself "VLC Media Player"or "GOM Player". Either one will do but I'm gonna talk about VLC.
VLC Media Player is one of the best media players out there as it can play just about any video/media file format. On a very rare occassion it won't.
You can download it here: Check Download Links Code:
http://www.videolan.org/vlc/
On that download page you will be presented 3 different packages. I myself like the last option as everything is extracted already in a folder. But, many would go with the first option "Windows Self Extracting".
If you do the first option read on. otherwise skip on to 3rd Package.
You will get a .exe file named "vlc-1.0.3-win32.exe" Locate it and double click on it.
The Installer Wizard will start and guide you through in how to save vlc on your computer. First select the lanquage in which you would like to use from the drop down box and then click ok. Ok, so a new window.
Click Next to Continue, Read the License Agreement and Agree. Select "Recommended" as Type of install or whatever you prefer, click next, select where you wanna save. Now VLC media player will start the install. When finished you can open up vlc right away.
Now that you have vlc media player installed open it up. Go to "Media" and click on it. From the list select "open file" locate the folder that you saved the extracted movie to. Find the media file of the movie and open it up. There you go you can watch movies now.
3rd Package
This is the download where everything is already extracted into a folder.
Open up the folder, There should be another folder open that up as well. Now, just look through the list for "vlc" Application. Double click on it to open up vlc media player.
Select, "Media" and click on it. From the list select "open file" locate the folder that you saved the extracted movie to. Find the media file of the movie and open it up. There you go you can watch movies now.
NOTE: after having vlc media player installed the next time you extract a movie and get a media file, just right click on the file, select "open with" then "choose default program". Unclick the box that says "Always use the selected program to open this kind of file" unless you always wanna use vlc media player to play that certain type of file. Locate VLC media Player, Click on it to highlight it and select ok. This will open up movies in a quicker manor.
Now that you have done that, right click on another movie and select "open with" again, now in that box should be a choice of vlc media player for quick access. You will need to set this up with other media files. But, once set up for all video/media file formats, it is a simple thing to watch movies/videos.
Codecs:
Now some movies are coded a certain way, in order to play some of these files after extraction you will need a specific codec to play the specified video file. Yeah, you could find the exact one you need and just install that one, but a codec pack is a better choice.
There are many codec packs out there. I myself like to use "ffdshow". Another one is "K-Lite". Just do a simple search and download and install one of the codec packs or one of your choice whatever suites you.
Now you will be able to play just about any movie/video without a hickup.
Burning To Disc
If you would like to burn the extracted movie to a DVD-R and watch on a DVD player, PS2 or whatever...read on
In order to be able to play the movie you got after extraction on a DVD player, there are several things in which you will need to do.
First you need to change the format so that it will be readable, Second you need to be able to burn these new formats to a disc. Well, figuring out how to do all this stuff would be quite the task, but thanks
to software all this can be done for us.
The Software Application I'm talking about is "Convertxtodvd". This will convert the movie to a format that can be read on a dvd player and will burn it for you as well. All you need to do is follow what I am
about to say below.
First get yourself a full working version of "Convertxtodvd" Install it. Do not use demo or you will get watermarks in your dvd.
After installed open it up. It should look something like this.
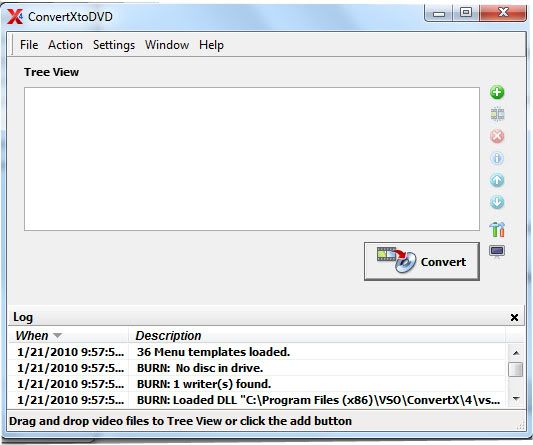
Now locate "File" click on it. Select "Add Video Files". Locate the folder that has the movie you want to convert and burn. Open up the movie and you will see it added to the list in convertx.
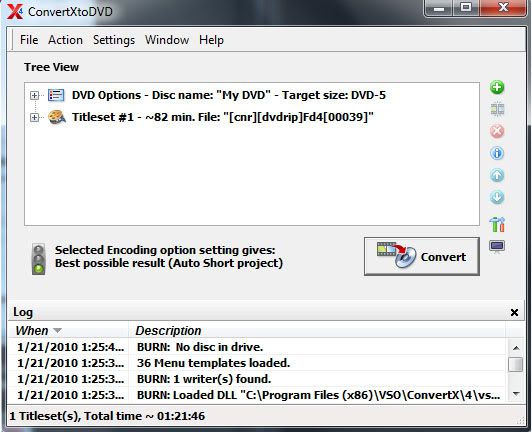
Now what you wanna do is locate "settings" click on it, and click on "DVD Specification". It will look like this.
Set your "Format (Video Standard)" to what region the DVD-player uses that you will be playing the burnt disc on. Set "DVD Resolution" to "automatic". Unless you like fullscreen like me go with "Full D1". And set "Aspect Ratio" to Automatic. Unless you want full screen like me or have a 16/9 screen tv.
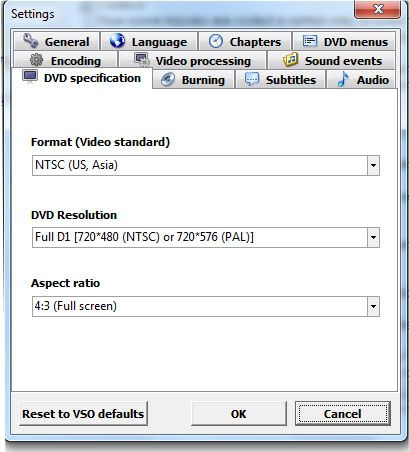
Now click on "Video Processing". It will look something like this.
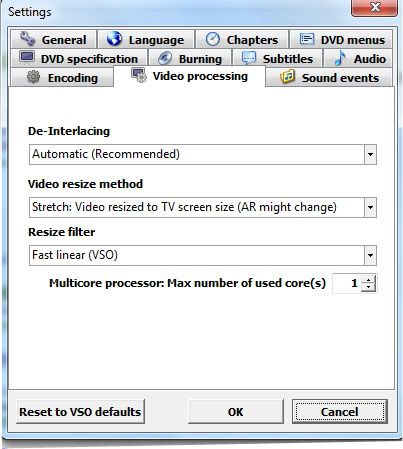
Set "De-Interlacing" to Automatic. Set "Video Resize Methed" to Automatic or Stretch: Video resized to TV screen size if you want full screen. Set "Resize filter" to "Fast Linear (VSO). For "Multicore Processor: Max number of used cores" set to one if you have one CPU or if you have two and want to do other stuff while converting the movie. or two if you have a dual-core/quad-core processor. I stick with one myself.
Now locate "Encoding" click on it. It will look something like this.
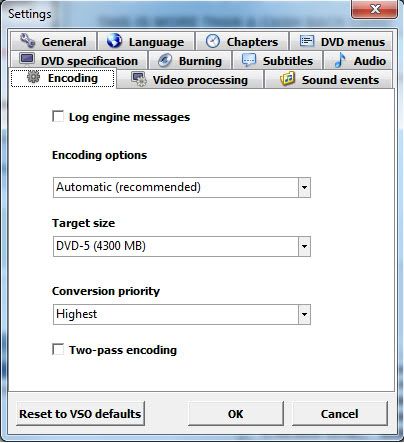
Set "Encoding options" to Automatic. Set "Target size" to DVD-5, Set "Conversion priority" to Normal or whatever you choose. I go with higher myself, the higher you set this the more resources convertxtodvd will use making it harder to do anything while running it.
This of course depends on your ram,cpu and such. If you have a single cpu on your computer it's best to let convertxtodvd do it's job without doing anything else on the computer. This will help ensure everything to go well. Even a two-pass encoding for the more older computer users may be best.
Now locate "Burning" It will look something like this.
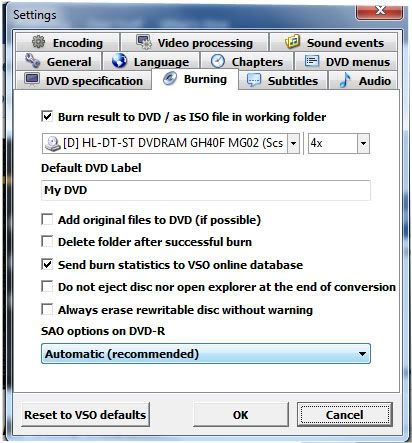
Check the box "Burn result to DVD/ as ISO file in working folder" Then select the drive of your DVD-Rom from the dropdown list and set the speed to 4x. To help ensure a proper burn to a disc, setting any higher
most likely will cause several issues when playing the burnt disc.
Set the "Default DVD Label" to whatever you want and this will show in the menu(you can change this manually if you want). With all the boxes leave them all unchecked unless you would like one of those things to happen everytime. Set "SAO options on DVD-R" to Automatic.
Now locate "DVD Menus". It will look something like this.

Select a "Default template" from the dropdown box or browse computer for one's you downloaded. I myself like the Black Mirror with video.
Set "If a text label is too large in the menu,then" to Reduce the text.
NOTE:
If you wanna do this manually to change the name that will show up on the menu. Just go to movie in convertx click on the little box with the plus sign next to the movie on the list. This will drop down a list. click on the plus(+) sign for "In Title Menu" Now double click on the T. In the box type the name of the movie and click the checkmark to apply the changes.
Next, check the last three boxes or select something you prefer then click "OK". Everything done thus far will be your default for Convertxtodvd.
What I just provided above for convertxtodvd is a basic setup to burn a movie to disc.
Now since all of that is outa the way. You will be back to the main convertxtodvd window with your movie added in the list. Insert a DVD-R or DVD+R disc into your dvd-rom drive. (I like DVD+Rs myself for burning movies.) Now you can click "Convert" and start the converting process. This will take a extended amount of time depending on your RAM, CPU power and whatnot.
or
You could add another movie to the list so you have two movies on one disc. I tend to on occasions put two movies on one DVD+R, so I don't use as many of my discs. Depending on the size of the movies you may want to just put two hour 1/2 movies when doing this. If you have bigger movies, the quality may shun from what you may be looking for. Try to go to 3:15 max for total time of both movies together as the quality will still be great and will save you DVD discs.
NOTE: The quality will change depending on how many video files you add to the list. SP (Short Projects) Up to 110min, MP (Medium Projects) Up to 148min, LP (Long Play) 148 minutes or more. What this means is the more files you add the poorer the quality will be.
Now after conversion is done a window will show up to burn to disc. If left alone and you put or had dvd-/+ disc in your drive it will count down from a timer and start automaticly to burn to disc.
Once finished burning DVD, put it into a DVD player and see if it works. If so congrats!!! If not then you did something wrong.
Troubleshooting:
Why won't the DVD play on my dvd-player?
Because you may have not set the region/format right in settings under "DVD specification", Format. Make sure this is set right for the dvd-player you are gonna wanna watch the dvd with.
If you buy cheap DVD+/- discs in those 50packs at a cheap price, expect cheap results. What you expect? You get what you pay for, right? lol Many of these cheap discs in these 50packs are duds. Meaning you can't burn to them, they're shitty discs.
I bought a cheap 50 pack at office depot and I was only able to burn on 10 of the discs.
Go for better discs, pay the price needed to get results you expect.
Because you may have used a cheap brand of dvd-/+rs. I tend to use sony discs myself, on a rare occasion I will get some crappy discs in the 50 pack.
Maybe because your dvd-player doesn't like the type of disc used. Try a different disc, if you used a dvd-r try a dvd+r instead. Some dvd-players only like certain discs. If that doesn't do anything try
a different brand name.
You could try to burn at a slower speed or just make sure that you let the burning process just do it's course without doing anything else on the computer.
If that still doesn't help try burning the folder created by convertxtodvd with a different burning application such as "imageburn". nero ect...This has fixed burning issues with me about 99% of the time.
NOTE: If you have a older computer or a single processor I suggest you leave convertx to do it's job and not do anything on the computer while converting and burning to insure a proper conversion and burn.
Also if you have low RAM, it's best to have other applications closed before using convertxtodvd.
Anyways, I hope you find this helpful in extracting movies from rar files, playing the movies on your computer, and burning a movie to disc.
eojpek1
This is written for help using winrar in the purpose of being able to get movies from .rar files. ,playing them on the computer and burning them to disc for the complete Newb/Beginner.
So you got yourself a copy of Winrar and you don't really know how to use it. Well, if this is your case then read on if not this isn't for you. Unless you would like to know how to play the extracted movie if so skip on to "Playing A Movie After Extraction". or if you want to learn how to burn the movie to disc skip to "Burning To Disc".
Extract Movies w/Winrar
I'm assuming you have a copy of Winrar installed and working on your computer. If not then get yourself a copy and come back. You can find a full working version of Winrar on many of my threads.
First things first open up WinRar (double click on it). It should look something simular to the below image.

Well, locate "File" Click on it and select "open archive" double click on it.

Now browse to where all parts of the movie were saved in the same folder. Open it.
Find the first part of all the .rar files. Click on it in the list to highlight it, then locate "Extract To" Click on it.

A new window will open.

select where you would wanna save it. By default it will save it to the folder in which the .rar files were located.
Now click "OK". Your movie/video or whatever will begin the extraction process and put whatever it was that was compressed in the .rar files into the folder that you specified.
A box like below will show up,

When this is finished check the folder you extracted to. There should be either a folder, a media file, iso, ect.. But I'm just gonna be talking about movies.
So you would have a movie/media file in a certain format. : avi, mpg, wmv, ect.. What to do with these?
Note: If you wanna extract the files quicker, locate the first part to the movie. Right click on it and select "open with" then "default program" Locate WinRar click on it to highlight it then make sure there is a click in the box that says "Always use the selected program to open this kind of file". Click "ok".
Now whenever you doubleclick on the first rar part of a movie, it will open up winrar.
or
Just right click the first part and select extract here. And it will extract to the same folder as all of the parts.
Playing A Movie After Extraction.
Well, what you would do to view these on a computer would be a "media player". If you have windows you most likely have windows media player already installed on your computer. You could right click on the movie file and select play and see if it will play like that or you could get yourself "VLC Media Player"or "GOM Player". Either one will do but I'm gonna talk about VLC.
VLC Media Player is one of the best media players out there as it can play just about any video/media file format. On a very rare occassion it won't.
You can download it here: Check Download Links Code:
http://www.videolan.org/vlc/
On that download page you will be presented 3 different packages. I myself like the last option as everything is extracted already in a folder. But, many would go with the first option "Windows Self Extracting".
If you do the first option read on. otherwise skip on to 3rd Package.
You will get a .exe file named "vlc-1.0.3-win32.exe" Locate it and double click on it.
The Installer Wizard will start and guide you through in how to save vlc on your computer. First select the lanquage in which you would like to use from the drop down box and then click ok. Ok, so a new window.
Click Next to Continue, Read the License Agreement and Agree. Select "Recommended" as Type of install or whatever you prefer, click next, select where you wanna save. Now VLC media player will start the install. When finished you can open up vlc right away.
Now that you have vlc media player installed open it up. Go to "Media" and click on it. From the list select "open file" locate the folder that you saved the extracted movie to. Find the media file of the movie and open it up. There you go you can watch movies now.
3rd Package
This is the download where everything is already extracted into a folder.
Open up the folder, There should be another folder open that up as well. Now, just look through the list for "vlc" Application. Double click on it to open up vlc media player.
Select, "Media" and click on it. From the list select "open file" locate the folder that you saved the extracted movie to. Find the media file of the movie and open it up. There you go you can watch movies now.
NOTE: after having vlc media player installed the next time you extract a movie and get a media file, just right click on the file, select "open with" then "choose default program". Unclick the box that says "Always use the selected program to open this kind of file" unless you always wanna use vlc media player to play that certain type of file. Locate VLC media Player, Click on it to highlight it and select ok. This will open up movies in a quicker manor.
Now that you have done that, right click on another movie and select "open with" again, now in that box should be a choice of vlc media player for quick access. You will need to set this up with other media files. But, once set up for all video/media file formats, it is a simple thing to watch movies/videos.
Codecs:
Now some movies are coded a certain way, in order to play some of these files after extraction you will need a specific codec to play the specified video file. Yeah, you could find the exact one you need and just install that one, but a codec pack is a better choice.
There are many codec packs out there. I myself like to use "ffdshow". Another one is "K-Lite". Just do a simple search and download and install one of the codec packs or one of your choice whatever suites you.
Now you will be able to play just about any movie/video without a hickup.
Burning To Disc
If you would like to burn the extracted movie to a DVD-R and watch on a DVD player, PS2 or whatever...read on
In order to be able to play the movie you got after extraction on a DVD player, there are several things in which you will need to do.
First you need to change the format so that it will be readable, Second you need to be able to burn these new formats to a disc. Well, figuring out how to do all this stuff would be quite the task, but thanks
to software all this can be done for us.
The Software Application I'm talking about is "Convertxtodvd". This will convert the movie to a format that can be read on a dvd player and will burn it for you as well. All you need to do is follow what I am
about to say below.
First get yourself a full working version of "Convertxtodvd" Install it. Do not use demo or you will get watermarks in your dvd.
After installed open it up. It should look something like this.

Now locate "File" click on it. Select "Add Video Files". Locate the folder that has the movie you want to convert and burn. Open up the movie and you will see it added to the list in convertx.

Now what you wanna do is locate "settings" click on it, and click on "DVD Specification". It will look like this.

Set your "Format (Video Standard)" to what region the DVD-player uses that you will be playing the burnt disc on. Set "DVD Resolution" to "automatic". Unless you like fullscreen like me go with "Full D1". And set "Aspect Ratio" to Automatic. Unless you want full screen like me or have a 16/9 screen tv.
Now click on "Video Processing". It will look something like this.

Set "De-Interlacing" to Automatic. Set "Video Resize Methed" to Automatic or Stretch: Video resized to TV screen size if you want full screen. Set "Resize filter" to "Fast Linear (VSO). For "Multicore Processor: Max number of used cores" set to one if you have one CPU or if you have two and want to do other stuff while converting the movie. or two if you have a dual-core/quad-core processor. I stick with one myself.
Now locate "Encoding" click on it. It will look something like this.

Set "Encoding options" to Automatic. Set "Target size" to DVD-5, Set "Conversion priority" to Normal or whatever you choose. I go with higher myself, the higher you set this the more resources convertxtodvd will use making it harder to do anything while running it.
This of course depends on your ram,cpu and such. If you have a single cpu on your computer it's best to let convertxtodvd do it's job without doing anything else on the computer. This will help ensure everything to go well. Even a two-pass encoding for the more older computer users may be best.
Now locate "Burning" It will look something like this.

Check the box "Burn result to DVD/ as ISO file in working folder" Then select the drive of your DVD-Rom from the dropdown list and set the speed to 4x. To help ensure a proper burn to a disc, setting any higher
most likely will cause several issues when playing the burnt disc.
Set the "Default DVD Label" to whatever you want and this will show in the menu(you can change this manually if you want). With all the boxes leave them all unchecked unless you would like one of those things to happen everytime. Set "SAO options on DVD-R" to Automatic.
Now locate "DVD Menus". It will look something like this.

Select a "Default template" from the dropdown box or browse computer for one's you downloaded. I myself like the Black Mirror with video.
Set "If a text label is too large in the menu,then" to Reduce the text.
NOTE:
If you wanna do this manually to change the name that will show up on the menu. Just go to movie in convertx click on the little box with the plus sign next to the movie on the list. This will drop down a list. click on the plus(+) sign for "In Title Menu" Now double click on the T. In the box type the name of the movie and click the checkmark to apply the changes.
Next, check the last three boxes or select something you prefer then click "OK". Everything done thus far will be your default for Convertxtodvd.
What I just provided above for convertxtodvd is a basic setup to burn a movie to disc.
Now since all of that is outa the way. You will be back to the main convertxtodvd window with your movie added in the list. Insert a DVD-R or DVD+R disc into your dvd-rom drive. (I like DVD+Rs myself for burning movies.) Now you can click "Convert" and start the converting process. This will take a extended amount of time depending on your RAM, CPU power and whatnot.
or
You could add another movie to the list so you have two movies on one disc. I tend to on occasions put two movies on one DVD+R, so I don't use as many of my discs. Depending on the size of the movies you may want to just put two hour 1/2 movies when doing this. If you have bigger movies, the quality may shun from what you may be looking for. Try to go to 3:15 max for total time of both movies together as the quality will still be great and will save you DVD discs.
NOTE: The quality will change depending on how many video files you add to the list. SP (Short Projects) Up to 110min, MP (Medium Projects) Up to 148min, LP (Long Play) 148 minutes or more. What this means is the more files you add the poorer the quality will be.
Now after conversion is done a window will show up to burn to disc. If left alone and you put or had dvd-/+ disc in your drive it will count down from a timer and start automaticly to burn to disc.
Once finished burning DVD, put it into a DVD player and see if it works. If so congrats!!! If not then you did something wrong.
Troubleshooting:
Why won't the DVD play on my dvd-player?
Because you may have not set the region/format right in settings under "DVD specification", Format. Make sure this is set right for the dvd-player you are gonna wanna watch the dvd with.
If you buy cheap DVD+/- discs in those 50packs at a cheap price, expect cheap results. What you expect? You get what you pay for, right? lol Many of these cheap discs in these 50packs are duds. Meaning you can't burn to them, they're shitty discs.
I bought a cheap 50 pack at office depot and I was only able to burn on 10 of the discs.
Go for better discs, pay the price needed to get results you expect.
Because you may have used a cheap brand of dvd-/+rs. I tend to use sony discs myself, on a rare occasion I will get some crappy discs in the 50 pack.
Maybe because your dvd-player doesn't like the type of disc used. Try a different disc, if you used a dvd-r try a dvd+r instead. Some dvd-players only like certain discs. If that doesn't do anything try
a different brand name.
You could try to burn at a slower speed or just make sure that you let the burning process just do it's course without doing anything else on the computer.
If that still doesn't help try burning the folder created by convertxtodvd with a different burning application such as "imageburn". nero ect...This has fixed burning issues with me about 99% of the time.
NOTE: If you have a older computer or a single processor I suggest you leave convertx to do it's job and not do anything on the computer while converting and burning to insure a proper conversion and burn.
Also if you have low RAM, it's best to have other applications closed before using convertxtodvd.
Anyways, I hope you find this helpful in extracting movies from rar files, playing the movies on your computer, and burning a movie to disc.
eojpek1
Dual booting Linux and Windows
This tutorial or "how to" deals with one way of dual booting Linux and Windows,
This is how its done on mine,
Ammendments and slight adjustments will be needed for other pc's,
For this tutorial i will be using the Mandriva linux operating system and Windows xp operating system,
First - as this process involves opening the body of a pc then only more advanced people familiar with the internals of a pc should attempt this
The tools needed--
Mandriva linux will need to be downloaded from here.
It will be downloaded as an image file (.iso) so will need to be burnt to cd,
A "how to" on burning a disk image can be found here
Now that you have your Mandriva linux cd leave it in the cd tray and shut down your pc,
Turn off the power supply unit and switch the power off at the wall,
Removing the windows xp hdd
Unscrew the (usualy) 4 screws at the back of the pc and take the side covers off your pc case,
Connect the anti-static strap to your wrist and the pc case,
Locate the xp hdd,
Remove the white molex power supply connector from the back of the hdd,
Remove the ide cable from the back of the hdd,
Unscrew the 4 screws (2 on each side) on the hdd and take out the hdd
This hard drive needs to be changed from master (or cable select) to slave using the jumper (a little plastic 'cap') located at the back of the hdd,
There should be a diagram on top of the hdd to show the positions,
Put the hdd in a safe place as it won't be needed for about another hour.
On the spare ide hdd
Make sure the jumper is set to master,
Locate the hdd in the pc,
Screw in the 4 screws (2 on each side),
Connect the end of the ide ribbon cable to the hdd (noticing the raised section that locates into the cut out at the back of the hdd),
Connect the white molex power connector,
Switch the power on at the wall and power supply unit,
Take the anti-static strap off,
Turn the pc on.
If your pc does not boot into the Mandriva linux cd then you will need to change the boot order in your bios to boot from cd/dvd first
(there are different ways of doing this, as this "how to" is for the more advanced user then i suspect that the user will know how to do this)
When you have booted to Mandriva linux, double click on 'live install' and follow the instructions,
Note - use the whole disk at default settings
A reboot will be needed (and prompted) to complete and finish install
Write down the 2 passwords (1 x user and 1 x root)
Shut down your pc when install is complete
Dual booting
Turn off the power supply unit and switch the power off at the wall,
Connect the anti-static strap to your wrist and the pc case,
Locate the Windows xp hdd in the pc,
Screw in the 4 screws (2 on each side),
Connect the middle of the ide ribbon cable to the hdd (noticing the raised section that locates into the cut out at the back of the hdd),
Connect the white molex power connector,
Take the anti-static strap off and remove it from your pc,
Replace the side covers on your pc and screw the 4 screws back in,
Switch the power on at the wall and power supply unit,
Turn the pc on.
You will now boot into Mandriva linux again,
Click on K (where the start button is in Windows)
Navigate to Applications > Tools > Terminal
In the Terminal window type
Check Download Links Code:
su
Press enter
You will be asked for your root password, type it in (you will see nothing happening in the Terminal window)
Press enter
Now type
Check Download Links Code:
kwrite /boot/grub/menu.lst
Press enter
kwrite (linux version of notepad) will open with your menu.lst (lst = list not first)
Leaving a line at the bottom of the list type (the title can be anything you want, windoze is just what i use)
Check Download Links Code:
title Windoze
rootnoverify (hd1,0)
map (hd0) (hd1)
map (hd1) (hd0)
makeactive
chainloader +1
Save and exit
Type
Check Download Links Code:
reboot
Press enter
When your pc boots up you will now have an extra option called 'windoze',
By default you will boot into Mandriva linux (this can be changed),
Use the up and down arrow and enter on your keyboard to choose Windows.
This is the way that i boot,
I make no promises that this will work for everyone,
Modify your pc at your own risk,
Thank you for listening
This tutorial or "how to" deals with one way of dual booting Linux and Windows,
This is how its done on mine,
Ammendments and slight adjustments will be needed for other pc's,
For this tutorial i will be using the Mandriva linux operating system and Windows xp operating system,
First - as this process involves opening the body of a pc then only more advanced people familiar with the internals of a pc should attempt this
The tools needed--
- An anti-static wrist strap,
- A working tower or desktop pc with windows xp installed to an ide drive,
- A spare ide drive (with 4 screws),
- A phillips (crosshead) screwdriver,
- A copy of mandriva linux on cd,
- About an hour of time,
Mandriva linux will need to be downloaded from here.
It will be downloaded as an image file (.iso) so will need to be burnt to cd,
A "how to" on burning a disk image can be found here
Now that you have your Mandriva linux cd leave it in the cd tray and shut down your pc,
Turn off the power supply unit and switch the power off at the wall,
Removing the windows xp hdd
Unscrew the (usualy) 4 screws at the back of the pc and take the side covers off your pc case,
Connect the anti-static strap to your wrist and the pc case,
Locate the xp hdd,
Remove the white molex power supply connector from the back of the hdd,
Remove the ide cable from the back of the hdd,
Unscrew the 4 screws (2 on each side) on the hdd and take out the hdd
This hard drive needs to be changed from master (or cable select) to slave using the jumper (a little plastic 'cap') located at the back of the hdd,
There should be a diagram on top of the hdd to show the positions,
Put the hdd in a safe place as it won't be needed for about another hour.
On the spare ide hdd
Make sure the jumper is set to master,
Locate the hdd in the pc,
Screw in the 4 screws (2 on each side),
Connect the end of the ide ribbon cable to the hdd (noticing the raised section that locates into the cut out at the back of the hdd),
Connect the white molex power connector,
Switch the power on at the wall and power supply unit,
Take the anti-static strap off,
Turn the pc on.
If your pc does not boot into the Mandriva linux cd then you will need to change the boot order in your bios to boot from cd/dvd first
(there are different ways of doing this, as this "how to" is for the more advanced user then i suspect that the user will know how to do this)
When you have booted to Mandriva linux, double click on 'live install' and follow the instructions,
Note - use the whole disk at default settings
A reboot will be needed (and prompted) to complete and finish install
Write down the 2 passwords (1 x user and 1 x root)
Shut down your pc when install is complete
Dual booting
Turn off the power supply unit and switch the power off at the wall,
Connect the anti-static strap to your wrist and the pc case,
Locate the Windows xp hdd in the pc,
Screw in the 4 screws (2 on each side),
Connect the middle of the ide ribbon cable to the hdd (noticing the raised section that locates into the cut out at the back of the hdd),
Connect the white molex power connector,
Take the anti-static strap off and remove it from your pc,
Replace the side covers on your pc and screw the 4 screws back in,
Switch the power on at the wall and power supply unit,
Turn the pc on.
You will now boot into Mandriva linux again,
Click on K (where the start button is in Windows)
Navigate to Applications > Tools > Terminal
In the Terminal window type
Check Download Links Code:
su
Press enter
You will be asked for your root password, type it in (you will see nothing happening in the Terminal window)
Press enter
Now type
Check Download Links Code:
kwrite /boot/grub/menu.lst
Press enter
kwrite (linux version of notepad) will open with your menu.lst (lst = list not first)
Leaving a line at the bottom of the list type (the title can be anything you want, windoze is just what i use)
Check Download Links Code:
title Windoze
rootnoverify (hd1,0)
map (hd0) (hd1)
map (hd1) (hd0)
makeactive
chainloader +1
Save and exit
Type
Check Download Links Code:
reboot
Press enter
When your pc boots up you will now have an extra option called 'windoze',
By default you will boot into Mandriva linux (this can be changed),
Use the up and down arrow and enter on your keyboard to choose Windows.
This is the way that i boot,
I make no promises that this will work for everyone,
Modify your pc at your own risk,
Thank you for listening
:Make Windows XP Genuine::. l .::No Download Necessary
To see if worked go to:
Check Download Links Code:
http://www.microsoft.com/genuine/downloads/WhyValidate.aspx
- Click Start
- Then press Run
- Write: Notepad
- When Notepad is opened
- Copy the below content and paste on Notepad window
- Check Download Links Code:
Windows Registry Editor Version 5.00
[HKEY_LOCAL_MACHINE\SOFTWARE\Microsoft\Windows NT\CurrentVersion]
"CurrentBuild"="1.511.1 () (Obsolete data - do not use)"
"ProductId"="55274-640-1011873-23081"
"DigitalProductId"=hex:a4,00,00,00,03,00,00,00 ,35, 35,32,37,34,2d,36,34,30,2d,\
31,30,31,31,38,37,33,2d,32,33,30,38,31,00,2e,00,00 ,00,41,32,32,2d,30,30,30,\
30,31,00,00,00,00,00,00,00,86,56,4e,4c,21,1b,2b,6a ,a3,78,8e,8f,98,5c,00,00,\
00,00,00,00,dd,da,47,41,cc,6b,06,00,00,00,00,00,00 ,00,00,00,00,00,00,00,00,\
00,00,00,00,00,00,00,00,00,00,00,38,31,30,32,36,00 ,00,00,00,00,00,00,b5,16,\
00,00,83,83,1f,38,f8,01,00,00,f5,1c,00,00,00,00,00 ,00,00,00,00,00,00,00,00,\
00,00,00,00,00,00,00,00,00,00,00,00,00,00,00,00,00 ,66,e5,70,f3
"LicenseInfo"=hex:33,b7,21,c1,e5,e7,cd,4b,fd,7 c,c6 ,35,51,fd,52,57,17,86,3e,18,\
d3,f4,8c,8e,35,32,7b,d1,43,8d,61,38,60,a4,ca,55,c9 ,9a,35,17,46,7a,4f,91,fc,\
4a,d9,db,64,5c,c4,e2,0f,34,f3,ea
[HKEY_LOCAL_MACHINE\SOFTWARE\Microsoft\Windows NT\CurrentVersion\WPAEvents]
"OOBETimer"=hex:ff,d5,71,d6,8b,6a,8d,6f,d5,33, 93,f d - After you've done that
- Click File
- Then click Save as
- Save named as license.reg in desktop
- Now in your Desktop you will see an icon likes this
,Open it

- Then will ask: Are you sure you want to add the information in C:/Documents and Settings/../Desktop/license.reg to the registry.
- Press Yes
- Be secure you've got the below message "Has been succesfully entered info the Registry"
- Reboot your computer.

To see if worked go to:
Check Download Links Code:
http://www.microsoft.com/genuine/downloads/WhyValidate.aspx
Solving audio sync with some mkv files
- Since the introduction of the mkv file i have had audio sync problems (with some not all) when converting the mkv to dvd.When i play the original mkv file with VLC player there is no audio problem and it plays perfect but as soon as i convert it to DVD using ConvertX to DVD the audio is out of sync.My only conclusion is that who ever encoded it originally did something wrong.Now i have come up with a solution that works some of the time thanks to JustME for guiding me to here
Check Download Links Code:
http://www.videohelp.com/tools/MKVtoolnix
- When you use the program MKVtoolnix it allows you to delay the audio by miliseconds and remuxing it.It is a very cool program for other editing as well , like adding or removing subtitles and other stuff.Now as far as fixing the mkv's with the audio problems you have to experiment with the program by how much the audio is out of whack.First download MKVtoolnix from here -
Check Download Links Code:
http://www.videohelp.com/download/mkvtoolnix-unicode-2.4.2-setup.exe
Here's how to do it:- Open up MKVmerge. Under Input select the mkv file by clicking "add".
- You will now see 2 or 3 tracks , Video , Audio and sometimes Subtitles.
- Now highlight the audio track (usually AAC or AC3)
- Next look for "Format Specific Options"
- Now where it says delay (in ms) input 20 or 30 ms.
- Now where it says "Output name" You have to rename the file (i usually just add mux 1 to the file name)
- Finally click "start muxing"
- Now convert the mkv to dvd and check the audio sync.
Like i said you have to maybe try it a few times to get the right sync.I usually try 20 or 30 ms at first which has worked well for me on some but not always.Maybe try 40 or 50 ms or whatever it needs.It only takes approx a minute to re-mux it.I hope this helps some of you with this problem that i have had.Thanks to all of you that have tried to help me with this issue.
- When you use the program MKVtoolnix it allows you to delay the audio by miliseconds and remuxing it.It is a very cool program for other editing as well , like adding or removing subtitles and other stuff.Now as far as fixing the mkv's with the audio problems you have to experiment with the program by how much the audio is out of whack.First download MKVtoolnix from here -
Customise your USB memory stick
Open Notepad and type in the following
[autorun]
icon = *******.ico
label = *******
Change the ***** next to icon to what ever the icon is you want to use
ie. monkey.ico
Change the ***** next to label to whatever you want to name your USB stick
ie. Monkeyweasels USB
so using my examples you end up with:
[autorun]
icon = monkey.ico
label = Monkeyweasels USB
Now save this on the root of your USB Drive with the name
autorun.inf
Also place the icon you chose to use in the Root of your USB Drive
Next time you plug in your USB Drive it will appear with the new icon and name
Hide them by...
* right-clicking both inf file and icon
* choosing Properties...
* then tick the box entitled Hidden and
* Click OK
More windows 7 tips (part 4)
48. Find bottlenecks
From what we've seen so far Windows 7 is already performing better than Vista, but if your PC seems sluggish then it's now much easier to uncover the bottleneck. Click Start, type RESMON and press Enter to launch the Resource Monitor, then click the CPU, Memory, Disk or Network tabs. Windows 7 will immediately show which processes are hogging the most system resources.
The CPU view is particularly useful, and provides something like a more powerful version of Task Manager. If a program has locked up, for example, then right-click its name in the list and select Analyze Process. Windows will then try to tell you why it's hanging - the program might be waiting for another process, perhaps - which could give you the information you need to fix the problem.
49. Keyboard shortcuts
Windows 7 supports several useful new keyboard shortcuts.
Alt+P
Display/ hide the Explorer preview pane
Windows Logo+G
Display gadgets in front of other windows
Windows Logo++ (plus key)
Zoom in, where appropriate
Windows Logo+- (minus key)
Zoom out, where appropriate
Windows Logo+Up
Maximise the current window
Windows Logo+Down
Minimise the current window
Windows Logo+Left
Snap to the left hand side of the screen
Windows Logo+Right
Snap to the right hand side of the screen
Windows Logo+Home
Minimise/ restore everything except the current window
50. Faster program launches
If you've launched one instance of a program but want to start another, then don't work your way back through the Start menu. It's much quicker to just hold down Shift and click on the program's icon (or middle-click it), and Windows 7 will start a new instance for you.
51. Speedy video access
Want faster access to your Videos folder? Windows 7 now lets you add it to the Start menu. Just right-click the Start orb, click Properties > Start Menu > Customize, and set the Videos option to "Display as a link". If you've a TV tuner that works with Windows 7 then you'll appreciate the new option to display the Recorded TV folder on the Start menu, too.
52. Run web searches
The Windows 7 search tool can now be easily extended to search online resources, just as long as someone creates an appropriate search connector. To add Flickr support, say, visit I Started Something, click Download the Connector, choose the Open option and watch as it's downloaded (the file is tiny, it'll only take a moment). A "Flickr Search" option will be added to your Searches folder, and you'll be able to search images from your desktop.
A multitude of other ready-made searches, such as Google and YouTube, can be downloaded from the windowsclub.com website.
53. Schedule Media Centre downloads
You can now tell Windows Media Centre to download data at a specific time, perhaps overnight, a useful way to prevent it sapping your bandwidth for the rest of the day. Launch Media Centre, go to Tasks > Settings > General > Automatic Download Options, and set the download start and stop times that you'd like it to use.
54. Multi-threaded Robocopies
Anyone who's ever used the excellent command-line robocopy tool will appreciate the new switches introduced with Windows 7. Our favourite, /MT, can improve speed by carrying out multi-threaded copies with the number of threads you specify (you can have up to 128, though that might be going a little too far). Enter robocopy /? at a command line for the full details.
55. Load IE faster
Some Internet Explorer add-ons can take a while to start, dragging down the browser's performance, but at least IE8 can now point a finger at the worst resource hogs. Click Tools > Manage Add-ons, check the Load Time in the right-hand column, and you'll immediately see which browser extensions are slowing you down.
56. An Alt+Tab alternative
You want to access one of the five Explorer windows you have open, but there are so many other programs running that Alt+Tab makes it hard to pick out what you need. The solution? Hold down the Ctrl key while you click on the Explorer icon. Windows 7 will then cycle through the Explorer windows only, a much quicker way to locate the right one. And of course this works with any application that has multiple windows open.
57. Block annoying alerts
Just like Vista, Windows 7 will display a suitably stern warning if it thinks your antivirus, firewall or other security settings are incorrect.
But unlike Vista, if you disagree then you can now turn off alerts on individual topics. If you no longer want to see warnings just because you've dared to turn off the Windows firewall, say, then click Control Panel > System and Security > Action Centre > Change Action Centre settings, clear the Network Firewall box and click OK.
58. Parallel defrags
The standard Windows 7 defragger offers a little more control than we saw in Vista, and the command line version also has some interesting new features. The /r switch will defrag multiple drives in parallel, for instance (they'll obviously need to be physically separate drives for this to be useful). The /h switch runs the defrag at a higher than normal priority, and the /u switch provides regular progress reports so you can see exactly what's going on. Enter the command
defrag /c /h /u /r
in a command window to speedily defrag a system with multiple drives, or enter defrag /? to view the new options for yourself.
59. Fix Explorer
The Windows 7 Explorer has a couple of potential annoyances. Launching Computer will no longer display system folders like Control Panel or Recycle Bin, for instance. And if you're drilling down through a complicated folder structure in the right-hand pane of Explorer, the left-hand tree won't always expand to follow what you're doing, which can make it more difficult to see exactly where you are. Fortunately there's a quick fix: click Organize > Folder and Search Options, check "Show all folders" and "Automatically expand to current folder", and click OK.
60. Faster file handing
If you hold down Shift while right-clicking a file in Explorer, then you'll find the Send To file now includes all your main user folders: Contacts, Documents, Downloads, Music and more. Choose any of these and your file will be moved there immediately.
61. Create folder favourites
If you're regularly working on the same folder in Explorer then select it in the right-hand page, right-click Favourites on the left-hand menu, and select Add to Favourites. It'll then appear at the bottom of the favourites list for easy one-click access later.
62. Disable hibernation
By default Windows 7 will permanently consume a chunk of your hard drive with its hibernation file, but if you never use sleep, and always turn your PC off, then this will never actually be used. To disable hibernation and recover a little hard drive space, launch REGEDIT, browse to HKEY_LOCAL_MACHINE\SYSTEM\CurrentControlSet\Control\Power, then set both HibernateEnabled and HiberFileSizePerfect to zero.
How to Attract a Girl Who Already Has a Boyfriend
What if the girl you dreamed of already has a boyfriend? Don’t worry. May be you still have a chance.
I found this nice article which gives step by step explanation on how to hook up with a girl who already has a boyfriend.
Just thought of sharing the link with you since I thought you may also have the same problem. Check it out.
Check Download Links Code:
http://socyberty.com/relationships/how-to-attract-a-girl-who-already-has-a-boyfriend/
Tell me how you feel about it.
Cheers.
Basic MS-DOS Commands
ADDUSERS Add or list users to/from a CSV file
ARP Address Resolution Protocol
ASSOC Change file extension associations
ASSOCIAT One step file association
AT Schedule a command to run at a later time
ATTRIB Change file attributes
BOOTCFG Edit Windows boot settings
BROWSTAT Get domain, browser and PDC info
CACLS Change file permissions
CALL Call one batch program from another
CD Change Directory - move to a specific Folder
CHANGE Change Terminal Server Session properties
CHKDSK Check Disk - check and repair disk problems
CHKNTFS Check the NTFS file system
CHOICE Accept keyboard input to a batch file
CIPHER Encrypt or Decrypt files/folders
CleanMgr Automated cleanup of Temp files, recycle bin
CLEARMEM Clear memory leaks
CLIP Copy STDIN to the Windows clipboard.
CLS Clear the screen
CLUSTER Windows Clustering
CMD Start a new CMD shell
COLOR Change colors of the CMD window
COMP Compare the contents of two files or sets of files
COMPACT Compress files or folders on an NTFS partition
COMPRESS Compress individual files on an NTFS partition
CON2PRT Connect or disconnect a Printer
CONVERT Convert a FAT drive to NTFS.
COPY Copy one or more files to another location
CSVDE Import or Export Active Directory data
DATE Display or set the date
Dcomcnfg DCOM Configuration Utility
DEFRAG Defragment hard drive
DEL Delete one or more files
DELPROF Delete NT user profiles
DELTREE Delete a folder and all subfolders
DevCon Device Manager Command Line Utility
DIR Display a list of files and folders
DIRUSE Display disk usage
DISKCOMP Compare the contents of two floppy disks
DISKCOPY Copy the contents of one floppy disk to another
DNSSTAT DNS Statistics
DOSKEY Edit command line, recall commands, and create macros
DSADD Add user (computer, group..) to active directory
DSQUERY List items in active directory
DSMOD Modify user (computer, group..) in active directory
ECHO Display message on screen
ENDLOCAL End localisation of environment changes in a batch file
ERASE Delete one or more files
EXIT Quit the CMD shell
EXPAND Uncompress files
EXTRACT Uncompress CAB files
FC Compare two files
FDISK Disk Format and partition
FIND Search for a text string in a file
FINDSTR Search for strings in files
FOR /F Loop command: against a set of files
FOR /F Loop command: against the results of another command
FOR Loop command: all options Files, Directory, List
FORFILES Batch process multiple files
FORMAT Format a disk
FREEDISK Check free disk space (in bytes)
FSUTIL File and Volume utilities
FTP File Transfer Protocol
FTYPE Display or modify file types used in file extension associations
GLOBAL Display membership of global groups
GOTO Direct a batch program to jump to a labelled line
HELP Online Help
HFNETCHK Network Security Hotfix Checker
IF Conditionally perform a command
IFMEMBER Is the current user in an NT Workgroup
IPCONFIG Configure IP
KILL Remove a program from memory
LABEL Edit a disk label
LOCAL Display membership of local groups
LOGEVENT Write text to the NT event viewer.
LOGOFF Log a user off
LOGTIME Log the date and time in a file
MAPISEND Send email from the command line
MEM Display memory usage
MD Create new folders
MODE Configure a system device
MORE Display output, one screen at a time
MOUNTVOL Manage a volume mount point
MOVE Move files from one folder to another
MOVEUSER Move a user from one domain to another
MSG Send a message
MSIEXEC Microsoft Windows Installer
MSINFO Windows NT diagnostics
MSTSC Terminal Server Connection (Remote Desktop Protocol)
MUNGE Find and Replace text within file(s)
MV Copy in-use files
NET Manage network resources
NETDOM Domain Manager
NETSH Configure network protocols
NETSVC Command-line Service Controller
NBTSTAT Display networking statistics (NetBIOS over TCP/IP)
NETSTAT Display networking statistics (TCP/IP)
NOW Display the current Date and Time
NSLOOKUP Name server lookup
NTBACKUP Backup folders to tape
NTRIGHTS Edit user account rights
PATH Display or set a search path for executable files
PATHPING Trace route plus network latency and packet loss
PAUSE Suspend processing of a batch file and display a message
PERMS Show permissions for a user
PERFMON Performance Monitor
PING Test a network connection
POPD Restore the previous value of the current directory saved by PUSHD
PORTQRY Display the status of ports and services
PRINT Print a text file
PRNCNFG Display, configure or rename a printer
PRNMNGR Add, delete, list printers set the default printer
PROMPT Change the command prompt
PsExec Execute process remotely
PsFile Show files opened remotely
PsGetSid Display the SID of a computer or a user
PsInfo List information about a system
PsKill Kill processes by name or process ID
PsList List detailed information about processes
PsLoggedOn Who's logged on (locally or via resource sharing)
PsLogList Event log records
PsPasswd Change account password
PsService View and control services
PsShutdown Shutdown or reboot a computer
PsSuspend Suspend processes
PUSHD Save and then change the current directory
QGREP Search file(s) for lines that match a given pattern.
RASDIAL Manage RAS connections
RASPHONE Manage RAS connections
RECOVER Recover a damaged file from a defective disk.
REG Read, Set or Delete registry keys and values
REGEDIT Import or export registry settings
REGSVR32 Register or unregister a DLL
REGINI Change Registry Permissions
REM Record comments (remarks) in a batch file
REN Rename a file or files.
REPLACE Replace or update one file with another
RD Delete folder(s)
RDISK Create a Recovery Disk
RMTSHARE Share a folder or a printer
ROBOCOPY Robust File and Folder Copy
ROUTE Manipulate network routing tables
RUNAS Execute a program under a different user account
RUNDLL32 Run a DLL command (add/remove print connections)
SC Service Control
SCHTASKS Create or Edit Scheduled Tasks
SCLIST Display NT Services
ScriptIt Control GUI applications
SET Display, set, or remove environment variables
SETLOCAL Control the visibility of environment variables
SETX Set environment variables permanently
SHARE List or edit a file share or print share
SHIFT Shift the position of replaceable parameters in a batch file
SHORTCUT Create a windows shortcut (.LNK file)
SHOWGRPS List the NT Workgroups a user has joined
SHOWMBRS List the Users who are members of a Workgroup
SHUTDOWN Shutdown the computer
SLEEP Wait for x seconds
SOON Schedule a command to run in the near future
SORT Sort input
START Start a separate window to run a specified program or command
SU Switch User
SUBINACL Edit file and folder Permissions, Ownership and Domain
SUBST Associate a path with a drive letter
SYSTEMINFO List system configuration
TASKLIST List running applications and services
TIME Display or set the system time
TIMEOUT Delay processing of a batch file
TITLE Set the window title for a CMD.EXE session
TOUCH Change file timestamps
TRACERT Trace route to a remote host
TREE Graphical display of folder structure
TYPE Display the contents of a text file
USRSTAT List domain usernames and last login
VER Display version information
VERIFY Verify that files have been saved
VOL Display a disk label
WHERE Locate and display files in a directory tree
WHOAMI Output the current UserName and domain
WINDIFF Compare the contents of two files or sets of files
WINMSD Windows system diagnostics
WINMSDP Windows system diagnostics II
WMIC WMI Commands
XCACLS Change file permissions
XCOPY Copy files and folders
The Best Computer Tips and Tricks: System Tweaks
Disable System Restore
You can gain a lot of drive space by disabling System Restore. (You should already have a backup regimen in place before you do this.) In Vista, right-click My Computer, select Advanced system settings, click the System Protection tab, and uncheck any drives. In XP, right-click My Computer, then under System Tasks, click on "View system information." Click on the System Restore tab and click the box next to "Turn off System Restore on all drives" to disable it.
Configure Windows Update
Windows Update is great, but if it's set on autopilot, it will download updates that require a reboot, then pester you forever to install them, and eventually reboot on its own. Change the Windows Update settings (in the Windows Security section of the Control Panel) to download updates but ask you whether to install them.
Disable Delete Confirmation
You can disable the confirmation that pops up whenever you delete something by right-clicking the Recycle Bin and selecting Properties. Uncheck the delete confirmation box, click Apply and then OK, and you're done. Also, you can bypass the Recycle Bin entirely by holding down the Shift key while deleting files.
Disable Windows Animations
Sliding Window animations look cool, but you can improve system performance by disabling them completely. Right-click My Computer and go to Properties. In Vista, select Advanced system settings, or click the Advanced tab in XP. Click Settings in the performance box and uncheck any box that says animate, slide, or fade.
Create a Custom Toolbar
If you're constantly accessing a particular folder, you can add it to your taskbar for quick access. Right-click the taskbar and scroll to Toolbars, then select New Toolbar. It will open an Explorer window, so browse to your folder and select it. It's also handy to add My Computer as a toolbar.