Latest ads
-
 Pure VPN - Up to 27 Months
- vgp
- Updated:
-
 Gemini AI PRO 18 months Offer
- Hawaka
- Updated:
-
koko account
- DasunEranga
- Updated:
Software thread By VirtualHacker and Dinuka<Including hacking softwares>
- Thread starter Virtual Hacker<><>
- Start date
You are using an out of date browser. It may not display this or other websites correctly.
You should upgrade or use an alternative browser.
You should upgrade or use an alternative browser.

TeamViewer - the All-In-One Solution for Remote Access and Support over the Internet
TeamViewer establishes connections to any PC or server all around the world within just a few seconds. You can remote control your partner's PC as if you were sitting right in front of it. Find out why more than 15.000.000 users trust TeamViewer!
Fast - simple - safe.

http://rapidshare.com/files/235146756/TeamViewer_Setup.exe
Rivatuner
Guru3D.com is the official hosting partner for this software. Webmaster, RivaTuner can be only distributed electronically through either Guru3D.com or nvworld.ru
 Distribution though other websites or in any other form without the author's permission is prohibited.
RivaTuner is a complete powerful tweaking environment, providing you everything you may need to tune NVIDIA GPU based display adapters. The widest driver-level Direct3D / OpenGL and system tuning options, flexible profiling system allowing to make custom settings on per-application basis, both driver-level and low-level hardware access modes, unique diagnostic and realtime hardware monitoring features and exclusive power user oriented tools like built-in registry editor and patch script engine make RivaTuner's feature set absolutely unmatched.
RivaTuner supports all NVIDIA display adapters starting from Riva TNT family up to the latest GeForce 7 series and widest range of NVIDIA drivers starting from the oldest Detonator 2.08 up to the newest ForceWare drivers family.
In addition to complete NVIDIA hardware support, RivaTuner also provides limited support for display adapters based upon ATI RADEON 8500 and newer ATI graphics processors. All RivaTuner's features besides driver-level tuning options are also available on supported ATI hardware.
System requirements:

Version 2.24:
Minor bugfixes:
DOWNLOAD Rivatuner
Guru3D.com is the official hosting partner for this software. Webmaster, RivaTuner can be only distributed electronically through either Guru3D.com or nvworld.ru

RivaTuner is a complete powerful tweaking environment, providing you everything you may need to tune NVIDIA GPU based display adapters. The widest driver-level Direct3D / OpenGL and system tuning options, flexible profiling system allowing to make custom settings on per-application basis, both driver-level and low-level hardware access modes, unique diagnostic and realtime hardware monitoring features and exclusive power user oriented tools like built-in registry editor and patch script engine make RivaTuner's feature set absolutely unmatched.
RivaTuner supports all NVIDIA display adapters starting from Riva TNT family up to the latest GeForce 7 series and widest range of NVIDIA drivers starting from the oldest Detonator 2.08 up to the newest ForceWare drivers family.
In addition to complete NVIDIA hardware support, RivaTuner also provides limited support for display adapters based upon ATI RADEON 8500 and newer ATI graphics processors. All RivaTuner's features besides driver-level tuning options are also available on supported ATI hardware.
System requirements:
[*]Windows 98 (updated MFC libraries required), Windows 98 SE, Windows ME, Windows 2000, Windows 2003 Server x32, Windows XP x32, Windows XP x64 edition, Vista x32 or Vista x64 (disabled driver signature checking required). Note: Windows 9x/ME is no longer officially supported since version RC15. It doesn't mean that RivaTuner will not work under Windows 9x/ME, but it does mean that RivaTuner is no longer tested for compatibility issues under these OS.
[*]Any desktop display adapter based on NVIDIA GeForce or ATI Radeon grarphics card. Mobile solutions are not supported.
[*]Detonator 2.08 or higher NVIDIA reference drivers for Windows 98 / Windows 98 SE or Windows ME.
[*]Detonator 5.08 or higher NVIDIA reference drivers for Windows 2000 / Windows XP.
[*]ForceWare 96.xx or higher NVIDIA reference drivers for Vista.
Version 2.24:
Minor bugfixes:
[*]Fixed bug in hardware monitoring module causing hardware monitoring based scheduled tasks to be ignored due to improper initialization on RivaTuner startup.
[*]Fixed erroneous 100MHz memory clock reading on G9x GPU series based display adapters caused by bug in memory clock frequency generator source clock detection code.
[*]File system redirection is no longer disabled when executing a patch script under 64-bit OS to prevent the issues with missing file system browser dialog when pressing the "Continue" button.
[*]Heights of sticky graphs in the group are now updated properly when manually editing fixed graph height settings in the properties of any graph of the group.
[*]Fixed bug into startup daemon routine of RivaTunerStatisticsServer and D3DOverrider utilities causing these tools to be started and reside in memory without displaying tray icon under certain conditions.
[*]Added database for ForceWare 182.06.
[*]Added Catalyst 9.2 drivers family detection.
[*]Updated PCI DeviceID database for ATI display adapters.
[*]Improved Logitech G15 keyboard LCD support in hardware monitoring module:- RivaTuner no longer maps OSD text to Logitech keyboard LCD, now there is separate "Show in LCD" option in the data source properties window allowing you to define independent output configurations for OSD and LCD. Previously available power user oriented MapOSDToLCD regitry entry is no longer in use.
- Previously available power user oriented LCD font size adjustment option is now also available in the data source properties.
- New dynamic LCD re-connection mode ensures proper LCD output when LCD software is being restarted dynamically.
[*]Improved detection algorithms for core and memory clock frequency generators switching to PCIE bus clock on NV40 and newer NVIDIA graphics processors. The algorithms are still experimental, so both core and memory clock frequency generator bypassing detection can be forcibly disabled via EnableNVPLLBypassingDetection and EnableMPLLBypassingDetection registry entries.
[*]Updated RivaTunerStatisticsServer v3.1.1 bundled utility. This version is a maintenance release, it doesn't contain new features besides the fix mentioned above.
[*]Updated D3DOverrider v2.0.1 bundled utility. This version is a maintenance release, it doesn't contain new features besides the fix mentioned above.
DOWNLOAD Rivatuner
Download Orthos Stress Prime
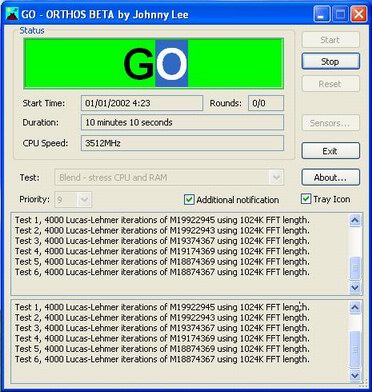
Orthos Stress Prime
I assembled a computer recently and ran a few apps to test the stability of the new system. One of the stress apps recommended by various overclocking guides and forums is Prime 95. Prime95 features a torture test to stress the CPU and RAM.
My typical usage of Prime95 was:
 was lacking.
I encountered the following problems with Prime95:
Download Orthos Stress Prime

Orthos Stress Prime
I assembled a computer recently and ran a few apps to test the stability of the new system. One of the stress apps recommended by various overclocking guides and forums is Prime 95. Prime95 features a torture test to stress the CPU and RAM.
My typical usage of Prime95 was:
- Start the torture test in blend mode.
- Watch the test for a few minutes. If no errors occurred within a few minutes...
- I turned off the monitor and walked away to do some other stuff.
- Every few hours, I'd return to the computer and check on the status of the test.
 was lacking.
I encountered the following problems with Prime95:
- No easily-visible test status. It is hard to determine the current status of the stress test at a glance. The user has to scan the log text to determine if there is an error or notice if the Prime95 icon is red or yellow.
- No time-related test status. There's no display of when the test started, and during the test, there's no display of how long the test has run.
- Read-only log window. The user can't copy the logged text from the main Prime95 window.Solution I could have modified the logged text in Prime95 to improve the first two problems within the Prime95 codebase. But if I could go beyond a text-only solution, I could have greater improvements.
So I created a WTL dialog app named SP2004.exe which fixes the above problems.
SP2004 uses a redesigned user interface that calls Version 23 Prime95's torture test code. This should provide the same results as Prime95, just displayed in a different manner.
SP2004 provides: - Easily-visible test status. SP2004 displays the current status of the app in a large font on an appropriate background colour. When an error occurs during the test, SP2004 will also:
- flash the dialog window
- play a sound named fail.wav or a beep if a WAV file of that name doesn't exist
- flash the scroll lock key LED
- change the app icon from a 'dormant volcano on a sunny day' to an 'erupting volcano on an overcast day'
- SP2004's tray icon displays a tooltip window that shows the current test status
- Time-related test status. SP2004 displays the test start time and how much time has elapsed.
- Log window text that can be copied.
Download Orthos Stress Prime
")

"The seminal book on white-hat hacking and countermeasures... Should be required reading for anyone with a server or a network to secure." --Bill Machrone, PC Magazine
"The definitive compendium of intruder practices and tools." --Steve Steinke, Network Magazine
"For almost any computer book, you can find a clone. But not this one... A one-of-a-kind study of the art of breaking in." --UNIX Review
Here is the latest edition of international best-seller, Hacking Exposed. Using real-world case studies, renowned security experts Stuart McClure, Joel Scambray, and George Kurtz show IT professionals how to protect computers and networks against the most recent security vulnerabilities. You'll find detailed examples of the latest devious break-ins and will learn how to think like a hacker in order to thwart attacks. Coverage includes:
Code hacking methods and countermeasures
New exploits for Windows 2003 Server, UNIX/Linux, Cisco, Apache, and Web and wireless applications
Latest DDoS techniques--zombies, Blaster, MyDoom
All new class of vulnerabilities--HTTP Response Splitting
and much more..................
http://rapidshare.com/files/235161313/Hacking_Exposed__5th_Edition.rar

Internet Download Manager has a smart download logic accelerator that features intelligent dynamic file segmentation and safe multipart downloading technology to accelerate your downloads. Unlike other download accelerators and managers that segment files before downloading starts, Internet Download Manager segments downloaded files dynamically during download process. Internet Download Manager reuses available connections without additional connect and login stages to achieve better acceleration performance. Internet Download Manager supports proxy servers, ftp and http protocols, firewalls, redirects, cookies, authorization, MP3 audio and MPEG video content processing. IDM integrates seamlessly into Microsoft Internet Explorer, Netscape, MSN Explorer, AOL, Opera, Mozilla, Mozilla Firefox, Mozilla Firebird, Avant Browser, MyIE2, and all other popular browsers to automatically handle your downloads. You can also drag and drop files, or use Internet Download Manager from command line. Internet Download Manager can dial your modem at the set time, download the files you want, then hang up or even shut down your computer when it's done. Other features include multilingual support, zip preview, download categories, scheduler pro, sounds on different events, HTTPS support, queue processor, html help and tutorial, enhanced virus protection on download completion, progressive downloading with quotas (useful for connections that use some kind of fair access policy or FAP like Direcway, Direct PC, Hughes, etc.), built-in download accelerator, and many others.
Main Features:
• All popular browsers and applications are supported! Internet Download Manager has been tested with the following browsers: Internet Explorer, MSN Explorer, AOL, Netscape Communicator, Netscape 6, Netscape 7, Mozilla, Mozilla Firefox, Mozilla Firebird, Opera, NetCaptor, UltraBrowser, Slim Browser, Avant Browser, MyIE2, Optimal Desktop, Ace Explorer, Advanced Browser, 27 Tools-in-1 Wichio Browser, WindowSurfer, 550 Access Browser, FineBrowser Freeware, Kopassa Browser, Fast Browser Pro, Enigma Browser, GoSuRF, K-Meleon, Smart Explorer, The Off By One Web Browser, Smartalec Voyager, CrystalPort AppCapture, The Family Browser, XANA Web Browser, Bluto, AutoSurf, 32bit Web Browser, BrowseMan, WrestlingBrowser, Eminem Browser, UltraBrowser, Cygsoft LDAP Browser, and Net M@nager. Internet Download Manager supports all versions of popular browsers, and can be integrated into any 3rd party Internet applications.
• Easy downloading with one click. When you click on a download link in a browser, IDM will take over the download and accelerate it. IDM supports HTTP, FTP, HTTPS and MMS protocols.
• Download Speed Acceleration. Internet Download Manager can accelerate downloads by up to 5 times due to its intelligent dynamic file segmentation technology. Unlike other download managers and accelerators Internet Download Manager segments downloaded files dynamically during download process and reuses available connections without additional connect and login stages to achieve best acceleration performance.
• Download Resume. Internet Download Manager will resume unfinished download from the place where they left off.
• YouTube grabber. Internet Download Manager can grab FLV videos from popular sites like YouTube, MySpaceTV, and Google Video.
• Simple installation wizard. Quick and easy installation program will make necessary settings for you, and check your connection at the end to ensure trouble free installation of Internet Download Manager
• Drag and Drop. You may simply drag and drop links to IDM, and drag and drop downloaded files out of Internet Download Manager.
• Automatic Antivirus checking. Antivirus checking makes your downloads free from viruses and trojans.
• Advanced Browser Integration. When enabled, the feature can be used to catch any download from any application. None of download managers have this feature.
• Built-in Scheduler. Internet Download Manager can connect to the Internet at a set time, download the files you want, disconnect, or shut down your computer when it's done.
• IDM includes web site spider and grabber. IDM downloads all required files that are specified with filters from web sites, for example all pictures from a web site, or subsets of web sites, or complete web sites for offline browsing. It's possible to schedule multiple grabber projects to run them once at a specified time, stop them at a specified time, or run periodically to synchronize changes.
• IDM supports many types of proxy servers. For example, IDM works with Microsoft ISA, and FTP proxy servers.
• IDM supports main authentication protocols: Basic, Negotiate, NTLM, and Keberos. Thus IDM can access many Internet and proxy servers using login name and password.
• Download All feature. IDM can add all downloads linked to the current page. It's easy to download multiple files with this feature.
• Customizable Interface. You may choose the order, and what buttons and columns appear on the main IDM window.
• Download Categories. Internet Download Manager can be used to organize downloads automatically using defined download categories.
• Quick Update Feature. Quick update may check for new versions of IDM and update IDM once per week.
• Download limits. Progressive downloading with quotas feature. The feature is useful for connections that use some kind of fair access policy (or FAP) like Direcway, Direct PC, Hughes, etc.
• IDM is multilingual. IDM is translated to Albanian, Arabic, Azerbaijan, Bosnian, Bulgarian, Chinese, Croatian, Czech, Danish, Dutch, Farsi, French, German, Greek, Hebrew, Hungarian, Italian, Japanese, Korean, Lithuanian, Macedonian, Norwegian, Polish, Portuguese, Romanian, Russian, Serbian, Slovak, Slovenian, Spanish, Thai, Turkish, and Uzbek languages.
Size : 2.8 MB
Internet Download Manager +Patch 100% FRESH FRESH!
Last edited:

A complete start guide to sub7 legends 2.1.5
To start with lets get an idea of what words we will use throughout this tutorial.
Client is what we will use to call the sub7 control center this is where you control your friends PC.
Server is what we call the infection file, this is what your friend will click to infect himself and also the that part you will edit
Also server is also known as a live chatroom that will help you keep your sub7server.exe but we will chat more about this later.
The editserver is a program that we will use to edit the standard one with your own details.
Okay that should cover the basics that will help you through this basic tutorial. First thing we need to do is go to the download section of this website and download a nice new copy of sub7 legends 2.1.5
which you can do by clicking here and clicking download sub7 legends 2.1.5.
You will need a username and password which you can get from here and you will also need the unzip
password which is located in the same place.
Okay great, so now you have downloaded sub7 legends 2.1.5 and your ready to unzip it.
If you got any errors while your copy was downloading its because you have your anti-virus software enabled.
You must always disable your anti-virus software while working with any part of sub7.
If you are sure your anti-virus is disabled then click here.
Okay now sub7 has now been downloaded onto your desktop so the next thing we need to do is extract it and set it up.
While its extracting you will be prompted for a password, type in the password and the file should extract to another folder.
If your having problems extracting the files or if you get any errors please click here Once the files have extracted you can now start sub7 and program your server.
First lets have a look at the client, double click the client.exe and load it up.
If you get any errors while clicking or loading the client up then click here.
If all goes well it should look something like this.

Why dont you have a play about with this for a bit your cant do any damage to yourself or any1 yet.
Have a look at the menu and get to know the client its great.
Ahhh, your back for more, you really want to get into another computer dont you.. well okay lets start!
Go back to your sub7 folder and this time load up editserver.exe this is program you will design your server.
Once its loaded it will look something like this!

This will be the place where you edit your server.
First thing we need to is click the browse button to load the standard server into the editserver.
You will now need to go to the sub7 folder through the browse button and find server.exe and load it in.
Now you will see the edit server again but this time its fully loaded and ready to go!
Lets just make a basic server so you can connect with nothing fancy.
First we need to choose some startup methods, these will re-start your server.exe once your friend resets!
Thats right theres no getting away once your in you wanna go back again right? or course..
Lets just tick some basic start ups, these send keys to the registry which we can remove later if your
testing this on yourself which is very wize to make sure you get the server just right!
Tick Registry- run and Registry- Runservices.
Leave the keyname as winloader but in the advanced version you can change this
Do not tick any others this is a just a basic tutorial to get yourself use to sub7.
Next we are doing the notification which so many people have lots of trouble with, not sure why.
Your friends name will be the person who you will infect it has nothing to do with how the server.exe runs.
You can choose anything for this.
Now lets skip out ICQ, if you want to add those details go ahead but were skipping it.
Now we come to IRC which so many have problems with in the past so I am going to explain this really well!
We have now setup our own sub7 server live on www.sub7legends.com which means there should be no more problems!
The server is designed to test and see the workings of remote administration not a place to launch ddos attacks.
All you have to do is follow my instructions and your home and dry.
Put in the following details:

The reason we enable IRC notify is because this will send a robot to tell you there online,
they are awaiting your command.
It will tell you what version of sub7 you have installed on there computer,
it will tell you a password to get into there computer and
Tt will even tell you there IP address, even if it changes there is no escape!
Tick the IRC notify box and choose a room, pick anything and remember it, you will need that later.
Dont pick a name like sub7 or hacker because they will be in use try to get a roomname thats not taken.
Dont forget to put # infront of the room name you choose.
Your doing great, now go to the top right and auto start on port 27374.
You can change this port in the advanced version of this tutorial but now just leave it 27374.
Tick the box to auto start on that port, DO NOT tick random.
Tick server password and put in a password, this is just incase someone else finds your server and trys to steal it.
Or incase someone trys to connect to you while your testing live.
Tick protect port and password.
Do not enable bot thats for advanced tutorial.
Specify a filename... now in the event the friend has a firewall and you have not expected it, this is the name your friend
will see is trying to connect.
So we dont want to be calling this sub7 or hacker or anything like that.
Instead choose something like windows.com be creative! if you do a filename and the server has an error so what
this is what testing is for!
Tick melt server you ask what this does in the forum but I dont want to confuse by jumping around.
Enable fake error message, yea why not, once you have done this fake message that your friend will see after he runs your file tick the box.
Dont bother binding with .exe file in this tut, but yea whatever you choose
to bind to your server.exe the wont suspect anything!
If you come across Anti virus dont worry it can always be by-passed. shhhez.. all the fuss?? . Now tick the bottom protect port and password so it cant be changed.
Now choose save a NEW copy of the server and call it anything you want
Make sure your server has saved as .exe file, if not rename it to .exe
we wont use any icon changers as this is only testing
Now, lets go and prepare to accept the info from the server.
Click here to go the IRC page.
If you want to use mIRC instead then load it up and join server: /server irc.sub7legends.com 6667
If your are unable to connect using the re-direct then use: 66.252.21.99 instead of irc.sub7legends.com
Now if your connecting through the website type:
/join yourroom
you will now join a room where you will be the admin.
Now go back to your desktop and double click the server you just made!
You are now infected with sub7, but dont worry you will do this hundreds of times!
Now if your server was programmed correct and it ran okay just sit back and wait
if it didnt and you didnt get a fake error message head on over the forums.
Now if it ran okay and you got the fake error message
A bot or robot will come and tell you all the details you need to connect.
Load your client.exe up and stand by!
This can take between 60-120 seconds...
Has he arrived yet? if he has put that info into your client and you are now controlling your PC!
If someone else clicked your server.exe you would be controlling there PC.
If your bot didnt arrive then click here. Now if you connect okay and you have tried a few commands, click "remove server" and this will
destroy the infection and you will be no longer infected with sub7.
If you have any questions or problems about this tutorial then click here.
I have tried to cover the basics to get the server.exe and client talking.
Remember at first its hard to take in all the info but after you have used it for a few weeks.
You will be a pro!
If your ready to try the advanced version then go here.
Final note: If you want to make sure your server is working then try connecting to your IP address.
If your behind a router or on a network you may want to try your network IP.
To get this go to start, then run then type CMD, then type IPCONFIG in the black window.
The IP address listed there is your network IP which you can insert into the client.
Written by Defcon
http://rapidshare.com/files/235163220/ss.2.2.0w.zip

Main Features:
- Creates a virtual encrypted disk within a file and mounts it as a real disk.
- Encrypts an entire partition or storage device such as USB flash drive or hard drive.
- Encrypts a partition or drive where Windows is installed (pre-boot authentication).
- Encryption is automatic, real-time (on-the-fly) and transparent.
- Provides plausible deniability, in case an adversary forces you to reveal the password:
Hidden volume (steganography) and hidden operating system. - Encryption algorithms: AES-256, Serpent, and Twofish. Mode of operation: XTS.
http://rapidshare.com/files/235184205/TrueCrypt_Setup_6.2.exe
Last edited:
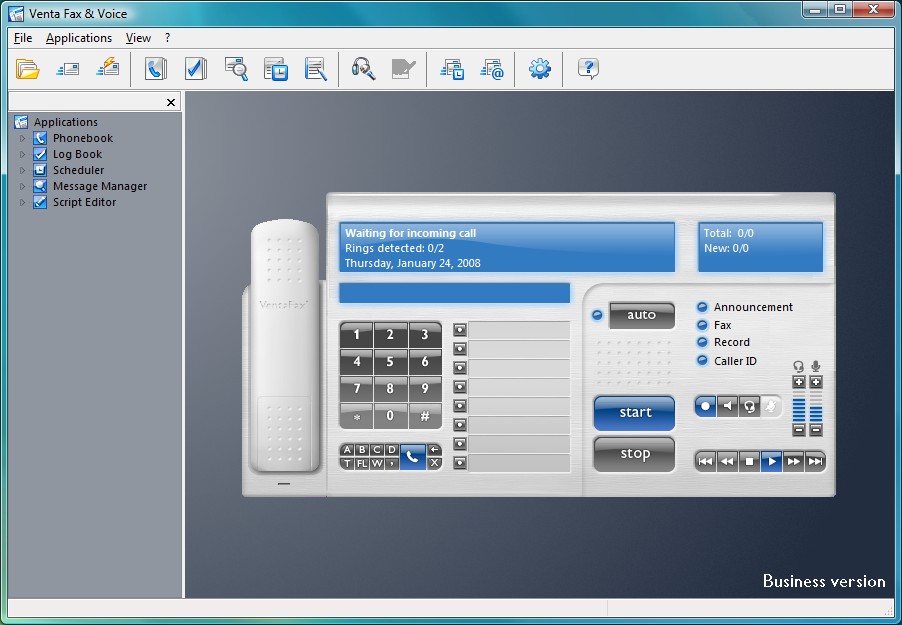
VentaFax
 is a full-featured computer fax software and answering machine software
Send and receive black-and-white or color faxes, and turns your PC's fax modem into a versatile answering machine with remote control. Retrieve your fax and voice messages from any touchtone phone, plus have your e-mail messages and faxes forwarded to you as e-mail attachments. VentaFax also supports Caller ID (if available) and allows you to record a telephone conversation with a single click.
http://rapidshare.com/files/235195412/vfvh61i.exe

Ever thought about visualizing your network connections in 3D environment? Try Wandering IPs, lightweight tool that monitors TCP connections, identifies remote IP adresses and then determines their geographic coordinates. Results are projected on textured 3D Globe that can be integrated with your desktop background. Apart from locating endpoinds, it can be used to trace the route taken by packets across an IP network. Program utilizes variation of MaxMind GeoLite database which contains over 4,000,000 IP-to-location records and is frequently updated.
http://rapidshare.com/files/235204006/Wandering.IPs.v1.2.3.rar
winrar extreme edition with serials

http://rapidshare.com/files/235204007/WinRARv3.71.Extreme_netmaza.com_CW_.rar

http://rapidshare.com/files/235204007/WinRARv3.71.Extreme_netmaza.com_CW_.rar
Similar threads
- Replies
- 6
- Views
- 249
- Replies
- 2
- Views
- 197
- Replies
- 7
- Views
- 256