


Latest ads
-
🎮 INDIAN PSN GIFT CARDS AVAILABLE NOW! 🎮
- madukaperera
- Updated:
-
 🚀 Google AI PRO – 18 Months | Rs. 850 Only
- lkkolla
- Updated:
-
 🔒 NordVPN Premium – 3 Months
- hrdilshan
- Updated:
-
 🚀 Microsoft Office 365 Pro Plus – Lifetime Access! 🚀
- hrdilshan
- Updated:
Photoshop Trix To You My Friend .....
- Thread starter creativeN
- Start date
You are using an out of date browser. It may not display this or other websites correctly.
You should upgrade or use an alternative browser.
You should upgrade or use an alternative browser.

18.
Step 1
Open your model stock in Photoshop. You will not need to subtract it from it’s background unless you want to add something that requires that. The first thing I did was to make some general adjustments to the image using Adjustment Layers. I added the default purple-orange Gradient Map, set its Blend Mode to Linear Dodge (Add) and Opacity 10%. Then I increased the Saturation to 25 on a Hue/Saturation adjustment layer.

Step 2
I started by making a light ball. For that I used a stock photo made by myself. So open powerball.jpg scale it down and increase the Saturation. Change the blend mode to Screen so that you hide the black background. Once you have the stock image ready, get a big soft brush and paint two big dots and change the blend mode to Overlay. I used yellow and blue to match the colors of the stock image.

Step 3
At this point this doesn’t really look very good so I added some more details. Create the glow of the ball using a big soft brush and an orange color. I changed the blend mode to Pin Light and reduced the Opacity to 50%. This is very important because if you don’t create this, the Outerglow of the little dots shown on the next image will not be visible or will not look right.
Keep in mind that depending on the colors of your stock image, you might have to use different blend modes. Blend modes work differently depending on the colors and illumination. The dots are made using a custom scattered brush and with the Noise option activated. The blend mode of the outer glow is Color Dodge.

As you see on the powerball dots layer, the nice outerglow around the small dots is visible because of the big orange glow light.
In order to give more consistence and shape to this ball, I made some lines using the Pen Tool (P). I took a 2 pixels hard brush then I traced some arc paths and stoke those paths with the brush using the Simulate Pressure option. After creating 5 or 6 curved lines, you can duplicate them and rotate them, nobody will notice they are duplicated.

After making the lines, merge them all in one layer if you made them on separate layers and apply Outerglow. Again keep in mind the size and colors of your image may affect the final result so you might need to use different settings than on this tutorial.

Step 5
After making the first power ball I started adding some colors on the body using brushes and stock images. Open color-waves.jpg and paste it over the model. Scale it if necessary and change the Blend Mode to Screen. Create a layer mask and mask the upper part. See image below.

Add more colors on a new layer using a big soft brush and Overlay or Screen Blend Mode.

Step 6
Now I will show you how I made those 3D glassy squares and circles. Get the square brush and in the preset editor activate Scatter but do not add too much, about half way and increase Angle Jitter. Also increase Size Jitter to maximum and set Control to Fade if you don’t have a tablet. The Fade amount depends on the distance at which you want your pixels to become small.
Start with the brush on the left foot and make a long stroke towards the right hand. Adjust the Fade amount until the squares get smaller as you get closer to the hand. If the squares are too close together, increase the Spacing not the Scattering.

Set layer Blend Mode of the squares layer to Overlay and add the following layer effects. Try different colors and blend modes to get different results.

The 3D circles are made the same way. I created some random size circles and reduced the Fill to 16%. Actually I copied the same FX from the squares layer and I changed some blend modes and colors and the Outer Glow settings. I will hide these 3D circles on the next steps so that you can see the other effects better.

Step 7
Open color-lines.jpg and place it over the left foot and change Blend Mode to Screen. As you can see, I’m using a technique that I already used on previous tutorials. Change the Hue if you want and increase the Saturation.

I created some paths with the Pen Tool (p) and then I used a 2px hard brush to stroke the path. This is the layer style applied to the lines.

Still working on the left foot, get a soft brush set the Brush Opacity to 43% and paint two spots using the colors: c2839f and bac93c and change the Blend Mode to Vivid Light.

Step 8
Create two or three 45º selections with the Polygonal Lasso Tool. Press the Shift key while you make the selection in order to create 45º angle selections. Then use a big soft brush and paint along the edge of the selection and create something like in the image below. After you did that change the Blend Mode of the layer to Overlay or Soft Light.

Step 9
Open fractals.jpg and place it over the model then go to Filter>Pixelate>Mosaic. I used 30 pixels as cell size because I’m working with a high resolution picture but you can use a size that’s suitable for your picture. Try to keep some detail. After that, I increased the Saturation and changed the Blend Mode to Color Dodge. You can also try changing the Hue to see what color combinations you can get.

Step 10
I noticed that the right side of the picture is too empty so I added some colors too. I used the squares brushes and created a few random squares not to far away from each other and I applied a 45º Motion Blur. Then, in order to add the colors I used the layer styles. I used the following style. For a stronger effect duplicate the layer.

So, after duplicating the layer to obtain a stronger color, I also added some soft dots using a scattered brush. These dots have an Outer Glow with Color Dodge Blend Mode.

Using a big soft brush and blue color I added a big light on the right leg. The Blend Mode used is Linear Dodge (Add).

Step 11
I made a second light ball on the other hand and again I used several stock images made by myself. Open supernova.jpg, increase saturation, scale the image, place it over the hand and change the Blend Mode to Screen.
In order to recreate the light produced by the ball, I took a soft brush about 800 px (because I worked with a hi-res stock image) and I made a big reddish orange soft spotlight. I used Linear Dodge (Add).

Use a scattered brush to add some particles to this ball like you did a few steps ago on the right hand. Add some Outer Glow with default color and Blend Mode Color Dodge.

Lastly, I created a tail to this ball using another light stock image. Open trail.jpg place it over the light ball and change the Blend Mode to Screen.

One more stock image to enhance the ball shape. This time I used shatters.jpg

That’s all. You can add more things if you want but it would look too crowded. So as you’ve seen I used pretty much the same techniques as in other tutorials.
As I said keep in mind the stock image you are using as Blend Modes work differently depending on the colors and contrast. Also remember that I used a high resolution stock so the dimensions of brushes and layer style settings might not work the same if you use a low res image. That being said, I hope you liked this tutorial. Below you have the Preview image and PSD download link.
Step 1
Open your model stock in Photoshop. You will not need to subtract it from it’s background unless you want to add something that requires that. The first thing I did was to make some general adjustments to the image using Adjustment Layers. I added the default purple-orange Gradient Map, set its Blend Mode to Linear Dodge (Add) and Opacity 10%. Then I increased the Saturation to 25 on a Hue/Saturation adjustment layer.

Step 2
I started by making a light ball. For that I used a stock photo made by myself. So open powerball.jpg scale it down and increase the Saturation. Change the blend mode to Screen so that you hide the black background. Once you have the stock image ready, get a big soft brush and paint two big dots and change the blend mode to Overlay. I used yellow and blue to match the colors of the stock image.

Step 3
At this point this doesn’t really look very good so I added some more details. Create the glow of the ball using a big soft brush and an orange color. I changed the blend mode to Pin Light and reduced the Opacity to 50%. This is very important because if you don’t create this, the Outerglow of the little dots shown on the next image will not be visible or will not look right.
Keep in mind that depending on the colors of your stock image, you might have to use different blend modes. Blend modes work differently depending on the colors and illumination. The dots are made using a custom scattered brush and with the Noise option activated. The blend mode of the outer glow is Color Dodge.

As you see on the powerball dots layer, the nice outerglow around the small dots is visible because of the big orange glow light.
In order to give more consistence and shape to this ball, I made some lines using the Pen Tool (P). I took a 2 pixels hard brush then I traced some arc paths and stoke those paths with the brush using the Simulate Pressure option. After creating 5 or 6 curved lines, you can duplicate them and rotate them, nobody will notice they are duplicated.

After making the lines, merge them all in one layer if you made them on separate layers and apply Outerglow. Again keep in mind the size and colors of your image may affect the final result so you might need to use different settings than on this tutorial.

Step 5
After making the first power ball I started adding some colors on the body using brushes and stock images. Open color-waves.jpg and paste it over the model. Scale it if necessary and change the Blend Mode to Screen. Create a layer mask and mask the upper part. See image below.

Add more colors on a new layer using a big soft brush and Overlay or Screen Blend Mode.

Step 6
Now I will show you how I made those 3D glassy squares and circles. Get the square brush and in the preset editor activate Scatter but do not add too much, about half way and increase Angle Jitter. Also increase Size Jitter to maximum and set Control to Fade if you don’t have a tablet. The Fade amount depends on the distance at which you want your pixels to become small.
Start with the brush on the left foot and make a long stroke towards the right hand. Adjust the Fade amount until the squares get smaller as you get closer to the hand. If the squares are too close together, increase the Spacing not the Scattering.

Set layer Blend Mode of the squares layer to Overlay and add the following layer effects. Try different colors and blend modes to get different results.

The 3D circles are made the same way. I created some random size circles and reduced the Fill to 16%. Actually I copied the same FX from the squares layer and I changed some blend modes and colors and the Outer Glow settings. I will hide these 3D circles on the next steps so that you can see the other effects better.

Step 7
Open color-lines.jpg and place it over the left foot and change Blend Mode to Screen. As you can see, I’m using a technique that I already used on previous tutorials. Change the Hue if you want and increase the Saturation.

I created some paths with the Pen Tool (p) and then I used a 2px hard brush to stroke the path. This is the layer style applied to the lines.

Still working on the left foot, get a soft brush set the Brush Opacity to 43% and paint two spots using the colors: c2839f and bac93c and change the Blend Mode to Vivid Light.

Step 8
Create two or three 45º selections with the Polygonal Lasso Tool. Press the Shift key while you make the selection in order to create 45º angle selections. Then use a big soft brush and paint along the edge of the selection and create something like in the image below. After you did that change the Blend Mode of the layer to Overlay or Soft Light.

Step 9
Open fractals.jpg and place it over the model then go to Filter>Pixelate>Mosaic. I used 30 pixels as cell size because I’m working with a high resolution picture but you can use a size that’s suitable for your picture. Try to keep some detail. After that, I increased the Saturation and changed the Blend Mode to Color Dodge. You can also try changing the Hue to see what color combinations you can get.

Step 10
I noticed that the right side of the picture is too empty so I added some colors too. I used the squares brushes and created a few random squares not to far away from each other and I applied a 45º Motion Blur. Then, in order to add the colors I used the layer styles. I used the following style. For a stronger effect duplicate the layer.

So, after duplicating the layer to obtain a stronger color, I also added some soft dots using a scattered brush. These dots have an Outer Glow with Color Dodge Blend Mode.

Using a big soft brush and blue color I added a big light on the right leg. The Blend Mode used is Linear Dodge (Add).

Step 11
I made a second light ball on the other hand and again I used several stock images made by myself. Open supernova.jpg, increase saturation, scale the image, place it over the hand and change the Blend Mode to Screen.
In order to recreate the light produced by the ball, I took a soft brush about 800 px (because I worked with a hi-res stock image) and I made a big reddish orange soft spotlight. I used Linear Dodge (Add).

Use a scattered brush to add some particles to this ball like you did a few steps ago on the right hand. Add some Outer Glow with default color and Blend Mode Color Dodge.

Lastly, I created a tail to this ball using another light stock image. Open trail.jpg place it over the light ball and change the Blend Mode to Screen.

One more stock image to enhance the ball shape. This time I used shatters.jpg

That’s all. You can add more things if you want but it would look too crowded. So as you’ve seen I used pretty much the same techniques as in other tutorials.
As I said keep in mind the stock image you are using as Blend Modes work differently depending on the colors and contrast. Also remember that I used a high resolution stock so the dimensions of brushes and layer style settings might not work the same if you use a low res image. That being said, I hope you liked this tutorial. Below you have the Preview image and PSD download link.


Thanxs for the Comment & also Reputationහොදයි දිගටම කරගෙන යන්න.
rep+
හොදයි දිගටම කරගෙන යන්න.
rep+
patta..
ela machan. pictures vala sizes aduven dammanam hondai
♥-Aurora-♥;8555461 said:Nice one!
thanks! ~♥~
rep++
Thanx All
19.

Step 1
Open the background image in Photoshop. You don’t even have to unlock it because you will not retouch it. Next, open the squirrel image and subtract it from the background with the Pen Tool (P). Paste the squirrel over the background and use a soft brush to blend it with the grass from the background layer.

Step 2
The next obvious step is to create the shadows casted by the squirrel. So create a new layer below the squirrel and paint some shadows underneath using a soft low opacity brush. I also painted some shadows over the lower parts of the squirrel’s body.

Step 3
Now you have to redo the fur on the squirrels body. Get the Smudge Tool set Strength to about 20% and a 40-50px soft brush and smudge the sharp edges. Then set the smudge brush to 1 or 2px set Strength to 80-90% and make the hairs of the squirrel.

Step 4
Open the helmet image in Photoshop (if you can’t open it try opening it in Paint and then save it as jpg and try opening it again in Photoshop.) Scale it down and place it over the squirrel’s head. In order to make the helmet more symmetric I cloned the right side. If you can’t clone it, copy the right side as shown below, paste it on the left side and blend the edges with a soft brush.

After that, create a shadow of the helmet on the squirrel’s head using a soft brush.

Step 5
Open the gun stock image and start cutting with the Pen Tool (P).

Once you masked the parts of the soldier you don’t need, scale down and place the image so that the left hand of the soldier fits the squirrels left arm.

Step 6
Next you will have to remove the shadow from the gun stock. Use the Clone Tool (S). See details on the images below.


Step 7
Now you have to recreate the butt of the rifle. Make a selection with the Polygonal Lasso Tool (L) and then fill the selection with the Gradient Tool (G). As for the gradient colors I sampled them from the gun stock. After that add a 1 or 2 pixels Drop Shadow.

Step 8
Let’s get to something more difficult now. You have put the squirre’ls hand on the gun. Start with the left hand. Use the Clone Tool (S) to sample hair from the squirrel’s arm and cover the soldier’s hand. If you activate the “All layers” option you will be able to clone the hair on an empty layer. I suggest you don’t clone the hair directly on the gun layer because it’s very easy to mess up here If you do, make sure you have a copy of it as backup.
After cloning the finger on the trigger, copy the squirrel’s left fingers and paste them over the remaining soldier hand. Use the Brush Tool (B) to blend it and the Warp Tool to adjust it. See image below.

Step 9
Now go to the right arm.Select and copy the squirrel’s right hand and paste it on a new layer as backup. Now on the original squirrel layer hide the right arm with the Clone Too. Again, I cloned on a separate layer.

After hiding the arm, blend the copied arm using a Layer Mask and a soft brush. Rotate it so that it fits the soldier’s right hand fingers.

Step 10
The final step on this process is to cover the soldiers right hand fingers. Again, use the squirrels fingers and paste them over the soldier’s. Use the warp tool for adjustments and make it look as the squirrel is holding the gun.

Step 11
Now start making the ammo belt. Open the image with the bullets and delete the background using the Pen Tool (P) or any other technique you prefer. After that, duplicate the bullets and use the Clone Tool and Free Transform to position the duplicated bullets and “weld” them to the others. After fusing both ammo clips, duplicate then a few times and create a long strip like in the image below.

Step 12
Select the bullets layer and activate the Free Transform with Ctrl+T and select the Warp Tool. Adjust the ammo belt to create the illusion that it’s sitting around the squirrel’s body. Use Levels to increase the Midtones a bit. See Image below.

Step 13
Time for some Dodge & Burn because the manipulation is ready. Create a new layer above all layers on the palette and fill it with 50% gray from Edit>Fill or Shift+F5. Set the Blend Mode of the gray layer to Overlay and name it dodge-burn. Use the Burn and Dodge tool to enhance the shadows and highlights of the squirrel’s body and the gun. Also paint some shadows below the ammo belt on a separate layer.

Step 14
Time to make the final adjustments. Now you can turn this into something more interesting and more artistic tweaking the colors and lighting using some adjustment layers. Add a Photo Filter and a Gradient Map like in the image below.

Step 15
I also created a vignette effect. You can easily make it by selecting the Rectangular Marquee tool, set Feather to 150-200 px (smaller if you use a low res image) and drag to select the entire canvas (Ctrl+A will not work as the father will not be applied). After you make the selection invert it and fill it with black using the shortcut Alt+Backspace, change the layer blending mode to Soft Light.

Step 16
Next up I created a stamp with Shift+Ctrl+Alt+E and made more adjustments. I used the Lighting Effects from Filter>Render>Lighting Effects to focus the light on the squirrel. I also adjusted the Shadows/Highlights from Image>Adjustments>Shadows/Highlights and I increased the Midtone Contrast to 12 and decreased the Color Correction to -56.
The final touch is given by a Black & White adjustment layer set to Lighter Color and Opacity 25%.

I hope you learned something out of this tutorial. As you can see the Warp tool can be a really cool tool if used correctly.

Step 1
Open the background image in Photoshop. You don’t even have to unlock it because you will not retouch it. Next, open the squirrel image and subtract it from the background with the Pen Tool (P). Paste the squirrel over the background and use a soft brush to blend it with the grass from the background layer.

Step 2
The next obvious step is to create the shadows casted by the squirrel. So create a new layer below the squirrel and paint some shadows underneath using a soft low opacity brush. I also painted some shadows over the lower parts of the squirrel’s body.

Step 3
Now you have to redo the fur on the squirrels body. Get the Smudge Tool set Strength to about 20% and a 40-50px soft brush and smudge the sharp edges. Then set the smudge brush to 1 or 2px set Strength to 80-90% and make the hairs of the squirrel.

Step 4
Open the helmet image in Photoshop (if you can’t open it try opening it in Paint and then save it as jpg and try opening it again in Photoshop.) Scale it down and place it over the squirrel’s head. In order to make the helmet more symmetric I cloned the right side. If you can’t clone it, copy the right side as shown below, paste it on the left side and blend the edges with a soft brush.

After that, create a shadow of the helmet on the squirrel’s head using a soft brush.

Step 5
Open the gun stock image and start cutting with the Pen Tool (P).

Once you masked the parts of the soldier you don’t need, scale down and place the image so that the left hand of the soldier fits the squirrels left arm.

Step 6
Next you will have to remove the shadow from the gun stock. Use the Clone Tool (S). See details on the images below.


Step 7
Now you have to recreate the butt of the rifle. Make a selection with the Polygonal Lasso Tool (L) and then fill the selection with the Gradient Tool (G). As for the gradient colors I sampled them from the gun stock. After that add a 1 or 2 pixels Drop Shadow.

Step 8
Let’s get to something more difficult now. You have put the squirre’ls hand on the gun. Start with the left hand. Use the Clone Tool (S) to sample hair from the squirrel’s arm and cover the soldier’s hand. If you activate the “All layers” option you will be able to clone the hair on an empty layer. I suggest you don’t clone the hair directly on the gun layer because it’s very easy to mess up here If you do, make sure you have a copy of it as backup.
After cloning the finger on the trigger, copy the squirrel’s left fingers and paste them over the remaining soldier hand. Use the Brush Tool (B) to blend it and the Warp Tool to adjust it. See image below.

Step 9
Now go to the right arm.Select and copy the squirrel’s right hand and paste it on a new layer as backup. Now on the original squirrel layer hide the right arm with the Clone Too. Again, I cloned on a separate layer.

After hiding the arm, blend the copied arm using a Layer Mask and a soft brush. Rotate it so that it fits the soldier’s right hand fingers.

Step 10
The final step on this process is to cover the soldiers right hand fingers. Again, use the squirrels fingers and paste them over the soldier’s. Use the warp tool for adjustments and make it look as the squirrel is holding the gun.

Step 11
Now start making the ammo belt. Open the image with the bullets and delete the background using the Pen Tool (P) or any other technique you prefer. After that, duplicate the bullets and use the Clone Tool and Free Transform to position the duplicated bullets and “weld” them to the others. After fusing both ammo clips, duplicate then a few times and create a long strip like in the image below.

Step 12
Select the bullets layer and activate the Free Transform with Ctrl+T and select the Warp Tool. Adjust the ammo belt to create the illusion that it’s sitting around the squirrel’s body. Use Levels to increase the Midtones a bit. See Image below.

Step 13
Time for some Dodge & Burn because the manipulation is ready. Create a new layer above all layers on the palette and fill it with 50% gray from Edit>Fill or Shift+F5. Set the Blend Mode of the gray layer to Overlay and name it dodge-burn. Use the Burn and Dodge tool to enhance the shadows and highlights of the squirrel’s body and the gun. Also paint some shadows below the ammo belt on a separate layer.

Step 14
Time to make the final adjustments. Now you can turn this into something more interesting and more artistic tweaking the colors and lighting using some adjustment layers. Add a Photo Filter and a Gradient Map like in the image below.

Step 15
I also created a vignette effect. You can easily make it by selecting the Rectangular Marquee tool, set Feather to 150-200 px (smaller if you use a low res image) and drag to select the entire canvas (Ctrl+A will not work as the father will not be applied). After you make the selection invert it and fill it with black using the shortcut Alt+Backspace, change the layer blending mode to Soft Light.

Step 16
Next up I created a stamp with Shift+Ctrl+Alt+E and made more adjustments. I used the Lighting Effects from Filter>Render>Lighting Effects to focus the light on the squirrel. I also adjusted the Shadows/Highlights from Image>Adjustments>Shadows/Highlights and I increased the Midtone Contrast to 12 and decreased the Color Correction to -56.
The final touch is given by a Black & White adjustment layer set to Lighter Color and Opacity 25%.

I hope you learned something out of this tutorial. As you can see the Warp tool can be a really cool tool if used correctly.


20.
Step 1
The first thing I did was to see if my images fit so I first made a rough cut of the man using the Pen Tool and then I put it over the city. I reduced a bit the opacity and I resized the man just to see how it looks. Getting the size right is crucial because if you make your model too big or too small the effect is not that cool.
Once I new what size I will use I noted it down, I went back to the man photo and made an accurate cut. As the man is laying down on the grass, there are grass straws over his hands so I couldn’t cut along the edges of his hands. To solve this problem, I cutted a wider area around the edges so that I have more room when I get to the blending and cloning stage.

Step 2
Once the man was in place, I selected the buildings in the foreground and copied them on a new layer. Then, I placed the man layer below the copied buildings. I could have created a layer mask instead of placing the buildings on a separate layer but I decided that I will use the layer mask to help me with the blending only and not have to worry about the buildings anymore.

Step 3
At this point I was ready to start blending the man with the new background. Basically what it needs to be done is to remove the grass from the hands and blend the area around the hands and the head. If you have clean edges and you don’t need to clean up, go to Step 4.
In order to remove the grass from the hands and the head I used the Clone Tool and the Patch Tool. Removing the grass from the head is very easy because of the chaotic hair pattern. Just use a bigger clone brush.

Cleaning up the arms is a bit tricky because they also have gradient shadows as they are closer to the ground. Use the Patch Tool on areas that are lighter and also Clone bit by bit every grass straw. If you don’t get a seamless blend after using the Clone Tool, use the Patch Tool to cover that area using a clean and similar skin area. This operation can get a bit frustrating if you don’t have practice with the Clone and Patch tools so take your time and save a duplicate of your man in case you screw up.

Step 4
Now it’s time to start making some adjustments to the model. In my case I had to increase the yellows to match the surrounding buildings and the color of the light. On the stock photo that I used as background, the light source is on the top left so I added some shadows on the man’s right side of the body and on the lower part of his arms.
I also increased a bit the mid tones and highlights to match the luminosity of the background layer. All these adjustments are very important because they will give more realism to the scene. If you don’t match your model to the background, you will not get that effect that he’s really sitting in the middle of the city.

Step 5
Probably the most important thing here are shadows. Without shadows this scene is completely unrealistic.
Since the light source is coming from the top left side, I casted the shadows on the right side of the man. I created some shadows on his body as well using a soft brush and Soft Light Blend Mode but the most important are the ground shadows.

Step 6
When you’re dealing with shadows you have to think in 3D and keep in mind where your main light source is. Also look for other shadows that are already in the scene because they can help you establish the direction and opacity of the shadows that you create.
In this case a good clue comes from the trees because you can see that the left sides of the crowns of all of them are highlighted and the right sides are in shadow. That tells me that I should cast my shadows on the man’s right side.
I used multiple layers to create the shadows and then I put them all in a group. The first thing I did was some Overlay shadows using a soft medium brush and low opacity, about 20-30%.

The ground shadows are maybe the most difficult to recreate. I used a soft brush with low opacity and I painted some shadows where I thought they should be. I also tried to mimic the shape of the body in order to get a more realistic look.

Lastly, I casted some shadows over the buildings as well. I used a low opacity soft brush and I painted only the side of the buildings that are facing the man. After painting them I duplicated the layer and changed the Blend Mode to Overlay.

That’s basically it. All that’s left to do now is some general adjustments.
Post Editing
I always like to do that on a separate document which I call post-editing. That way, I preserve the original. So select the entire canvas with the keyboard shortcut Ctrl+A and go to Edit>Copy Merged. Create a new document, paste your copied image and duplicate it just in case.
Step 7
On the post editing stage I added some filters to make the scene more epic, if you will. So make sure you have a copy of your manipulated image and convert it into a Smart Object. To do that right-click the layer on the palette and choose Convert to Smart Object. The reason why I converted this into a smart object is because I applied a Lighting Filter which cannot be undone unless you apply if on smart objects.
Now go to Filters>Render>Lighting Effects and use the settings shown in the image below. Once you apply the filter notice that a smart filter has been created on the layer. That allows you to change the settings of the Lighting filter any time you want as long as you keep the layer as a smart object.

Step 8
The overall color of the scene is given by a gradient map. So create a new gradient map layer from Layer>New Adjustment Layer>Gradient Map or from the layer’s palette icon. Use the gradient shown in the screenshot below, Set Blend Mode to Hard Light and reduce the Opacity to 18%. I also adjusted the colors a bit using a Color Balance adjustment layer and I increased the Saturation to 10.

If you want to reduce the size apply some sharpening after you scale the image down.
Final Result

Step 1
The first thing I did was to see if my images fit so I first made a rough cut of the man using the Pen Tool and then I put it over the city. I reduced a bit the opacity and I resized the man just to see how it looks. Getting the size right is crucial because if you make your model too big or too small the effect is not that cool.
Once I new what size I will use I noted it down, I went back to the man photo and made an accurate cut. As the man is laying down on the grass, there are grass straws over his hands so I couldn’t cut along the edges of his hands. To solve this problem, I cutted a wider area around the edges so that I have more room when I get to the blending and cloning stage.

Step 2
Once the man was in place, I selected the buildings in the foreground and copied them on a new layer. Then, I placed the man layer below the copied buildings. I could have created a layer mask instead of placing the buildings on a separate layer but I decided that I will use the layer mask to help me with the blending only and not have to worry about the buildings anymore.

Step 3
At this point I was ready to start blending the man with the new background. Basically what it needs to be done is to remove the grass from the hands and blend the area around the hands and the head. If you have clean edges and you don’t need to clean up, go to Step 4.
In order to remove the grass from the hands and the head I used the Clone Tool and the Patch Tool. Removing the grass from the head is very easy because of the chaotic hair pattern. Just use a bigger clone brush.

Cleaning up the arms is a bit tricky because they also have gradient shadows as they are closer to the ground. Use the Patch Tool on areas that are lighter and also Clone bit by bit every grass straw. If you don’t get a seamless blend after using the Clone Tool, use the Patch Tool to cover that area using a clean and similar skin area. This operation can get a bit frustrating if you don’t have practice with the Clone and Patch tools so take your time and save a duplicate of your man in case you screw up.

Step 4
Now it’s time to start making some adjustments to the model. In my case I had to increase the yellows to match the surrounding buildings and the color of the light. On the stock photo that I used as background, the light source is on the top left so I added some shadows on the man’s right side of the body and on the lower part of his arms.
I also increased a bit the mid tones and highlights to match the luminosity of the background layer. All these adjustments are very important because they will give more realism to the scene. If you don’t match your model to the background, you will not get that effect that he’s really sitting in the middle of the city.

Step 5
Probably the most important thing here are shadows. Without shadows this scene is completely unrealistic.
Since the light source is coming from the top left side, I casted the shadows on the right side of the man. I created some shadows on his body as well using a soft brush and Soft Light Blend Mode but the most important are the ground shadows.

Step 6
When you’re dealing with shadows you have to think in 3D and keep in mind where your main light source is. Also look for other shadows that are already in the scene because they can help you establish the direction and opacity of the shadows that you create.
In this case a good clue comes from the trees because you can see that the left sides of the crowns of all of them are highlighted and the right sides are in shadow. That tells me that I should cast my shadows on the man’s right side.
I used multiple layers to create the shadows and then I put them all in a group. The first thing I did was some Overlay shadows using a soft medium brush and low opacity, about 20-30%.

The ground shadows are maybe the most difficult to recreate. I used a soft brush with low opacity and I painted some shadows where I thought they should be. I also tried to mimic the shape of the body in order to get a more realistic look.

Lastly, I casted some shadows over the buildings as well. I used a low opacity soft brush and I painted only the side of the buildings that are facing the man. After painting them I duplicated the layer and changed the Blend Mode to Overlay.

That’s basically it. All that’s left to do now is some general adjustments.
Post Editing
I always like to do that on a separate document which I call post-editing. That way, I preserve the original. So select the entire canvas with the keyboard shortcut Ctrl+A and go to Edit>Copy Merged. Create a new document, paste your copied image and duplicate it just in case.
Step 7
On the post editing stage I added some filters to make the scene more epic, if you will. So make sure you have a copy of your manipulated image and convert it into a Smart Object. To do that right-click the layer on the palette and choose Convert to Smart Object. The reason why I converted this into a smart object is because I applied a Lighting Filter which cannot be undone unless you apply if on smart objects.
Now go to Filters>Render>Lighting Effects and use the settings shown in the image below. Once you apply the filter notice that a smart filter has been created on the layer. That allows you to change the settings of the Lighting filter any time you want as long as you keep the layer as a smart object.

Step 8
The overall color of the scene is given by a gradient map. So create a new gradient map layer from Layer>New Adjustment Layer>Gradient Map or from the layer’s palette icon. Use the gradient shown in the screenshot below, Set Blend Mode to Hard Light and reduce the Opacity to 18%. I also adjusted the colors a bit using a Color Balance adjustment layer and I increased the Saturation to 10.

If you want to reduce the size apply some sharpening after you scale the image down.
Final Result

21.
In this Photoshop tutorial we will show you how to create nice unique photo effect from sketch and your photo. We will use many tools in Photoshop and also you will need some skills in drawing as to create this effect you will need to draw sketch. Also in this tutorial you will be able to learn the Photoshop technique how to use sketch and combine it with a real picture, as a result you will get a very unique and fantastic effect. So lets start to learn.
Final Image Preview

1.Step
Open a new document with (w:900px and h:1355px), and white background.

2.Step
Now open your main image, in this case I used a image of a boy found in Crestock.com. Name this layer "Boy". Now use the tool of your choice to extract the background photo, I used the Pen tool (press P) and created a layer mask to extract the image.When you finish tracing the path around the image click the right mouse button and choose make selection.then in the layers palette click on the Add layer mask button to extract the image.

3.Step
Now use a simple superimposition technique to draw some elements in the composition. Print a copy of the image and use as a base to add some elements to it. Follow the examples of the images below to get an idea of how to do this. There is no rule in this stage, just follow your imagination.


When you are satisfied with the sketches, scan the sketches and open in Photoshop. Position the sketches above "Boy" layer and use Select -> Color range with fuzziness 120 and hit ok to select the black areas of the sketch. If everything is right you have something like this image. Now name this layer sketch.

4.Step
I used this texture of metal to form the background. You can download this texture here or you can get it by download Psd file of this tutorial below. Open the metal texture an place above background layer, name this layer "Texture". Change the blend mode layer to Multiply and opacity to 30%. Use Burn tool (press O) to burn some areas in our texture.

5.Step
Create a new layer below the layer "Boy". Download some water paint brushes and splatter brushes from Deviantart. Use Eyedropper tool (press I), to get a color swatch of the clothing image. Pick a color sample of the shirt, pants and arms. Use different opacities and create a new layer for each color. Then press Ctrl+G and group all brush color tighter, name this group "Body brushes".

6.Step
Return the "Boy" layer and click the Layer mask to hide some areas of the image. This process will integrate the brush and the sketches in the image. Choose a water paint or splatter brush with black color and use different opacity, start paint over the mask to hide some areas.

7.Step
Create a new layer and name "Shadows". Select the Lasso tool (press L) and adjust the feather to 30px. Create a shape on the floor to simulate a shadow. Right click, select Fill to fill with black color.

Then go to Filter -> Blur -> Motion blur (angle 0, distance 999px) and reduce the layer opacity to 40%.

Copy this layer press Ctrl+J and reduce opacity to 30%. In the layers pallet select all shadows layer together and press Ctrl+G to group this layers.

8.Step
Create a new layer, name this layer "Line circles". Select Elliptical marquee tool (press M), hold shift key and draw a perfect circle, then go to Edit -> Stroke: 3px black to color and hit ok.With selection active go to Select -> Transform selection and reduce the size of the circle, use 1px black color this time. Put this layer above "Texture" layer.

Add a layer mask ( click in the layer mask button ) in the layers pallet and hide some areas to create a nice effect. Change color to black and use water paint brushes or splatter brushes with black color and low opacity to hide some areas.

9.Step
Create another layer and name it "Black bars". Select Rectangular marquee tool (press M), and draw some black bars like the image bellow.

Press Ctrl+T and rotate 45 degrees. One more time press layer mask icon in the layers pallet, select color black and use Brush tool to hide some areas.

When you finish reduce layer opacity to 20% or 10%. Then group (press G) "Line circles" and "Black bars" layers together, name this group "Circle effects".

10.Step
Almost done. Create a new layer and call this layer "Black lines". Use Pen tool (press P) and create angles and intersecting lines.

Open brush panel and adjust spacing to 425%, select a hard round brush with black color and 1px, press P to Pen tool right click and choose Stroke path without simulate pressure and hit ok.

Repeat this process in other areas, make some circles too, try make things like angles. Make straight lines and dotted lines on separate layers. Finish this step masking or erase some areas in this lines. Group all black lines layers together.

11.Step
If you want to add a boom box in the composition, follow the steps that were shown above, repeat steps 2 through 6.

12.Step
Last step. Select Eyedropper tool (press I), take a sample of skin color and paint around the eyes. Use low opacity to paint.

Final Result: Hand Drawing Sketch With Photo Effect
In this Photoshop tutorial we will show you how to create nice unique photo effect from sketch and your photo. We will use many tools in Photoshop and also you will need some skills in drawing as to create this effect you will need to draw sketch. Also in this tutorial you will be able to learn the Photoshop technique how to use sketch and combine it with a real picture, as a result you will get a very unique and fantastic effect. So lets start to learn.
Final Image Preview

1.Step
Open a new document with (w:900px and h:1355px), and white background.

2.Step
Now open your main image, in this case I used a image of a boy found in Crestock.com. Name this layer "Boy". Now use the tool of your choice to extract the background photo, I used the Pen tool (press P) and created a layer mask to extract the image.When you finish tracing the path around the image click the right mouse button and choose make selection.then in the layers palette click on the Add layer mask button to extract the image.

3.Step
Now use a simple superimposition technique to draw some elements in the composition. Print a copy of the image and use as a base to add some elements to it. Follow the examples of the images below to get an idea of how to do this. There is no rule in this stage, just follow your imagination.


When you are satisfied with the sketches, scan the sketches and open in Photoshop. Position the sketches above "Boy" layer and use Select -> Color range with fuzziness 120 and hit ok to select the black areas of the sketch. If everything is right you have something like this image. Now name this layer sketch.

4.Step
I used this texture of metal to form the background. You can download this texture here or you can get it by download Psd file of this tutorial below. Open the metal texture an place above background layer, name this layer "Texture". Change the blend mode layer to Multiply and opacity to 30%. Use Burn tool (press O) to burn some areas in our texture.

5.Step
Create a new layer below the layer "Boy". Download some water paint brushes and splatter brushes from Deviantart. Use Eyedropper tool (press I), to get a color swatch of the clothing image. Pick a color sample of the shirt, pants and arms. Use different opacities and create a new layer for each color. Then press Ctrl+G and group all brush color tighter, name this group "Body brushes".

6.Step
Return the "Boy" layer and click the Layer mask to hide some areas of the image. This process will integrate the brush and the sketches in the image. Choose a water paint or splatter brush with black color and use different opacity, start paint over the mask to hide some areas.

7.Step
Create a new layer and name "Shadows". Select the Lasso tool (press L) and adjust the feather to 30px. Create a shape on the floor to simulate a shadow. Right click, select Fill to fill with black color.

Then go to Filter -> Blur -> Motion blur (angle 0, distance 999px) and reduce the layer opacity to 40%.

Copy this layer press Ctrl+J and reduce opacity to 30%. In the layers pallet select all shadows layer together and press Ctrl+G to group this layers.

8.Step
Create a new layer, name this layer "Line circles". Select Elliptical marquee tool (press M), hold shift key and draw a perfect circle, then go to Edit -> Stroke: 3px black to color and hit ok.With selection active go to Select -> Transform selection and reduce the size of the circle, use 1px black color this time. Put this layer above "Texture" layer.

Add a layer mask ( click in the layer mask button ) in the layers pallet and hide some areas to create a nice effect. Change color to black and use water paint brushes or splatter brushes with black color and low opacity to hide some areas.

9.Step
Create another layer and name it "Black bars". Select Rectangular marquee tool (press M), and draw some black bars like the image bellow.

Press Ctrl+T and rotate 45 degrees. One more time press layer mask icon in the layers pallet, select color black and use Brush tool to hide some areas.

When you finish reduce layer opacity to 20% or 10%. Then group (press G) "Line circles" and "Black bars" layers together, name this group "Circle effects".

10.Step
Almost done. Create a new layer and call this layer "Black lines". Use Pen tool (press P) and create angles and intersecting lines.

Open brush panel and adjust spacing to 425%, select a hard round brush with black color and 1px, press P to Pen tool right click and choose Stroke path without simulate pressure and hit ok.

Repeat this process in other areas, make some circles too, try make things like angles. Make straight lines and dotted lines on separate layers. Finish this step masking or erase some areas in this lines. Group all black lines layers together.

11.Step
If you want to add a boom box in the composition, follow the steps that were shown above, repeat steps 2 through 6.

12.Step
Last step. Select Eyedropper tool (press I), take a sample of skin color and paint around the eyes. Use low opacity to paint.

Final Result: Hand Drawing Sketch With Photo Effect

22.

Materials needed
Woman stock – http://mjranum-stock.deviantart.com/art/Bridal-5-113832921
Rose petals – http://two-ladies-stocks.deviantart.com/art/rose-petals-78232247
Pigeon - http://rewston-stock.deviantart.com/art/Wing-stock-14-55600948
Sky – http://www.sxc.hu/photo/478998
Sea - http://www.sxc.hu/photo/838874
Step 1
For this tutorial we are using another stock image from mjranum-stock. Open the model image in photoshop and start extracting the woman from the background. I used the Pen Tool (P) and instead of erasing the background I used a layer mask. After masking the background I reduced the size of the image to 1200×616 pixels.

Step 2
Once you have the background masked, add the sky on a new layer below the girl and adjust its size to fit your canvas. Use a soft brush and erase or mask the lower half like in the image below.

Step 3
Now duplicate the sky or paste it again and apply Gaussian Blur. Try to get something like in the image below. Use a soft brush to blend the edges with the other half of the sky.

Step 4
Use a Levels adjustment layers to increase the woman’s highlights, also increase Saturation and with the help of a Color Balance adjustment layer add blue and cyan (using the sliders) to the highlights and mid-tones.

Step 5
Now you will learn a photoshop technique to make reflections on uneven objects like the dress of this woman. Duplicate the woman layer and flip it vertically. Position it below the original layer and open the Liquify filter from Filter>Liquify…
Use different size brushes inside the filter and drag the dress until it meets the original (make sure you activate the option “View backdrop to see the other layers). After you make the reflection, create a layer mas and use the Gradient Tool (G) or a soft brush to hide the bottom part of the reflection. Also make sure you hide the head on the reflection because in the real world it would not be visible.
Change the layer’s blending mode to Linear Light apply a 1,5px Gaussian Blur and reduce the opacity to about 50%.

Step 6
Use a soft edge brush and 20% opacity and paint some shadows under the woman.

Step 7
Go to the sky layer added on step 2 and and add a Levels and Hue Saturation adjustment layers. On the levels, increase the mid tones (middle slider) to 1,68 and increase the saturation to +37. These two adjustments will make the sky brighter.

Step 8
Open the sea image in photoshop and paste it below the girl and her shadow layers but above the blurred sky that you made on step 3. Use a big soft brush and mask out the image like in the screenshot below. I named this layer pond ripples.

Step 9
The water is way to dark to leave it as it is so I added some adjustment layers to turn it blue and also lighter. The main reason why I added the water is because I wanted to have some natural ripples. I could have done that manually but it would take too long so I went for the easy option.
Add a Levels adjustment layer to the pond ripples and change the blending mode (of the adjustment layer) to Screen. Also add a color adjustment layer (blending mode normal this time) and use the settings shown below. Now I had exactly what I wanted, clear blue water.

Step 10
Open the swan image and subtract it from the background. I used a soft edge brush on the part of the water to blend it nicely. I used a Levels adjustment layers just like I did with the woman to increase the highlights and Color Balance to apply a blue cast.

Step 11
Add the pigeon, decrease its size to about 20% and again use levels to adjust the contrast. This time I used a solid color and blending mode Hue to create the blue color cast on the pigeon.

Step 12
Open the rose petals png in photoshop and grab a few different petals. Paste them over the water, duplicate each one of them and move them down a few pixels to create reflections. Change the duplicated petals blending mode to Soft Light and reduce their opacity to 50%.You will have to increase the saturation and also increase the contrast using Curves or Levels. I also painted some subtle shadows under each petal.

I also wanted to add some rain but it didn’t look very good so I discarded it for this tutorial. You can see how I made all the effects and shadows in the PSD file which you can download below.
I hope you liked the tutorial.

Materials needed
Woman stock – http://mjranum-stock.deviantart.com/art/Bridal-5-113832921
Rose petals – http://two-ladies-stocks.deviantart.com/art/rose-petals-78232247
Pigeon - http://rewston-stock.deviantart.com/art/Wing-stock-14-55600948
Sky – http://www.sxc.hu/photo/478998
Sea - http://www.sxc.hu/photo/838874
Step 1
For this tutorial we are using another stock image from mjranum-stock. Open the model image in photoshop and start extracting the woman from the background. I used the Pen Tool (P) and instead of erasing the background I used a layer mask. After masking the background I reduced the size of the image to 1200×616 pixels.

Step 2
Once you have the background masked, add the sky on a new layer below the girl and adjust its size to fit your canvas. Use a soft brush and erase or mask the lower half like in the image below.

Step 3
Now duplicate the sky or paste it again and apply Gaussian Blur. Try to get something like in the image below. Use a soft brush to blend the edges with the other half of the sky.

Step 4
Use a Levels adjustment layers to increase the woman’s highlights, also increase Saturation and with the help of a Color Balance adjustment layer add blue and cyan (using the sliders) to the highlights and mid-tones.

Step 5
Now you will learn a photoshop technique to make reflections on uneven objects like the dress of this woman. Duplicate the woman layer and flip it vertically. Position it below the original layer and open the Liquify filter from Filter>Liquify…
Use different size brushes inside the filter and drag the dress until it meets the original (make sure you activate the option “View backdrop to see the other layers). After you make the reflection, create a layer mas and use the Gradient Tool (G) or a soft brush to hide the bottom part of the reflection. Also make sure you hide the head on the reflection because in the real world it would not be visible.
Change the layer’s blending mode to Linear Light apply a 1,5px Gaussian Blur and reduce the opacity to about 50%.

Step 6
Use a soft edge brush and 20% opacity and paint some shadows under the woman.

Step 7
Go to the sky layer added on step 2 and and add a Levels and Hue Saturation adjustment layers. On the levels, increase the mid tones (middle slider) to 1,68 and increase the saturation to +37. These two adjustments will make the sky brighter.

Step 8
Open the sea image in photoshop and paste it below the girl and her shadow layers but above the blurred sky that you made on step 3. Use a big soft brush and mask out the image like in the screenshot below. I named this layer pond ripples.

Step 9
The water is way to dark to leave it as it is so I added some adjustment layers to turn it blue and also lighter. The main reason why I added the water is because I wanted to have some natural ripples. I could have done that manually but it would take too long so I went for the easy option.
Add a Levels adjustment layer to the pond ripples and change the blending mode (of the adjustment layer) to Screen. Also add a color adjustment layer (blending mode normal this time) and use the settings shown below. Now I had exactly what I wanted, clear blue water.

Step 10
Open the swan image and subtract it from the background. I used a soft edge brush on the part of the water to blend it nicely. I used a Levels adjustment layers just like I did with the woman to increase the highlights and Color Balance to apply a blue cast.

Step 11
Add the pigeon, decrease its size to about 20% and again use levels to adjust the contrast. This time I used a solid color and blending mode Hue to create the blue color cast on the pigeon.

Step 12
Open the rose petals png in photoshop and grab a few different petals. Paste them over the water, duplicate each one of them and move them down a few pixels to create reflections. Change the duplicated petals blending mode to Soft Light and reduce their opacity to 50%.You will have to increase the saturation and also increase the contrast using Curves or Levels. I also painted some subtle shadows under each petal.

I also wanted to add some rain but it didn’t look very good so I discarded it for this tutorial. You can see how I made all the effects and shadows in the PSD file which you can download below.
I hope you liked the tutorial.
23.

Step 1
Create a new document using the settings shown below.

Step 2
Drag one horizontal and one vertical guide to the center of the canvas. Create a new layer and name it "Side." Grab the Elliptical Marquee Tool, set the Style to Fixed Size and set Width and Height both to 440 px. Make a selection in the center of the canvas. You can do it by Alt-clicking where the guides meet. Fill the selection with 40% gray.

Step 3
Deselect by hitting Command + D. Go to Edit > Free Transform (Command + T.) Set Vertical Scale to 75% and apply. Duplicate the layer and name it "Top." Move the layer 100 pixels up. You can do it by using the arrow keys on the keyboard when the Move Tool is selected. While holding Shift, press the Up Arrow key ten times. Drag another guide from the top ruler and snap it to the middle of the layer. Next, drag two more guides from the left ruler, one for the left edge, the other one for the right.

Step 4
Get the Rectangular Marquee Tool and make a selection, as in the below image. Go to the "Side" layer in the Layers Palette and fill the selection with 40% gray. Deselect by hitting Command + D.

Step 5
Apply a Gradient Overlay Layer Style to "Side" layer with these settings: Blend Mode set to Multiply, Opacity at 50%, Gradient set at black to white, with a style of Linear, Angle set to 180 degrees, and Scale set at 35%. Create a new layer above the "Side" layer and name it "Side Reflection."
Grab the Rectangular Marque Tool and make three rectangular selections, as in the below image. Select the first one, then hold down the Shift key to select the other two. Fill the selection with white. Deselect by hitting Command + D. Go to Filter > Blur > Gaussian Blur and apply with a Radius of 10 pixels. Now we need to clear the excess pixels. Command-click the "Side" layer to load the selection and go to Select > Inverse, then hit Delete to clear. Hit Command + D to deselect.

Step 6
Create another layer above the "Side Reflection" layer and name it "Side Reflection 2." Make two rectangular selections, as in the image below and fill with white. Hit Command + D to Deselect. Go to Filter > Blur > Gaussian Blur and apply with a Radius of 15 pixels. Command-click the "Side" layer thumbnail to load the selection and go to Select > Inverse to inverse the selection. Hit Delete to clear. Hit Command + D to deselect.

Step 7
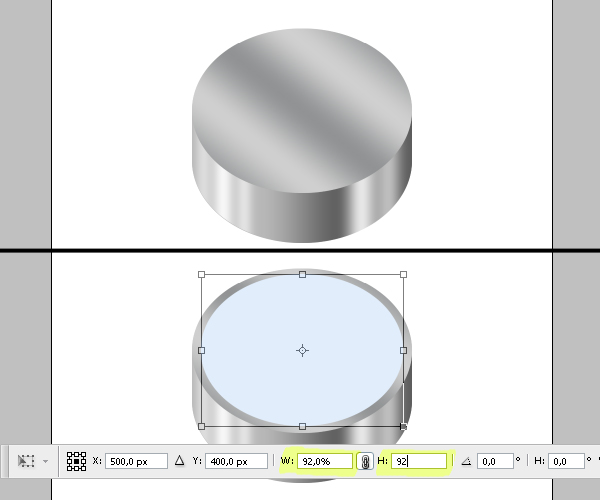
Create a new layer on top of the Layer Stack and name it "Inside." Command-click the "Top" layer thumbnail to load the selection and fill it with the color #e1edfb. Hit Command + D to Deselect. Hit Command + T to enter Free Transform mode and set the Horizontal and Vertical Scales to 92%, then apply.
Step 8
Create another layer above the "Inside" layer and name it "Dial." Command-click the "Inside" layer thumbnail and move the selection 80 pixels down. You can move selections using the arrow keys while the Marquee Tool is selected. While holding down the Shift key, press the Down Arrow key eight times. Fill the selection with white. Deselect by hitting Command + D. We’ll define the "Inside" layer as a Clipping Mask to the "Dial" layer. Alt-click on the line between "Dial" and "Inside" layers in the Layers Palette.

Step 9
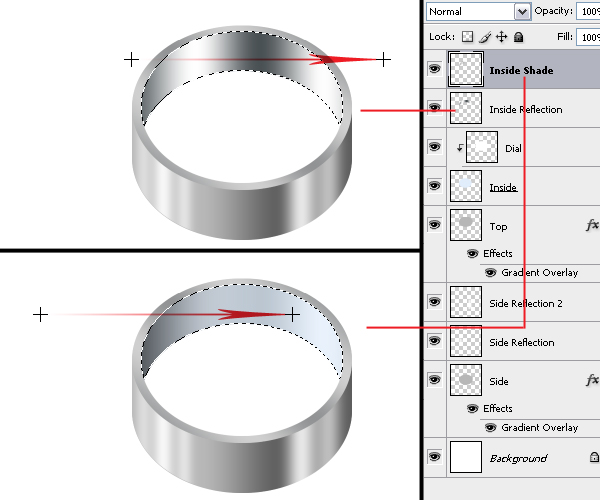
Command-click the "Inside" layer to load the selection, then Alt + Command-click the "Dial" layer to subtract from the selection. Now we have the inside wall selected. Create a new layer above the "Dial" layer and name it "Inside Reflection." Grab the Gradient Tool and pick the Silver preset, which is located in the Metals set. Fill the selection with a gradient, as shown in the image below. Set the layer Blending Mode to Multiply and Opacity at 25%.
Create a new layer at the top and name it "Inside Shade." We’ll use the Gradient Tool again. This time pick Foreground to Transparent preset and set black as your Foreground Color. Fill the selection with the gradient shown in the image below. Hit Command + D to Deselect.
Step 10
Create a new layer on top and name it "Outer Edge." Command-click the "Top" layer to load the selection and fill it with white. Make sure a Marquee Tool is selected and move the selection 1 pixel right and 1 pixel up using the Arrow keys. Now hit Delete to clear. Hit Command + D.
Create a new layer above the "Outer Edge" layer and name it "Inner Edge." Command-click the "Inside" layer and fill the selection with white. Move the selection 1 pixel left and 1 pixel down. Hit Delete to clear, then Deselect.

Step 11
Now we need a dial for our compass. You can draw it in a vector program or in Photoshop. I made one and you can download it here. Just have a look at the image below. The white area is our actual dial. I mirrored some elements in the dial in the blurred area. I thought it would be nice if we can see the reflection on the inner surface of the compass because our compass is reflective, and this area is going to be the reflection.
Open the compass Dial.png. Grab the Elliptical Marquee Tool, set the Style to Normal and make a circular selection, as in the image below. Go to Select > Inverse. Now go to Filter > Blur > Gaussian Blur and apply with a Radius of 2 pixels.

Step 12
Arrange your workspace so that you can see both documents at the same time. Hold down Shift and drag the dial to your Compass document. Holding down the Shift will center the dial to the canvas. Rename this new layer as "Compass Dial" and move this new layer above the "Dial" layer in the Layers Palette.
Hit Command + T, rotate the compass dial 30 degrees, then apply. Command-click the "Compass Dial" layer to load the selection, and go to Select > Inverse. Go to Select > Modify > Feather (in CS2 go to Select > Feather.) Set the Feather Radius to 50 pixels and hit Delete twice. Deselect by hitting Command + D.

Step 13
Hit Command + T and this time set the Vertical Scale to 75%. Now we should put the dial in the right place. Bringing the Layer Opacity down to 50% would help us see the dial and the compass at the same time. The non-blurred area of the dial should overlap with the "Dial" layer. Now bring back the Layer Opacity to 100%.


Step 1
Create a new document using the settings shown below.

Step 2
Drag one horizontal and one vertical guide to the center of the canvas. Create a new layer and name it "Side." Grab the Elliptical Marquee Tool, set the Style to Fixed Size and set Width and Height both to 440 px. Make a selection in the center of the canvas. You can do it by Alt-clicking where the guides meet. Fill the selection with 40% gray.

Step 3
Deselect by hitting Command + D. Go to Edit > Free Transform (Command + T.) Set Vertical Scale to 75% and apply. Duplicate the layer and name it "Top." Move the layer 100 pixels up. You can do it by using the arrow keys on the keyboard when the Move Tool is selected. While holding Shift, press the Up Arrow key ten times. Drag another guide from the top ruler and snap it to the middle of the layer. Next, drag two more guides from the left ruler, one for the left edge, the other one for the right.

Step 4
Get the Rectangular Marquee Tool and make a selection, as in the below image. Go to the "Side" layer in the Layers Palette and fill the selection with 40% gray. Deselect by hitting Command + D.

Step 5
Apply a Gradient Overlay Layer Style to "Side" layer with these settings: Blend Mode set to Multiply, Opacity at 50%, Gradient set at black to white, with a style of Linear, Angle set to 180 degrees, and Scale set at 35%. Create a new layer above the "Side" layer and name it "Side Reflection."
Grab the Rectangular Marque Tool and make three rectangular selections, as in the below image. Select the first one, then hold down the Shift key to select the other two. Fill the selection with white. Deselect by hitting Command + D. Go to Filter > Blur > Gaussian Blur and apply with a Radius of 10 pixels. Now we need to clear the excess pixels. Command-click the "Side" layer to load the selection and go to Select > Inverse, then hit Delete to clear. Hit Command + D to deselect.

Step 6
Create another layer above the "Side Reflection" layer and name it "Side Reflection 2." Make two rectangular selections, as in the image below and fill with white. Hit Command + D to Deselect. Go to Filter > Blur > Gaussian Blur and apply with a Radius of 15 pixels. Command-click the "Side" layer thumbnail to load the selection and go to Select > Inverse to inverse the selection. Hit Delete to clear. Hit Command + D to deselect.

Step 7
Create a new layer on top of the Layer Stack and name it "Inside." Command-click the "Top" layer thumbnail to load the selection and fill it with the color #e1edfb. Hit Command + D to Deselect. Hit Command + T to enter Free Transform mode and set the Horizontal and Vertical Scales to 92%, then apply.
Step 8
Create another layer above the "Inside" layer and name it "Dial." Command-click the "Inside" layer thumbnail and move the selection 80 pixels down. You can move selections using the arrow keys while the Marquee Tool is selected. While holding down the Shift key, press the Down Arrow key eight times. Fill the selection with white. Deselect by hitting Command + D. We’ll define the "Inside" layer as a Clipping Mask to the "Dial" layer. Alt-click on the line between "Dial" and "Inside" layers in the Layers Palette.

Step 9
Command-click the "Inside" layer to load the selection, then Alt + Command-click the "Dial" layer to subtract from the selection. Now we have the inside wall selected. Create a new layer above the "Dial" layer and name it "Inside Reflection." Grab the Gradient Tool and pick the Silver preset, which is located in the Metals set. Fill the selection with a gradient, as shown in the image below. Set the layer Blending Mode to Multiply and Opacity at 25%.
Create a new layer at the top and name it "Inside Shade." We’ll use the Gradient Tool again. This time pick Foreground to Transparent preset and set black as your Foreground Color. Fill the selection with the gradient shown in the image below. Hit Command + D to Deselect.
Step 10
Create a new layer on top and name it "Outer Edge." Command-click the "Top" layer to load the selection and fill it with white. Make sure a Marquee Tool is selected and move the selection 1 pixel right and 1 pixel up using the Arrow keys. Now hit Delete to clear. Hit Command + D.
Create a new layer above the "Outer Edge" layer and name it "Inner Edge." Command-click the "Inside" layer and fill the selection with white. Move the selection 1 pixel left and 1 pixel down. Hit Delete to clear, then Deselect.

Step 11
Now we need a dial for our compass. You can draw it in a vector program or in Photoshop. I made one and you can download it here. Just have a look at the image below. The white area is our actual dial. I mirrored some elements in the dial in the blurred area. I thought it would be nice if we can see the reflection on the inner surface of the compass because our compass is reflective, and this area is going to be the reflection.
Open the compass Dial.png. Grab the Elliptical Marquee Tool, set the Style to Normal and make a circular selection, as in the image below. Go to Select > Inverse. Now go to Filter > Blur > Gaussian Blur and apply with a Radius of 2 pixels.

Step 12
Arrange your workspace so that you can see both documents at the same time. Hold down Shift and drag the dial to your Compass document. Holding down the Shift will center the dial to the canvas. Rename this new layer as "Compass Dial" and move this new layer above the "Dial" layer in the Layers Palette.
Hit Command + T, rotate the compass dial 30 degrees, then apply. Command-click the "Compass Dial" layer to load the selection, and go to Select > Inverse. Go to Select > Modify > Feather (in CS2 go to Select > Feather.) Set the Feather Radius to 50 pixels and hit Delete twice. Deselect by hitting Command + D.

Step 13
Hit Command + T and this time set the Vertical Scale to 75%. Now we should put the dial in the right place. Bringing the Layer Opacity down to 50% would help us see the dial and the compass at the same time. The non-blurred area of the dial should overlap with the "Dial" layer. Now bring back the Layer Opacity to 100%.

Step 14
Command-click the "Dial" layer to load the selection and go to Select > Inverse. Go to Layer > New > Layer via Cut. This will move the selection to a new layer and now our dial and reflection are in separate layers. Rename the new layer as "Dial Reflection." Set the "Dial Reflection" Layer Opacity at 65%.
Go back to "Compass Dial" layer in the Layers Palette and apply an Inner Shadow Layer Style using these settings: Blend Mode of Multiply, Color set to black, Opacity at 30%, Angle set to -125 degrees, Distance set to 100 pixels, and Size set to 5 pixels.
Now apply a Gradient Overlay with these settings: Blend Mode set to Normal, Opacity at 20%, Gradient set at black to white, with a Style of Linear, and Angle set to 55 degrees. Now as you can see in the below image, Alt-click between the "Dial" and "Compass Dial" layers, then do the same thing for the "Compass Dial" and "Dial Reflection" layers.

Step 15
Create a new layer at the top and name it "Needle." Get the rectangular Marquee Tool and make a selection as shown in the image below. Drag three guides from the upper ruler and snap them to the top, center, and the bottom of the selection. Hit Command + D to deselect.
Grab the Polygonal Lasso Tool and make a selection as shown below, fill the selection with the color #dd0000. Get the Rectangular Marque Tool and select the left half of the needle as shown. Go to Image > Adjust > Hue/Saturation (Command + U) and set Saturation to -100 and Lightness to +80. Deselect by hitting Command + D.

Step 16
Move the needle down as in the below image and hit Command + T. Set the Vertical and Horizontal Scales both to 70%, Rotation to -30 degrees, then apply. Hit Command + T again and this time set Vertical Scale to 75%.

Step 17
Apply a Gradient Overlay to the "Needle" layer using these settings: Blend Mode set to Overlay, Opacity at 100%, Gradient set at Silver (which is in the Metals set), with a Style of Linear, Angle set to 0 degrees, and Scale set at 90%.
Create a new layer below the "Needle" and name it "Needle Shadow." Command-click the "Needle" layer and fill the selection with black. Hit Command + D to deselect. Move the layer 20 pixels down. Go to Filter > Blur > Gaussian Blur and apply with a Radius of 7 pixels. Set the Layer Opacity at 70%.

Step 18
Get the Elliptical Marquee Tool. Set the Style to Normal and make a circular selection, as in the below image. Create a new layer at the top of the layer stack and name it "Pin." Fill the selection with 40% gray. Hit Command + T and set the Vertical Scale to 75%. Deselect by hitting Command + D. Duplicate the "Pin" layer and move it up 1 pixel.
Duplicate the "Pin copy" layer and move it 1 pixel up and repeat duplicating and moving up until you reach "Pin copy 4" and move it up one 1 pixel. Rename the "Pin copy 4" layer as "Pin Top." Select all the pin layers except the "Pin Top" layer, as shown in the below image, then merge them. Name the merged layer "Pin Side."

Step 19
Apply a Gradient Overlay to the "Pin Side" layer using these settings: Blend Mode set to Overlay, Opacity at 90%, Gradient set at Silver, with a Style of Linear, and Angle set to 0 degrees. Apply a Gradient Overlay to the "PinTop" layer as well and use these settings: Blend Mode set to Normal, Opacity at 30%, Gradient set at Silver, with a Style of Linear, and Angle set to -10 degrees.

Step 20
Create a new layer above the "Needle" layer and name it "Pin Shadow." Command-click the "Pint Top" layer and fill the selection with black. Hit Command + D to deselect. Move the layer 4 pixels down and go to Filter > Blur > Gaussian Blur, then apply with a Radius of 2 pixels. Set the Layer Opacity to 70%.

Step 21
Now we’ll make the glass. Create a new layer on top and name it "Glass." Command-click the "Inside" layer thumbnail. Fill the selection with white. Deselect by hitting Command + D. Move the layer 15 pixels down and apply an Inner Glow layer Style using these settings: Blend Mode of Multiply, Opacity set at 60%, and Color set to black. Set "Glass" layer Blending Mode to Multiply and Opacity at 30%. Command-click the "Inside" layer thumbnail to load the selection. Go to Select > Inverse and hit Delete to clear, then go ahead and Deselect.

Step 22
Create a new layer above the "Glass" layer and name it "Glass Ref 1." Command-click the "Inside" layer to load the selection. Grab the Gradient Tool. Pick the Foreground to Transparent preset, set it to Radial Gradient and pick white as your Foreground Color. Fill the selection with a gradient, as shown below. Hit Command + D to deselect, then move the layer 30 pixels down.

Step 23
Command-click the "Glass" layer to load the selection. Create a new layer and name it "Glass Ref 2." Fill the selection with the gradient, as shown below, and use the previous step’s settings. Then hit Command + D to deselect.

Step 24
Go to the "Compass Dial" layer in the Layers Palette and hit Command + U to bring up the Hue/Saturation dialog. Check Colorize, set the Hue to 200, Saturation to 50, Lightness to -8, and hit OK. Now go to the "Dial Reflection" layer and hit Command + U once again. Set Hue to 200, Saturation to 50, Lightness to -3, and check Colorize.

Step 25
Create a new layer on top and name it "Bottom." Command-click the "Top" layer to load the selection. Grab the Gradient Tool, pick the Silver preset, set it to Linear, and fill the layer with the gradient, as shown below. Hit Command + D to deselect.
Now select all layers except the "Background" and the"Bottom" layers and go to Layer > Merge Layers (Command + E). Rename the merged layer as "Compass." Duplicate the "Compass" layer, then duplicate the "Bottom" layer. Select the "Compass copy" and "Bottom" layers in the Layers Palette and merge them. Name the merged layer as "Reflection." Rename the "Bottom copy" layer as "Shadow." Arrange the layer order as shown in the below image.

Step 26
Move the "Shadow" and "Reflection" layers down and place as shown. Select the "Shadow" layer in the Layers Palette and go to Image > Adjustments > Hue/Saturation (Command + U). Set the Lightness to -100. Go to Filter > Blur > Gaussian Blur and apply with a Radius of 45 pixels. Set the layer Opacity at 70%. Go to the "Reflection" layer and apply a Gaussian Blur filter with a Radius of 4 pixels, then set the layer Opacity at 30%.

Conclusion
Now our compass icon is ready! Again I applied that blueish gradient background to my image. That’s the end of another icon tutorial. Hope you liked it and had fun!
Command-click the "Dial" layer to load the selection and go to Select > Inverse. Go to Layer > New > Layer via Cut. This will move the selection to a new layer and now our dial and reflection are in separate layers. Rename the new layer as "Dial Reflection." Set the "Dial Reflection" Layer Opacity at 65%.
Go back to "Compass Dial" layer in the Layers Palette and apply an Inner Shadow Layer Style using these settings: Blend Mode of Multiply, Color set to black, Opacity at 30%, Angle set to -125 degrees, Distance set to 100 pixels, and Size set to 5 pixels.
Now apply a Gradient Overlay with these settings: Blend Mode set to Normal, Opacity at 20%, Gradient set at black to white, with a Style of Linear, and Angle set to 55 degrees. Now as you can see in the below image, Alt-click between the "Dial" and "Compass Dial" layers, then do the same thing for the "Compass Dial" and "Dial Reflection" layers.

Step 15
Create a new layer at the top and name it "Needle." Get the rectangular Marquee Tool and make a selection as shown in the image below. Drag three guides from the upper ruler and snap them to the top, center, and the bottom of the selection. Hit Command + D to deselect.
Grab the Polygonal Lasso Tool and make a selection as shown below, fill the selection with the color #dd0000. Get the Rectangular Marque Tool and select the left half of the needle as shown. Go to Image > Adjust > Hue/Saturation (Command + U) and set Saturation to -100 and Lightness to +80. Deselect by hitting Command + D.

Step 16
Move the needle down as in the below image and hit Command + T. Set the Vertical and Horizontal Scales both to 70%, Rotation to -30 degrees, then apply. Hit Command + T again and this time set Vertical Scale to 75%.

Step 17
Apply a Gradient Overlay to the "Needle" layer using these settings: Blend Mode set to Overlay, Opacity at 100%, Gradient set at Silver (which is in the Metals set), with a Style of Linear, Angle set to 0 degrees, and Scale set at 90%.
Create a new layer below the "Needle" and name it "Needle Shadow." Command-click the "Needle" layer and fill the selection with black. Hit Command + D to deselect. Move the layer 20 pixels down. Go to Filter > Blur > Gaussian Blur and apply with a Radius of 7 pixels. Set the Layer Opacity at 70%.

Step 18
Get the Elliptical Marquee Tool. Set the Style to Normal and make a circular selection, as in the below image. Create a new layer at the top of the layer stack and name it "Pin." Fill the selection with 40% gray. Hit Command + T and set the Vertical Scale to 75%. Deselect by hitting Command + D. Duplicate the "Pin" layer and move it up 1 pixel.
Duplicate the "Pin copy" layer and move it 1 pixel up and repeat duplicating and moving up until you reach "Pin copy 4" and move it up one 1 pixel. Rename the "Pin copy 4" layer as "Pin Top." Select all the pin layers except the "Pin Top" layer, as shown in the below image, then merge them. Name the merged layer "Pin Side."

Step 19
Apply a Gradient Overlay to the "Pin Side" layer using these settings: Blend Mode set to Overlay, Opacity at 90%, Gradient set at Silver, with a Style of Linear, and Angle set to 0 degrees. Apply a Gradient Overlay to the "PinTop" layer as well and use these settings: Blend Mode set to Normal, Opacity at 30%, Gradient set at Silver, with a Style of Linear, and Angle set to -10 degrees.

Step 20
Create a new layer above the "Needle" layer and name it "Pin Shadow." Command-click the "Pint Top" layer and fill the selection with black. Hit Command + D to deselect. Move the layer 4 pixels down and go to Filter > Blur > Gaussian Blur, then apply with a Radius of 2 pixels. Set the Layer Opacity to 70%.

Step 21
Now we’ll make the glass. Create a new layer on top and name it "Glass." Command-click the "Inside" layer thumbnail. Fill the selection with white. Deselect by hitting Command + D. Move the layer 15 pixels down and apply an Inner Glow layer Style using these settings: Blend Mode of Multiply, Opacity set at 60%, and Color set to black. Set "Glass" layer Blending Mode to Multiply and Opacity at 30%. Command-click the "Inside" layer thumbnail to load the selection. Go to Select > Inverse and hit Delete to clear, then go ahead and Deselect.

Step 22
Create a new layer above the "Glass" layer and name it "Glass Ref 1." Command-click the "Inside" layer to load the selection. Grab the Gradient Tool. Pick the Foreground to Transparent preset, set it to Radial Gradient and pick white as your Foreground Color. Fill the selection with a gradient, as shown below. Hit Command + D to deselect, then move the layer 30 pixels down.

Step 23
Command-click the "Glass" layer to load the selection. Create a new layer and name it "Glass Ref 2." Fill the selection with the gradient, as shown below, and use the previous step’s settings. Then hit Command + D to deselect.

Step 24
Go to the "Compass Dial" layer in the Layers Palette and hit Command + U to bring up the Hue/Saturation dialog. Check Colorize, set the Hue to 200, Saturation to 50, Lightness to -8, and hit OK. Now go to the "Dial Reflection" layer and hit Command + U once again. Set Hue to 200, Saturation to 50, Lightness to -3, and check Colorize.

Step 25
Create a new layer on top and name it "Bottom." Command-click the "Top" layer to load the selection. Grab the Gradient Tool, pick the Silver preset, set it to Linear, and fill the layer with the gradient, as shown below. Hit Command + D to deselect.
Now select all layers except the "Background" and the"Bottom" layers and go to Layer > Merge Layers (Command + E). Rename the merged layer as "Compass." Duplicate the "Compass" layer, then duplicate the "Bottom" layer. Select the "Compass copy" and "Bottom" layers in the Layers Palette and merge them. Name the merged layer as "Reflection." Rename the "Bottom copy" layer as "Shadow." Arrange the layer order as shown in the below image.

Step 26
Move the "Shadow" and "Reflection" layers down and place as shown. Select the "Shadow" layer in the Layers Palette and go to Image > Adjustments > Hue/Saturation (Command + U). Set the Lightness to -100. Go to Filter > Blur > Gaussian Blur and apply with a Radius of 45 pixels. Set the layer Opacity at 70%. Go to the "Reflection" layer and apply a Gaussian Blur filter with a Radius of 4 pixels, then set the layer Opacity at 30%.

Conclusion
Now our compass icon is ready! Again I applied that blueish gradient background to my image. That’s the end of another icon tutorial. Hope you liked it and had fun!

 R+
R+

Similar threads

- Replies
- 3
- Views
- 247

- Replies
- 14
- Views
- 300

- Replies
- 1
- Views
- 213