


Latest ads
-
🎮 INDIAN PSN GIFT CARDS AVAILABLE NOW! 🎮
- madukaperera
- Updated:
-
 🚀 Google AI PRO – 18 Months | Rs. 850 Only
- lkkolla
- Updated:
-
 🔒 NordVPN Premium – 3 Months
- hrdilshan
- Updated:
-
 🚀 Microsoft Office 365 Pro Plus – Lifetime Access! 🚀
- hrdilshan
- Updated:
Photoshop Trix To You My Friend .....
- Thread starter creativeN
- Start date
You are using an out of date browser. It may not display this or other websites correctly.
You should upgrade or use an alternative browser.
You should upgrade or use an alternative browser.


Download and install a swirls Photoshop brush. We used Swirls and Circles by BSILVIA. Or, you can browse for swirl brushes on Brusheezy. Once you’ve picked your Photoshop brush, load it into Photoshop.

Step 15 - Making Floor with Design
Now we are going to create a floor design for the image to show that the 3D text is on the floor. For that you need to Create a new layer, select the brush that you’d like to use, then paint it on this new layer. Choose Edit > Transform > Perspective then transform the swirl so that it matches the perspective of the text like the image below.

Step 16 - Making of Plants & roots
machan swirl 1 transform wennane help 1k dennako....

Step 15 - Making Floor with Design
Now we are going to create a floor design for the image to show that the 3D text is on the floor. For that you need to Create a new layer, select the brush that you’d like to use, then paint it on this new layer. Choose Edit > Transform > Perspective then transform the swirl so that it matches the perspective of the text like the image below.

Step 16 - Making of Plants & roots
machan swirl 1 transform wennane help 1k dennako....
Photoshop CS3 Use karannaDownload and install a swirls Photoshop brush. We used Swirls and Circles by BSILVIA. Or, you can browse for swirl brushes on Brusheezy. Once you’ve picked your Photoshop brush, load it into Photoshop.
Step 15 - Making Floor with Design
Now we are going to create a floor design for the image to show that the 3D text is on the floor. For that you need to Create a new layer, select the brush that you’d like to use, then paint it on this new layer. Choose Edit > Transform > Perspective then transform the swirl so that it matches the perspective of the text like the image below.
Step 16 - Making of Plants & roots
machan swirl 1 transform wennane help 1k dennako....


u r a god 4 me brother.. awesome..
can ya plz tel me z there any picture tutorials like this in Internet?? whr i can find them?
thankz dude.. \m/ \m/ \m/
can ya plz tel me z there any picture tutorials like this in Internet?? whr i can find them?
thankz dude.. \m/ \m/ \m/
niyamai
Thanx
u r a god 4 me brother.. awesome..
can ya plz tel me z there any picture tutorials like this in Internet?? whr i can find them?
thankz dude.. \m/ \m/ \m/

Thanx


♥-Aurora-♥;8615442 said:natho!!
Good work machn...
Keep it up.....
Thanx ////

24.
1. Basic Shapes
Start making the basic shapes of the iTune icon. If you need help on how to trace from an image, visit my Tracing Photo tutorial.

2. Music Note
Make a glossy orb by using my Glossy Button technique. First, make 3 shapes from light color to dark color. Go to Object > Blend > Blend Options, select Specified Steps = 128. Then select all 3 shapes and press Ctrl + Alt + B or go to Object > Blend > Make.

Reflection
Make an oval shape and fill with black-white gradient. Make sure the black color is full black (C,M,Y,K=100). Drag it on top of the orb and select Screen Blending Mode.

Highlights
Make a tall vertical rectangle and an elongate circle; then Blend it. Duplicate it by Alt-drag to the right.

Make a 3 color gradient path.

Make another highlight using the same Blending technique as in the previous step and select Screen Blending Mode.

3. CD
Use the Gradient tool and fill the CD shapes with white-grey gradient.

Rainbow Gradient
Make some multi-color line strokes as shown below. Make sure the first and last stroke is white because it will be transparent. Use the Blend Tool (W), click on the edge of each stroke starting from left to right.

Mask
Use the CD shape and mask the rainbow gradient by Ctrl+7 or Object > Clipping Mask > Make. Then select Multiply Blending Mode and adjust the Opacity to 26%.

Repeat the previous step to make another rainbow gradient.

4. Music Note Refection
Make 3 oval paths, make sure the outer path is white color(this will make a glow effect). Select all 3 paths, go to Object > Blend > Make (Ctl+Alt+B).

Drag it below the music note and select Multiply Blending Mode , 37% Opacity. Duplicate the refection object by Alt-drag to the right side.

5. Drop Shadow
The last step is to apply a Drop Shadow effect to the CD. Select the outer CD path, go to Effect > Stylize > Drop Shadow and apply the following setting:

Final
Here is the final iTune icon!

1. Basic Shapes
Start making the basic shapes of the iTune icon. If you need help on how to trace from an image, visit my Tracing Photo tutorial.

2. Music Note
Make a glossy orb by using my Glossy Button technique. First, make 3 shapes from light color to dark color. Go to Object > Blend > Blend Options, select Specified Steps = 128. Then select all 3 shapes and press Ctrl + Alt + B or go to Object > Blend > Make.

Reflection
Make an oval shape and fill with black-white gradient. Make sure the black color is full black (C,M,Y,K=100). Drag it on top of the orb and select Screen Blending Mode.

Highlights
Make a tall vertical rectangle and an elongate circle; then Blend it. Duplicate it by Alt-drag to the right.

Make a 3 color gradient path.

Make another highlight using the same Blending technique as in the previous step and select Screen Blending Mode.

3. CD
Use the Gradient tool and fill the CD shapes with white-grey gradient.

Rainbow Gradient
Make some multi-color line strokes as shown below. Make sure the first and last stroke is white because it will be transparent. Use the Blend Tool (W), click on the edge of each stroke starting from left to right.

Mask
Use the CD shape and mask the rainbow gradient by Ctrl+7 or Object > Clipping Mask > Make. Then select Multiply Blending Mode and adjust the Opacity to 26%.

Repeat the previous step to make another rainbow gradient.

4. Music Note Refection
Make 3 oval paths, make sure the outer path is white color(this will make a glow effect). Select all 3 paths, go to Object > Blend > Make (Ctl+Alt+B).

Drag it below the music note and select Multiply Blending Mode , 37% Opacity. Duplicate the refection object by Alt-drag to the right side.

5. Drop Shadow
The last step is to apply a Drop Shadow effect to the CD. Select the outer CD path, go to Effect > Stylize > Drop Shadow and apply the following setting:

Final
Here is the final iTune icon!

Last edited:
25.
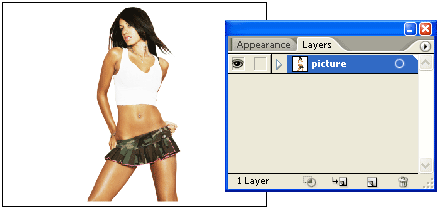
1. Import a Picture
Find a beautiful photo that you would like to use for your artwork. Place it in Illustrator by File > Place. Then lock the layer.
2. Base Paths
Make a new layer, ‘base paths’. Use the Pen tool, cover the clothes with white paths.

3. Envelope Text Distortion
Copy all white paths from ‘base paths’ layer and paste it in a new layer. If you want, you can just duplicate the ‘base paths’ layer. Now use the Type tool to type in your text message and send it to back (note: your text must be sit below the shape). Then select the text object and the shirt path, go to Object > Envelope Distort > Make with Top Object or press Ctrl+Alt+C. This will distort the text with the selected shape.

Repeat this step to make the envelope text distortion for the skirt.

Skirt
For the skirt text objects, rotate it to 90 degree.

Don’t forget to use the short cut keys. It will save you a lot of time. Just select the shape and text, and press Ctrl+Alt+C.

Final
Now you can add some design elements in the background to spice up the artwork.

1. Import a Picture
Find a beautiful photo that you would like to use for your artwork. Place it in Illustrator by File > Place. Then lock the layer.
2. Base Paths
Make a new layer, ‘base paths’. Use the Pen tool, cover the clothes with white paths.

3. Envelope Text Distortion
Copy all white paths from ‘base paths’ layer and paste it in a new layer. If you want, you can just duplicate the ‘base paths’ layer. Now use the Type tool to type in your text message and send it to back (note: your text must be sit below the shape). Then select the text object and the shirt path, go to Object > Envelope Distort > Make with Top Object or press Ctrl+Alt+C. This will distort the text with the selected shape.

Repeat this step to make the envelope text distortion for the skirt.

Skirt
For the skirt text objects, rotate it to 90 degree.

Don’t forget to use the short cut keys. It will save you a lot of time. Just select the shape and text, and press Ctrl+Alt+C.

Final
Now you can add some design elements in the background to spice up the artwork.


26.
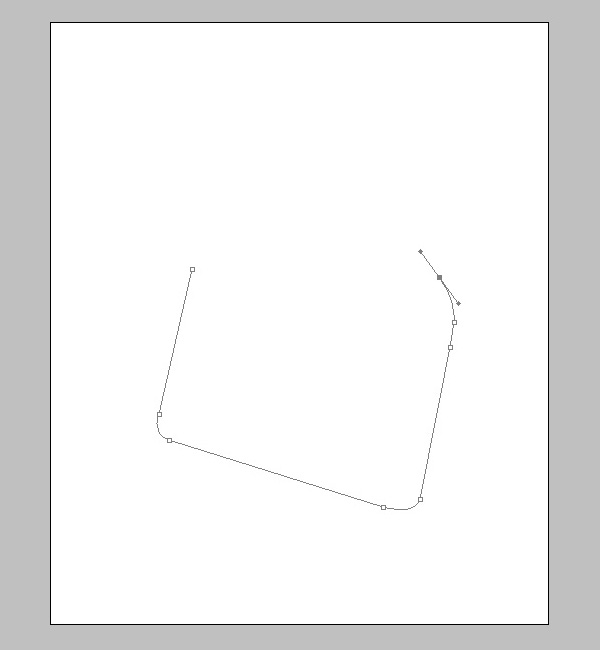
Step 1: Create a new document
Create a new document in Photoshop and fill it with white. Create a new layer and use the Pen Tool (P) to create the shape of the envelope. Then press Command + Enter to transform the path into a selection.
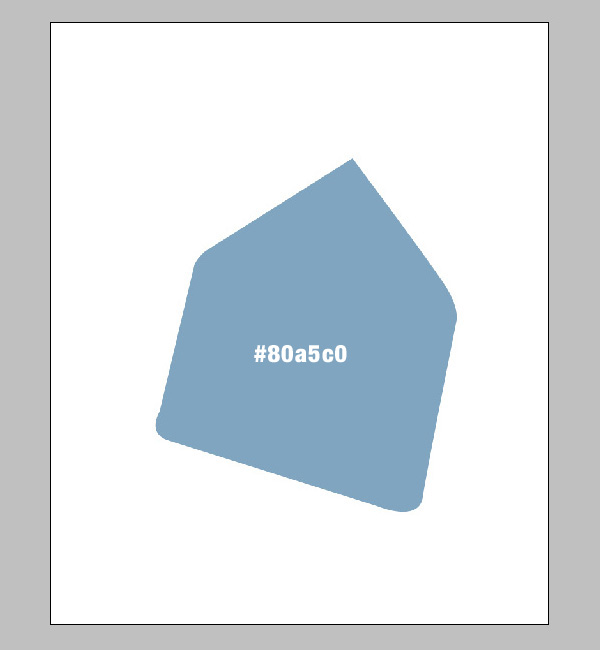
Step 2: Apply Color
Fill the selection with this color #80a5c0 using the Paint Bucket Tool (G).
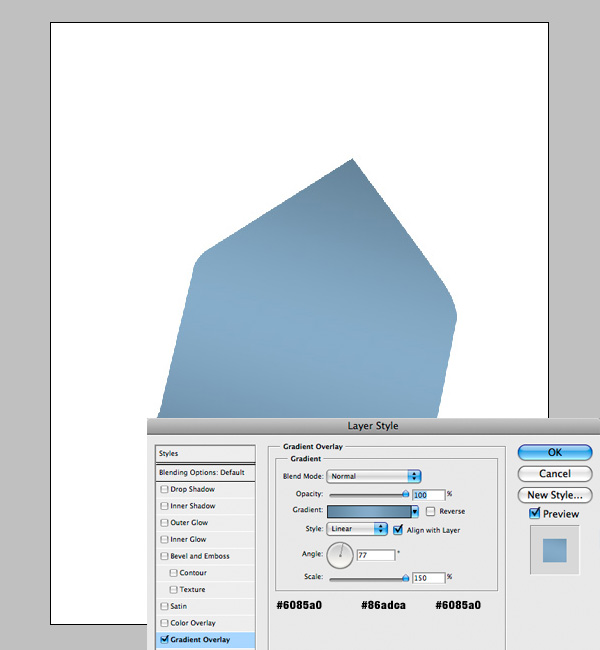
Step 3: Apply Gradient
Double click on the layer to activate the Blending Options and apply a Gradient Overlay like below.
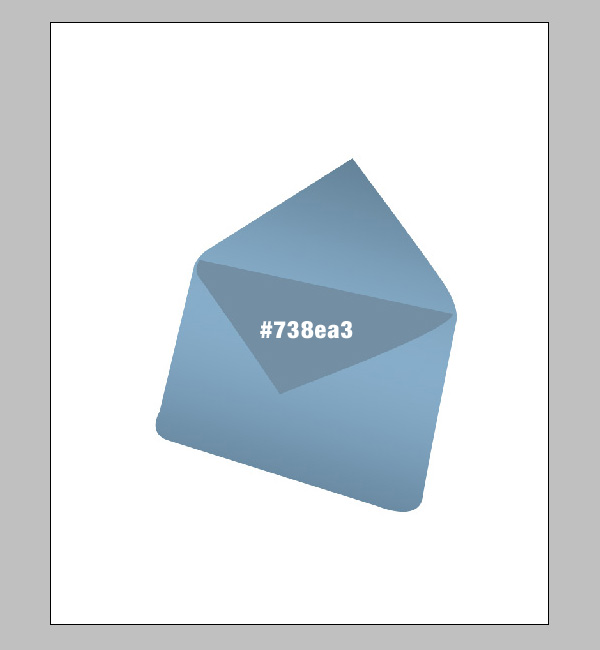
Step 4: Envelope interior
Now you need to create a new layer and create a new shape like below. Fill the shape with #738ea3.
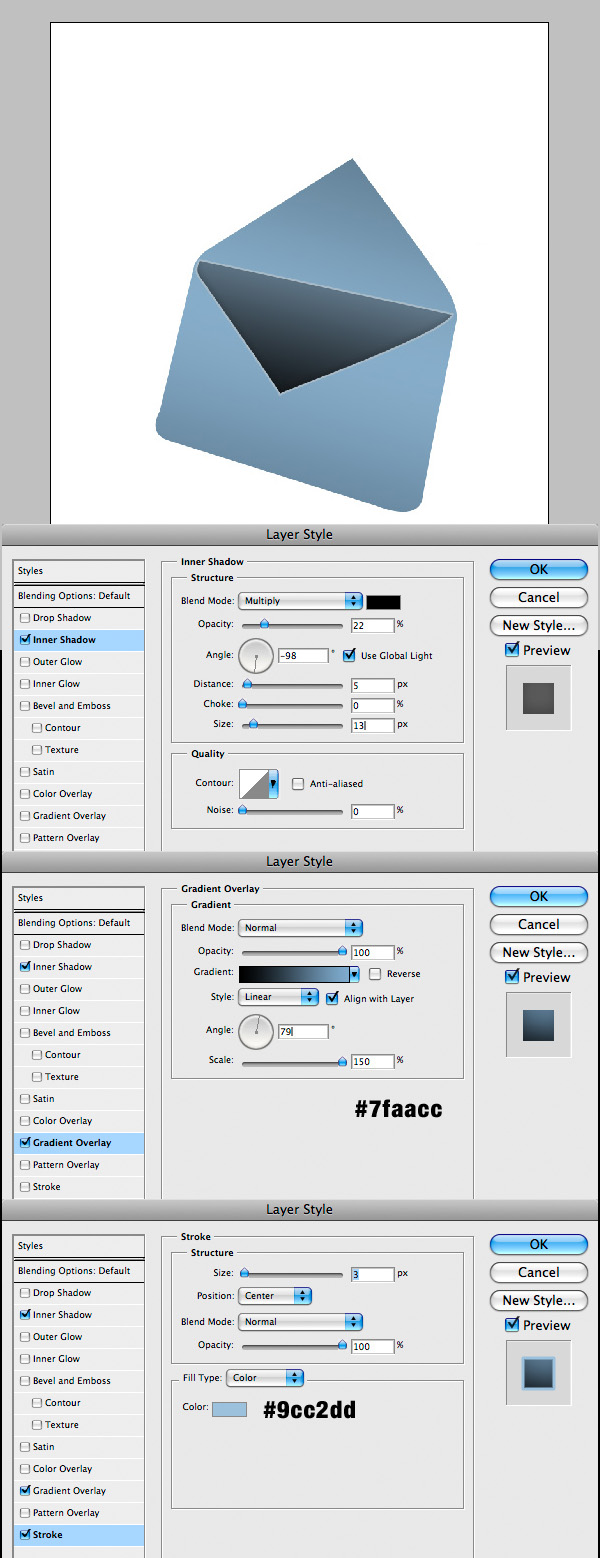
Step 5
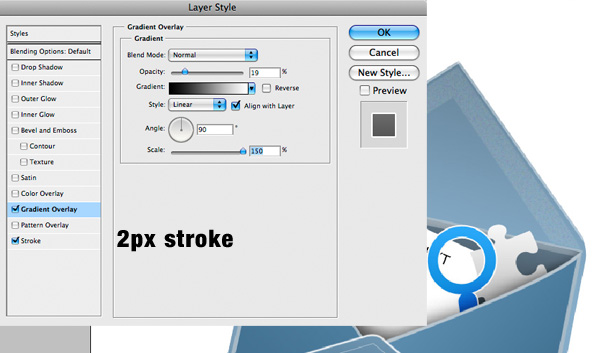
Double click on the layer you have just created and apply an Inner Shadow, Gradient Overlay and a Stroke to the layer.
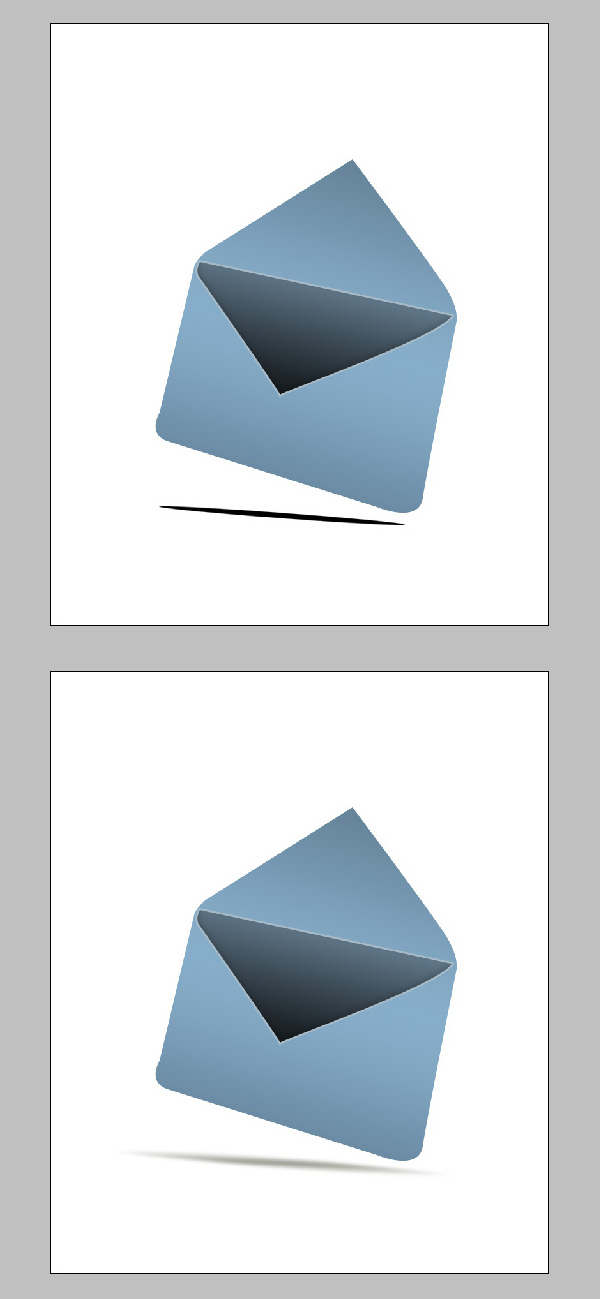
Step 6: Add Shadow
To add the shadow below the envelope you need to use the Elliptical Marquee Tool (M) and create a black shape like below. Then go to Filter Blur Gaussian Blur and use 3,8. This effect will make the envelope look like it is floating.
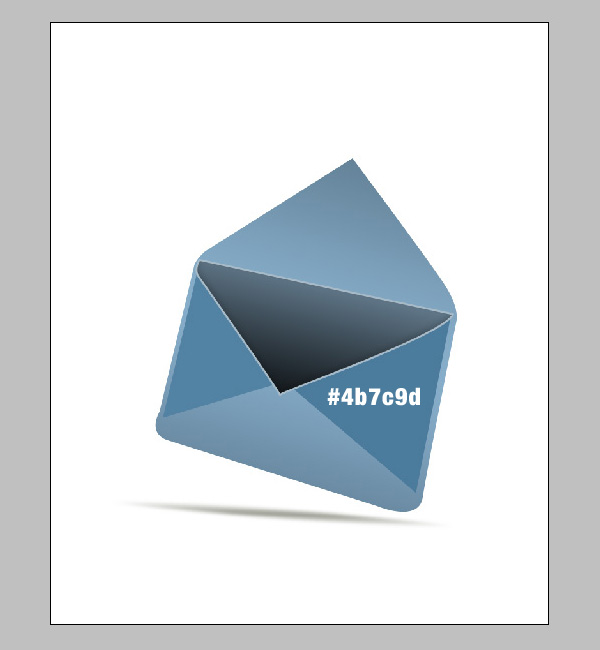
Step 7
Create another new layer and create a shape like below then fill it with #4b7c9d. Next double click on the layer and add a Gradient Overlay.
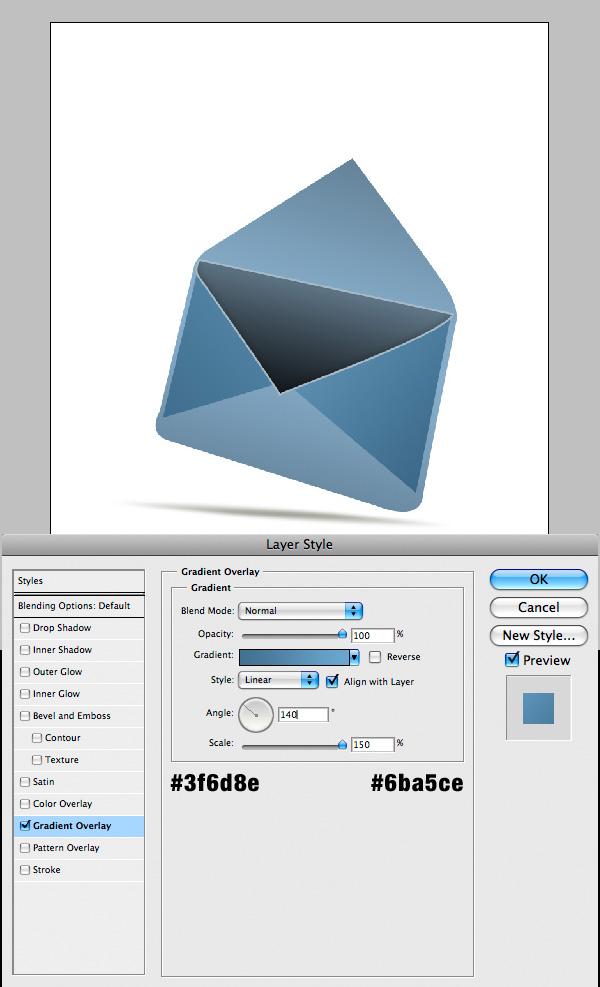
Step 8
Create the lower part of the envelope and add a Gradient Overlay like below.
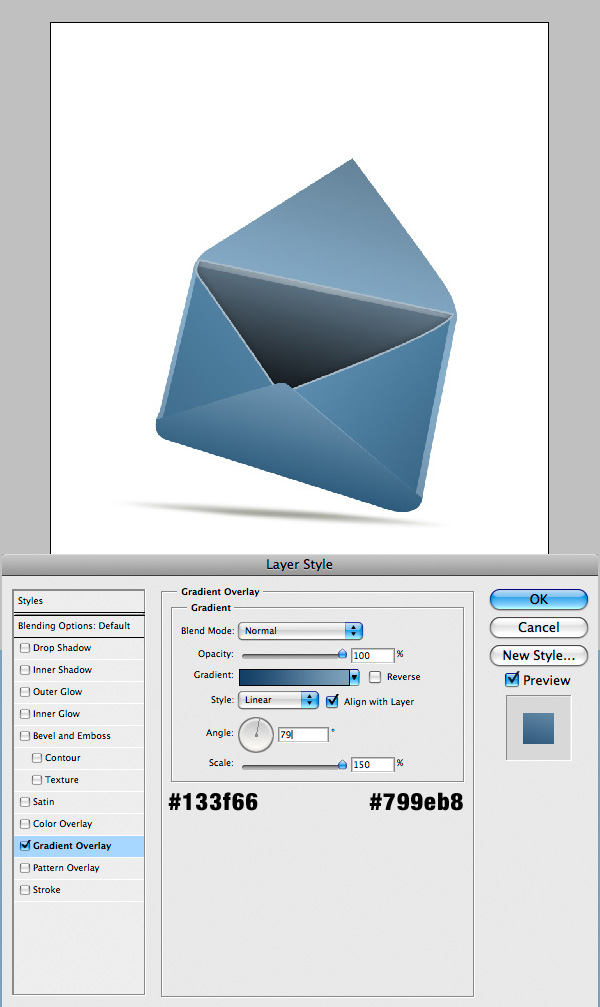
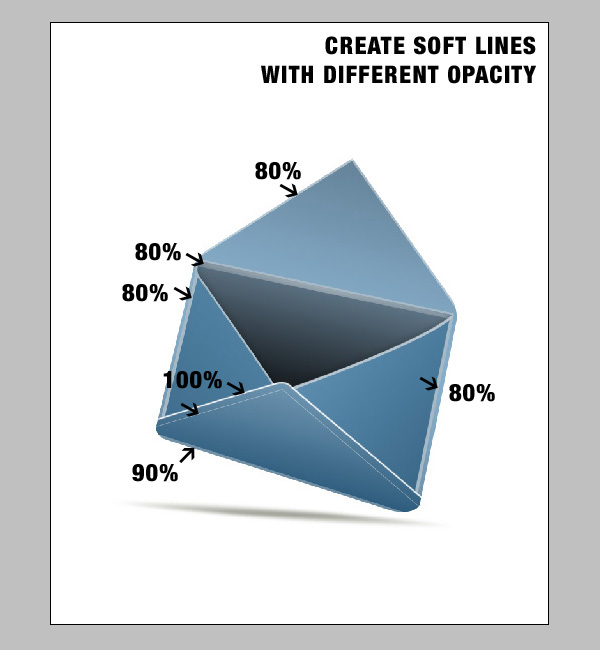
Step 9: Lines
Create a new layer for each line you create. You will create these lines using the Line Tool (U) set to white and different weights. Also you will change the Opacity of each as you wish.
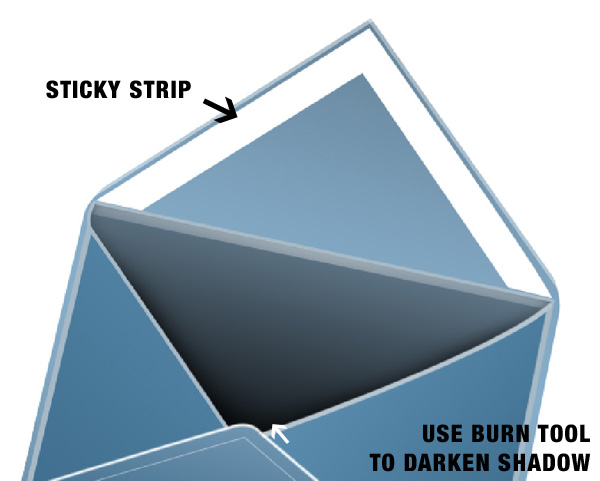
Step 10: Sticky strip
Start creating the sticky strip of the envelope. Create a new layer then use the Pen Tool (P) to create the shape below and fill the layer with white.
Step 11: Strip texture
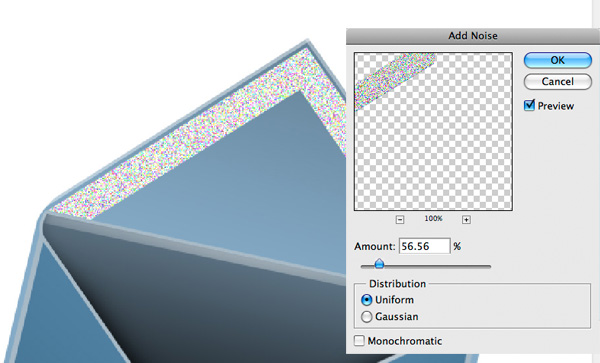
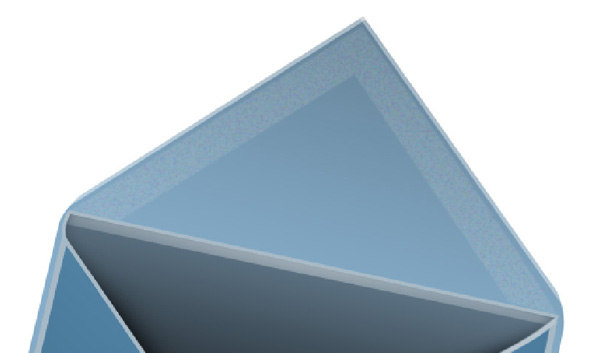
To create the strip texture you need to make sure you have the white strip layer selected and go to Filter > Noise > Add Noise and set the Noise to 56,56; Uniform and deselect Monochromatic. In the end set the layer to Opacity 15%.
Step 12: Elements
Now it is time to add the elements inside the envelope. Start with a piece of paper. Create a new layer and place it over the envelope like below then create the shape using the Polygonal Lasso Tool (L) and fill it with white. You must create another layer above this shape and use a black brush to create the shadow that is going to be above the inside elements.

Step 13
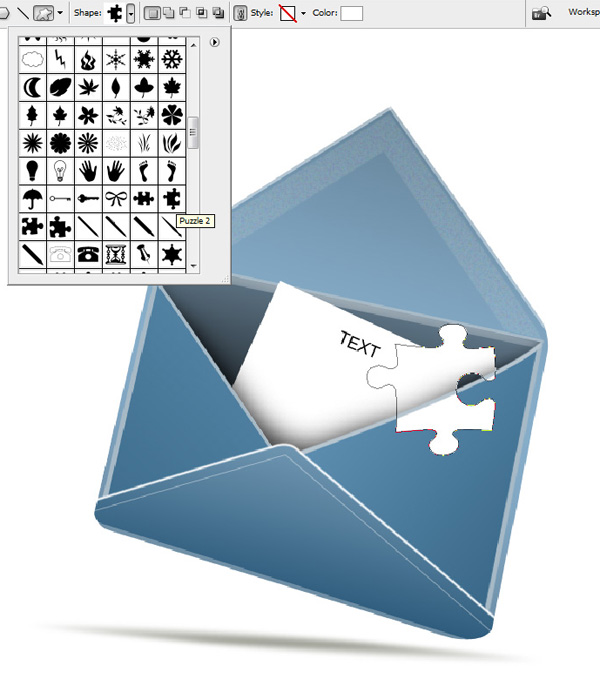
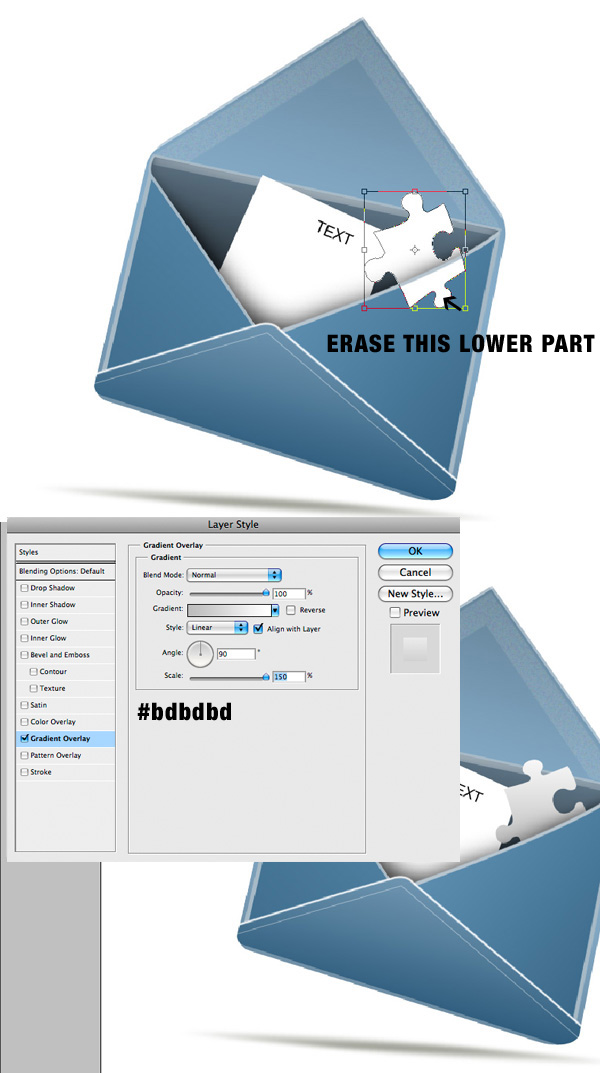
Create another shape. This time use the Custom Shape Tool (U) and in the shape list search for the puzzle shape. When you find it place it onto the screen, use the Transform Tool to distort the element then add a simple gradient like below.
Step 14
Create another shape as you did in step 13 but this time select from the list the magnifying glass. Apply the shape and fill it with #2ea7fa. Also apply a smooth Gradient Overlay.
Step 1: Create a new document
Create a new document in Photoshop and fill it with white. Create a new layer and use the Pen Tool (P) to create the shape of the envelope. Then press Command + Enter to transform the path into a selection.
Step 2: Apply Color
Fill the selection with this color #80a5c0 using the Paint Bucket Tool (G).
Step 3: Apply Gradient
Double click on the layer to activate the Blending Options and apply a Gradient Overlay like below.
Step 4: Envelope interior
Now you need to create a new layer and create a new shape like below. Fill the shape with #738ea3.
Step 5
Double click on the layer you have just created and apply an Inner Shadow, Gradient Overlay and a Stroke to the layer.
Step 6: Add Shadow
To add the shadow below the envelope you need to use the Elliptical Marquee Tool (M) and create a black shape like below. Then go to Filter Blur Gaussian Blur and use 3,8. This effect will make the envelope look like it is floating.
Step 7
Create another new layer and create a shape like below then fill it with #4b7c9d. Next double click on the layer and add a Gradient Overlay.
Step 8
Create the lower part of the envelope and add a Gradient Overlay like below.
Step 9: Lines
Create a new layer for each line you create. You will create these lines using the Line Tool (U) set to white and different weights. Also you will change the Opacity of each as you wish.
Step 10: Sticky strip
Start creating the sticky strip of the envelope. Create a new layer then use the Pen Tool (P) to create the shape below and fill the layer with white.
Step 11: Strip texture
To create the strip texture you need to make sure you have the white strip layer selected and go to Filter > Noise > Add Noise and set the Noise to 56,56; Uniform and deselect Monochromatic. In the end set the layer to Opacity 15%.
Step 12: Elements
Now it is time to add the elements inside the envelope. Start with a piece of paper. Create a new layer and place it over the envelope like below then create the shape using the Polygonal Lasso Tool (L) and fill it with white. You must create another layer above this shape and use a black brush to create the shadow that is going to be above the inside elements.
Step 13
Create another shape. This time use the Custom Shape Tool (U) and in the shape list search for the puzzle shape. When you find it place it onto the screen, use the Transform Tool to distort the element then add a simple gradient like below.
Step 14
Create another shape as you did in step 13 but this time select from the list the magnifying glass. Apply the shape and fill it with #2ea7fa. Also apply a smooth Gradient Overlay.

Step 15
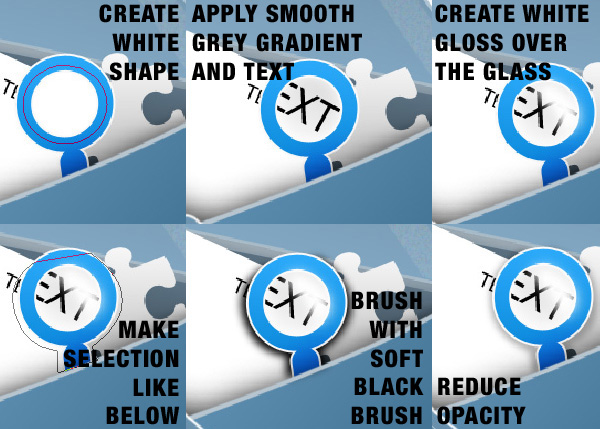
Create a magnifying effect. Simply create a new layer and place it below the magnifying glass layer. The layer should be white with a soft grey gradient. Then add the text “text” and erase a part of it to make it look like it is magnified. Next you need to add a soft white gloss to make it look like a glass. In the end add the shadow by creating a new layer below all these and applying a soft black color. Then set the layer to 20% Opacity.
Step 16
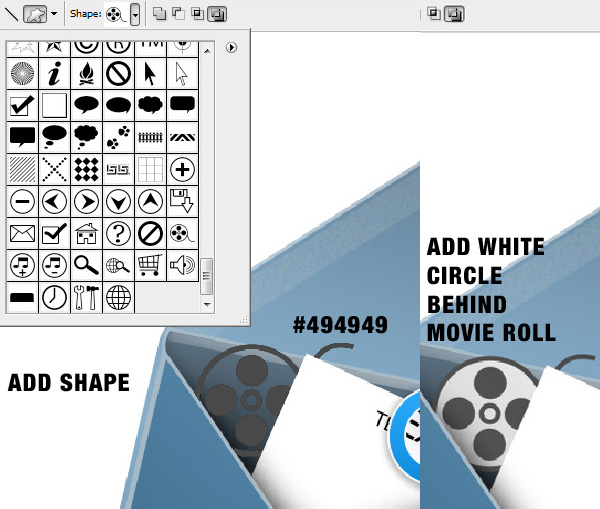
Create a movie roll the same way as you did with the other elements.
Step 17
The last element is a pen. Create this shape using this color #ff7000.

Step 18: Details
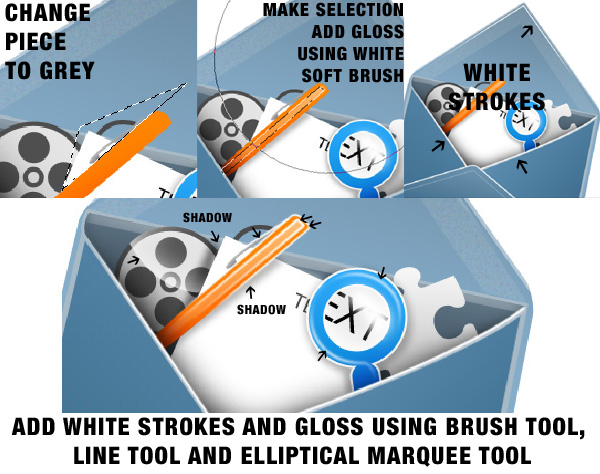
Now it is time to add details and gloss to the elements. Follow the steps below as you will be taken through each modification so you can create it as well.
Step 19: Gloss
Next you need to add some gloss effect to the envelope. Use the Polygonal Lasso Tool (L) and create 4 triangles the use a soft white brush to bring in some gloss.

Step 20: Final Shadow
Create a path like below using the Pen Tool (P) then transform it into a selection and use a black soft brush to add the shadow.

Step 21: Final Adjustment
In the end you need to darken everything a little and add more contrast. Press Command + A then copy Command + Shift + C and paste Command + V. Now that you have the image duplicated go to Image > Adjustments > Brightness/Contrast and increase the contrast a little.
This little icon looks pretty good when it is used on your app. Use Icon Composer to create the icon then set it to your app using Candy Bar.

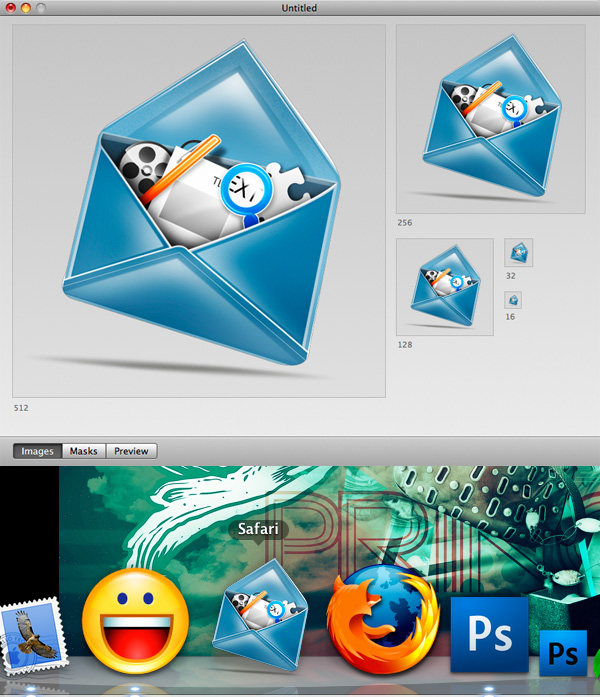
Final Result

Create a magnifying effect. Simply create a new layer and place it below the magnifying glass layer. The layer should be white with a soft grey gradient. Then add the text “text” and erase a part of it to make it look like it is magnified. Next you need to add a soft white gloss to make it look like a glass. In the end add the shadow by creating a new layer below all these and applying a soft black color. Then set the layer to 20% Opacity.
Step 16
Create a movie roll the same way as you did with the other elements.
Step 17
The last element is a pen. Create this shape using this color #ff7000.
Step 18: Details
Now it is time to add details and gloss to the elements. Follow the steps below as you will be taken through each modification so you can create it as well.
Step 19: Gloss
Next you need to add some gloss effect to the envelope. Use the Polygonal Lasso Tool (L) and create 4 triangles the use a soft white brush to bring in some gloss.
Step 20: Final Shadow
Create a path like below using the Pen Tool (P) then transform it into a selection and use a black soft brush to add the shadow.
Step 21: Final Adjustment
In the end you need to darken everything a little and add more contrast. Press Command + A then copy Command + Shift + C and paste Command + V. Now that you have the image duplicated go to Image > Adjustments > Brightness/Contrast and increase the contrast a little.
This little icon looks pretty good when it is used on your app. Use Icon Composer to create the icon then set it to your app using Candy Bar.
Final Result
Similar threads

- Replies
- 3
- Views
- 247

- Replies
- 14
- Views
- 300

- Replies
- 1
- Views
- 215