meka ubata help wenawada balapan...
I’m sure most of you have heard of emulation somewhere. So what is it exactly? 1,731diggsdigg
Wikipedia says that “an emulator duplicates the functions of one system, using a different system, so that the second system behaves like (and appears to be) the first system.” This means that we can make our PC mimic a specific system, which thereby enables us to run those system-specific games on our computers.
In this series, we’ll take a closer look at the software needed to run PSX, PS2 and Xbox games on your PC. This time we’ll discuss Sony’s Playstation (PSX) and the
ePSXe emulation software.
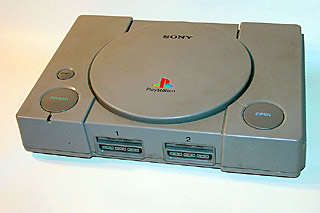
Part One – PlayStation 1
A lot of people had fun with the first PlayStation, including me, and we can’t seem to get rid of it (in a good way). All of the original PlayStation games were playable on the PlayStation 2, and
most of them on the PLAYSTATION 3. These days you can even play them on your PSP, so why not on our PC as well?
To play Playstation 1 games on your PC, you need to download a program called ePSXe.
The latest version can always be found
here.
As there’s no installer, you just have to unzip it in the folder of your choice. You’ll also want some shortcuts, so right-click on the ‘ePSXe.exe’, ‘send to’ and choose ‘desktop’.
The installation is far from complete though, as this is only the base of the emulator. Among the other things we’re going to need are the PSX’s BIOS files. These are essential for the emulation, but there is a catch.
You are only allowed to own these files if you also own a PSX. Make Use Of does NOT encourage piracy!
You can obtain the BIOS in two ways. You can dump it from your PSX, but that is the long route. You can also
download it somewhere (direct link
here), but again, only if you actually own a PSX.
We’ll extract these files in the \bios directory (you can also delete the ‘erase.me’ file)

Again, we are not ready yet. Next we need the video plug-in.
There’s a
wide variety of video plug-ins available, and (depending on your graphics card) some might work better for you than others, so I can’t tell you which one to use. I can point you in the right direction though, as Pete’s and P.E.Op.S. plug-ins have made a good name for themselves. If these do not work (well), try out a few and see which works best (all Linux plug-ins are at the bottom of the page).
We’re going to extract the downloaded package(s) into the \plugins directory. You might need to overwrite the ‘gpu.dat’ file.
The ePSXe core has built in sound plug-ins, but in case they didn’t work for you, check
here for alternatives (scroll down a bit). You can put these plug-ins in the \plugins directory.
The ePSXe core also has built in plug-ins for your disk drive, but in case they didn’t work for you, check
here for alternatives (about halfway down the page). You can put these plug-ins in the \plugins directory.
In their haste to please us, the developers of ePSXe forgot to add zlib.dll to the latest release (v 1.70). You can get it
here (just drop it in the same directory as ePSXe.exe).
You’ve got all the files you need now and are just a few steps away from playing your games. Upon opening ePSXe.exe, or the shortcut you made to it on your desktop, you will encounter a configuration wizard.
First you select the correct BIOS for your region (
PAL being Europe, Australia and a part of Asia). You’ll notice that there are different alternatives for your region, but all should work.
Next, select your video driver. When you press ‘Config’, you can change the video settings (like screen resolution, FPS limit, and so on. Apart from the resolution, only change these settings if you know what you’re doing.
Press next and select your sound plug-in and CD-ROM plug-in.
Last but not (at all!) least, you can configure your controller settings. First press on the controller you want to configure. In my opinion, the two best options here are either using a gamepad (USB, or an original one with a converter), or your keyboard (‘Digital’ in the menu).
Finally, in the ‘file’ menu, either choose ‘run CDROM’ or ‘run ISO’ to start playing!

You can make ISO’s of your PSX games without special procedures. Just use Nero, or another CD burning suite.
Be sure to look out for the next articles in this series, where we’ll take a closer look at PlayStation 2 and Xbox emulation.
You might also want to check out
ps3maven.com – it provides Playstation 3 updates, news and everything related to the cool ps3 game console
(By) Simon is a student from Belgium who wastes his time relaxing, watching anime and surfing the net. He would tell you to check out his blog, only he doesn’t have one yet!
1,731diggsdigg
ShareThis


 හොඳ, දැන්වීම්-රහිත (ad-free) ආයුර්වේද ඇප් එකක් සොයා ගැනීමට නොහැකි වූ නිසා, මමම එකක් නිර්මාණය කළා
 ලංකාවේ හොඳම උපකාරක පන්ති සහ ගුරුවරුන් එකම තැනකින් - TopTuition.lk
 Colombo RidhMathraa ’26 🎶✨
")