Latest ads
-
 Pure VPN - Up to 27 Months
- vgp
- Updated:
-
 Gemini AI PRO 18 months Offer
- Hawaka
- Updated:
-
koko account
- DasunEranga
- Updated:
You are using an out of date browser. It may not display this or other websites correctly.
You should upgrade or use an alternative browser.
You should upgrade or use an alternative browser.
When xp goes down don't reinstall, use this simple repair method...
The "it" in this case is XP's most powerful rebuild/repair option, and yet Microsoft chose to hide it behind seeming dead ends, red herrings, and a recycled interface that makes it hard to find and (at first) somewhat confusing to use.
But it's worth exploring because this option lets you completely and nondestructively rebuild, repair, or refre$h an existing XP installation while leaving already-installed software alone (no reinstallation needed!).
It also leaves user accounts, names, and passwords untouched and takes only a fraction of the time a full, from-scratch reinstall does.
And unlike a traditional full reinstall, this option doesn't leave you with two copies of XP on your hard drive.
Instead, you end up with just the original installation, but repaired, refre$hed, and ready to go.
When you're facing the prospects of a total reformat/reinstall, stop!
Try the no-reformat reinstall technique i'm about to illustrate, and you just may get your XP setup running again in a fraction of the time and with a fraction of the hassle of a grand wipe-and-restore.
The no-reformat reinstall operation starts with a normal boot from an XP setup CD
Start your PC with the setup CD in a drive, and hit a key when you see the following screen:

Boot from your XP setup CD to gain access to the no-reformat reinstall option.
If instead of booting to the CD your PC boots from the hard drive, you may need to modify your PC's "boot order."
It's easy and only takes a minute to make the change so that the PC will check for a bootable CD before trying to boot from the hard drive.
Once your PC starts to boot from the CD, you'll see something like what's shown in Screen 2:

Let the CD boot proceed normally and automatically through "Setup is inspecting your computer's hardware..." to the "Windows Setup" screen.
After a minute or two, you'll see the "Windows Setup/Setup is starting Windows" screen, shown in Screen Three.
Don't be alarmed:
It's still just the setup process running, and nothing's been changed on your PC yet.

The "Starting Windows" screen is a bit of an overstatement; it's just the setup process getting going.
Windows, as we normally think of it, isn't running yet, and no changes have been made to your PC.
Soon after Screen Three, you'll be presented with the normal "Welcome to Setup" screen, as shown in Screen Four.

The "Welcome to Setup" screen is poorly worded; the "Repair" option we want isn't the one explicitly offered here.
In fact, the repair option we want isn't shown at all.
See the text for full detail.
The poorly worded options in Screen Four lead many users astray.
The only mention of "Repair" here is "...repair a Windows XP installation using Recovery Console..." but that's not the no-reformat repair/reinstall we're seeking. (The Recovery Console Repair option is useful in its own right for fixing relatively minor problems with the operating system, and we fully explore it in the links listed above.)
The repair option we do want--a nondestructive, no-reformat reinstall--is actually hidden beneath the Setup option, "To set up Windows XP now, press ENTER."
So hit Enter, just as if you were setting up Windows afresh and from scratch.
The next screen, about licensing, gives no reassurances that you're on the right path for a nondestructive repair/reinstall--in fact, it's the same screen you see when you're setting XP up on a virgin hard drive.
But this is only the first of many screens that the Repair option will borrow from a full-blown setup.
Press F8 to accept the licensing terms and to go on.
Next, the XP setup process will show another screen that you may recall from your initial setup of XP. It searches for "a previous version of Microsoft Windows."
In our case, we're not replacing a previous version of Windows, but rather repairing the very same version that's on the setup CD--but that's OK; it's just another poorly worded screen.

Our intent is to repair the same version of Windows as is on the setup CD, but another poorly worded screen makes it seem like you're upgrading a previous version of Windows or installing one anew.
But don't let the bad wording alarm you; we're still on track for a nondestructive reinstall.
Screen Seven finally shows verbiage that's not recycled from the generic XP setup, but is specific to our Repair task.
Setup should find your damaged copy of XP and present it for repair, as shown:

At long last, Setup begins to refer to a Repair option. Here, Setup should have found your damaged XP setup, which you can select and then press R to start the nondestructive repair.
If your damaged copy of XP isn't highlighted in the list box, highlight it now. When it's selected, press R to start the repair process.
The Repair process then selectively deletes system files in the \Windows folder and subfolders and copies undamaged replacement files from the setup CD to their proper locations.

The Repair process then works on the current setup's Registry, leaving much of it intact and rebuilding the rest.

There's no fanfare, but this is one of the nicer parts of the Repair process: Setup retains what it can in the current Registry so that already-installed hardware and software will remain installed.
With the system files freshly copied and the Registry ready for rebuilding, the system needs to reboot.
Remove the CD from the drive so that the PC will boot to the hard drive instead of to the CD.
The first Repair reboot will take longer than normal.
Don't be alarmed. Also, don't be alarmed when Setup resumes.
Once again, it will appear that you're performing a full, from-scratch setup; there's nothing on-screen to indicate that you're repairing an existing version of XP.
But although the setup screens are the same as what you'd see in a full install, it's still a repair process, as will become clearer in a moment.
The first two of the Repair setup screens ask for your language preferences and product key.
Enter these normally.


When Setup resumes, it will appear that you're performing a full, from-scratch setup.
But don't worry--you're still indeed repairing your existing version of XP.
Many of the next few Repair screens will also be familiar.
The "installing devices" screen, for example, is identical to the one you normally see during a full, from-scratch setup.
But Repair is actually retaining much of the current setup's configuration and so will move through these steps faster than in a full setup.

The Repair version of the setup process skips or shortens many steps because it already has the information it needs from the existing setup.
For example, Repair's "installing devices" and the network setup steps are both much faster and require less user input than a new setup does.
The setup screens don't reflect the fact that a Repair proceeds much faster than a normal, full setup. In fact, the time estimates in the setup progress bar will be way off.
You'll be done in far less time than the progress bar predicts.

Just as with "installing devices," the network setup proceeds rapidly because Setup can re-use many of the configuration details from the current installation.
In fact, a Repair setup takes far less time than the installation progress bar indicates.
When this portion of the Repair is done, you'll see a "completing installation" screen:

The "completing installation" screen means most of the heavy lifting is done, and you're just minutes away from finishing the repair operation.
Setup then reboots your PC again, and this reboot will also take longer than usual. This is normal.
With the bulk of the repair work done, your PC needs to reboot once more and will do so automatically.
The reboot will take a bit longer than a standard boot, but this is normal.
After the reboot, you'll be brought to an abbreviated version of the "Welcome To Windows" setup pages.
You'll be asked if you want to register and--depending on how badly hosed the previous installation was--you may or may not be asked to reactivate the copy of Windows.
Next, the setup software handles the final networking details and then offers a "thank you" screen.

In most cases, the system will now reboot for a final time.
The Repair is done. It's a normal boot, bringing you to the normal choices for login.
With a final, fully normal reboot, you're done.
Your copy of XP should be as good as new, but with all your previously installed hardware, software, and user configuration data undamaged!
If all has gone as planned, you'll find all the user accounts and passwords intact, all the hardware devices set up as before, and all the previously installed software still installed and configured.
In fact, if all has gone as planned, the only significant change will be that whatever problem your copy of XP was previously experiencing will now be gone!
You now have a range of repair tools at your disposal, ranging from simple on-the-fly fixes such as Registry cleaning and safe Mode fixes to Recovery Console fixes, and, now, a nondestructive, no-reformat repair/rebuild option.
With this information, you should almost never have to face a dreaded start-over-from-scratch reformat/reinstall of XP!


Tnxz Was searching for this

")
Tnxz Was searching for this
i glad it's help u! and thanks for reply!


How to create screenshot with Media Player Classic
* How to create screenshot with Media Player Classic? Many People asked me about how to create screenshot without special software. Actually, If you have Media Player Classic installed in your computer it easy to create screenshot like the below image.
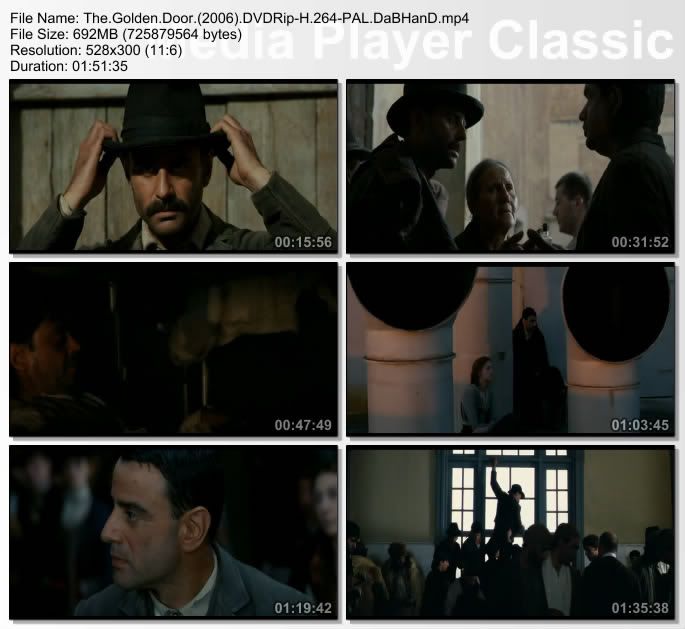
Here is step-by-step tutorial on how to create screenshot with Media Player Classic.
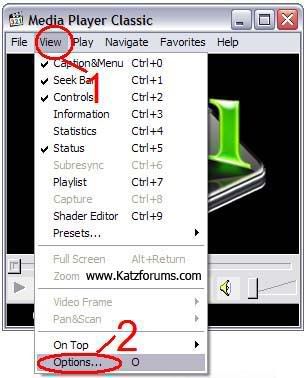
1.Open Media Player Classic then Go to menu views
2.Select Options…
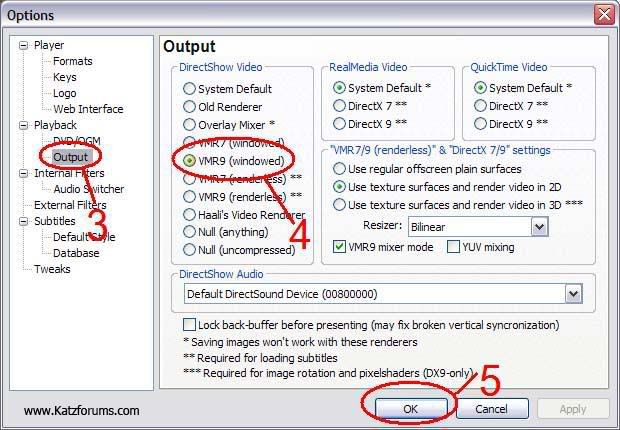
3.Select Playback>>output
4.Select DirectShow video to VMR9(windowed)
5.Press OK
and now we are ready to create screenshot
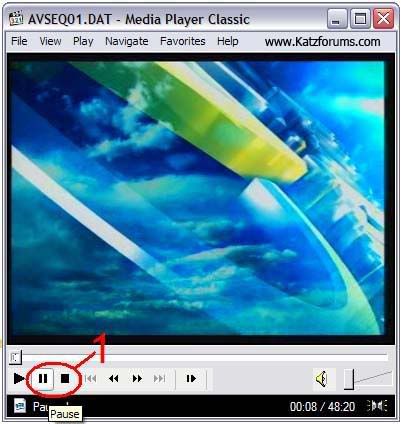
1.Open file that you want to create screenshot then Press stop or pause button.
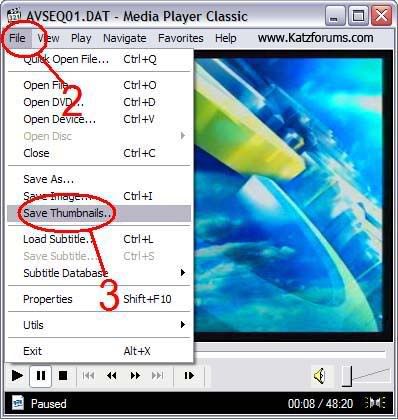
2.Go to menu File
3.Select Save Thumbnails
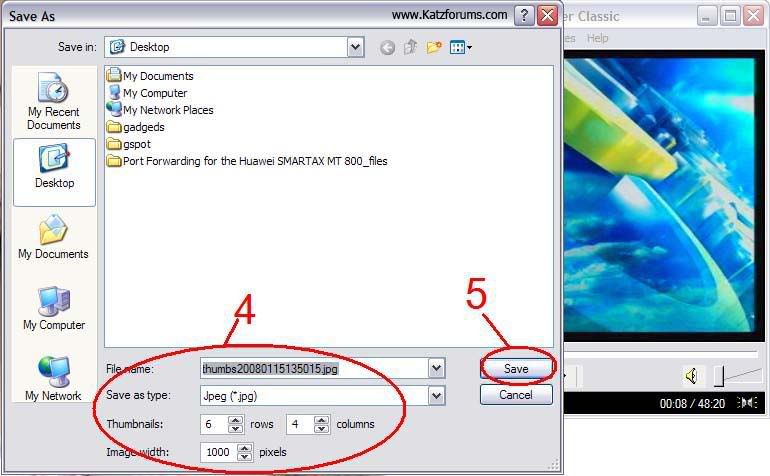
4.Set your output thumbnail file name, type,rows,columns and image width.
5.Press save.
6.Done
Thanx .
156 Run Commands
Accessibility Controls
access.cpl
Accessibility Wizard
accwiz
Add Hardware Wizard
hdwwiz.cpl
Add/Remove Programs
appwiz.cpl
Administrative Tools
control admintools
Adobe Acrobat (if installed)
acrobat
Adobe Designer (if installed)
acrodist
Adobe Distiller (if installed)
acrodist
Adobe ImageReady (if installed)
imageready
Adobe Photoshop (if installed)
photoshop
Automatic Updates
wuaucpl.cpl
Bluetooth Transfer Wizard
fsquirt
Calculator
calc
Certificate Manager
certmgr.msc
Character Map
charmap
Check Disk Utility
chkdsk
Clipboard Viewer
clipbrd
Command Prompt
cmd
Component Services
dcomcnfg
Computer Management
compmgmt.msc
Control Panel
control
Date and Time Properties
timedate.cpl
DDE Shares
ddeshare
Device Manager
devmgmt.msc
Direct X Control Panel (If Installed)*
directx.cpl
Direct X Troubleshooter
dxdiag
Disk Cleanup Utility
cleanmgr
Disk Defragment
dfrg.msc
Disk Management
diskmgmt.msc
Disk Partition Manager
diskpart
Display Properties
control desktop
Display Properties
desk.cpl
Display Properties (w/Appearance Tab Preselected)
control color
Dr. Watson System Troubleshooting Utility
drwtsn32
Driver Verifier Utility
verifier
Event Viewer
eventvwr.msc
Files and Settings Transfer Tool
migwiz
File Signature Verification Tool
sigverif
Findfast
findfast.cpl
Firefox (if installed)
firefox
Folders Properties
control folders
Fonts
control fonts
Fonts Folder
fonts
Free Cell Card Game
freecell
Game Controllers
joy.cpl
Group Policy Editor (XP Prof)
gpedit.msc
Hearts Card Game
mshearts
Help and Support
helpctr
HyperTerminal
hypertrm
Iexpress Wizard
iexpress
Indexing Service
ciadv.msc
Internet Connection Wizard
icwconn1
Internet Explorer
iexplore
Internet Properties
inetcpl.cpl
Internet Setup Wizard
inetwiz
IP Configuration (Display Connection Configuration) ipconfig /all
IP Configuration (Display DNS Cache Contents) ipconfig /displaydns
IP Configuration (Delete DNS Cache Contents) ipconfig /flushdns
IP Configuration (Release All Connections) ipconfig /release
IP Configuration (Renew All Connections) ipconfig /renew
IP Configuration (Refreshes DHCP & Re-Registers DNS) ipconfig /registerdns
IP Configuration (Display DHCP Class ID) ipconfig /showclassid
IP Configuration (Modifies DHCP Class ID) ipconfig /setclassid
Java Control Panel (If Installed)
jpicpl32.cpl
Java Control Panel (If Installed)
javaws
Keyboard Properties
control keyboard
Local Security Settings
secpol.msc
Local Users and Groups
lusrmgr.msc
Logs You Out Of Windows
logoff
Malicious Software Removal Tool
mrt
Microsoft Access (if installed)
access.cpl
Microsoft Chat
winchat
Microsoft Excel (if installed)
excel
Microsoft Frontpage (if installed)
frontpg
Microsoft Movie Maker
moviemk
Microsoft Paint
mspaint
Microsoft Powerpoint (if installed)
powerpnt
Microsoft Word (if installed)
winword
Microsoft Syncronization Tool
mobsync
Minesweeper Game
winmine
Mouse Properties
control mouse
Mouse Properties
main.cpl
Nero (if installed)
nero
Netmeeting
conf
Network Connections
control netconnections
Network Connections
ncpa.cpl
Network Setup Wizard
netsetup.cpl
Notepad
notepad
Nview Desktop Manager (If Installed)
nvtuicpl.cpl
Object Packager
packager
ODBC Data Source Administrator
odbccp32.cpl
On Screen Keyboard
osk
Opens AC3 Filter (If Installed)
ac3filter.cpl
Outlook Express
msimn
Paint
pbrush
Password Properties
password.cpl
Performance Monitor
perfmon.msc
Performance Monitor
perfmon
Phone and Modem Options
telephon.cpl
Phone Dialer
dialer
Pinball Game
pinball
Power Configuration
powercfg.cpl
Printers and Faxes
control printers
Printers Folder
printers
Private Character Editor
eudcedit
Quicktime (If Installed)
QuickTime.cpl
Quicktime Player (if installed)
quicktimeplayer
Real Player (if installed)
realplay
Regional Settings
intl.cpl
Registry Editor
regedit
Registry Editor
regedit32
Remote Access Phonebook
rasphone
Remote Desktop
mstsc
Removable Storage
ntmsmgr.msc
Removable Storage Operator Requests
ntmsoprq.msc
Resultant Set of Policy (XP Prof)
rsop.msc
Scanners and Cameras
sticpl.cpl
Scheduled Tasks
control schedtasks
Security Center
wscui.cpl
Services
services.msc
Shared Folders
fsmgmt.msc
Shuts Down Windows
shutdown
Sounds and Audio
mmsys.cpl
Spider Solitare Card Game
spider
SQL Client Configuration
cliconfg
System Configuration Editor
sysedit
System Configuration Utility
msconfig
System File Checker Utility (Scan Immediately) sfc /scannow
System File Checker Utility (Scan Once At Next Boot) sfc /scanonce
System File Checker Utility (Scan On Every Boot) sfc /scanboot
System File Checker Utility (Return to Default Setting) sfc /revert
System File Checker Utility (Purge File Cache) sfc /purgecache
System File Checker Utility (Set Cache Size to size x)
sfc /cachesize=x
System Information
msinfo32
System Properties
sysdm.cpl
Task Manager
taskmgr
TCP Tester
tcptest
Telnet Client
telnet
Tweak UI (if installed)
tweakui
User Account Management
nusrmgr.cpl
Utility Manager
utilman
Windows Address Book
wab
Windows Address Book Import Utility
wabmig
Windows Backup Utility (if installed)
ntbackup
Windows Explorer
explorer
Windows Firewall
firewall.cpl
Windows Magnifier
magnify
Windows Management Infrastructure
wmimgmt.msc
Windows Media Player
wmplayer
Windows Messenger
msmsgs
Windows Picture Import Wizard (need camera connected)
wiaacmgr
Windows System Security Tool
syskey
Windows Update Launches
wupdmgr
Windows Version (to show which version of windows)
winver
Windows XP Tour Wizard
tourstart
Wordpad
write
Enjoy

Lock Your Computer (One Mouse Click)
Instead of pressing CTRL+ALT+DEL or windows + L to lock your machine you can create an icon to lock your machine. There are very simple steps by using it you can simply lock your computer
using single mouse click.
Just Follow the simple step:
Instead of pressing CTRL+ALT+DEL or windows + L to lock your machine you can create an icon to lock your machine. There are very simple steps by using it you can simply lock your computer
using single mouse click.
Just Follow the simple step:
- Right click
An empty spot on the desktop, point to New and click Shortcut.
- In the Create Shortcut dialog box, type the following in the 'Type the location' of the item text box:
rundll32 user32.dll,LockWorkStation - Click Next
- In "Type a name for this shortcut", type "" (any name as u wish) and click Finish
- This will Create a shortcut in your Desktop.
- Now each time when you want to lock the computer , Just click on this shortcut.
How to fix corrupted files in XP
Source
(1) Introduction
(2) Required
(3) Actual Tutorial
(4) Copyright Notice
(( Introduction ))
This tutorial has been made so people that are having problems with corrupted files, can learn how to fix them easy.
(( Required ))
Windows XP operating system
Windows XP cd
(( Right to the tutorial ))
Place the xp cd in your cd/dvd drive
Go to start
run
type in 'sfc /scannow' (without the ')
Now it should all load, and fix all your corrupted file on windows XP
")
mage copy karanne nathiwa athi, habai okkoma repost
mama mewa godak kal dan post karala
repost klaata kamak nehe aiye..... apita ewaa balanna beriwunaa
6 Must Have Tools when Fixing a Computer Infected by Virus
When a good and powerful virus infects a computer, most likely it will disable you from running Task Manager (taskmgr.exe), Registry Editor (regedit.exe), Command Prompt (cmd.exe), System Configuration Utility (msconfig.exe), configuring Folder Options and hide the Run from Start Menu. Reason the virus does that is because most of the time it is “possible” for computer experts to remove the virus by using the built-in Windows programs without any third party tools.
But if you can’t run Task Manager, you cannot end the suspicious process. You could use the taskkill command in command prompt to kill the process but again you won’t be able to do that if CMD has been disabled. Perhaps you can run msconfig to stop the virus from auto startup but also cannot because of the virus. For advance computer users who has knowledge in registry and thought that they could manually remove the virus auto startup entries there, they too can’t do anything about it if regedit has been disabled. Disabling of Folder Options is to stop you from setting your computer to display hidden and system files. This way you can’t see the virus file and hence you won’t be able to delete them.
It is easy to re-enable all those tools back by modifying some values in your registry but if the is still virus active in your computer, the restrictions will be restored back. So for emergency cases, here are some replacement tools you can use to replace the disabled Windows tools.
1. Task Manager taskmgr.exe Replacement :
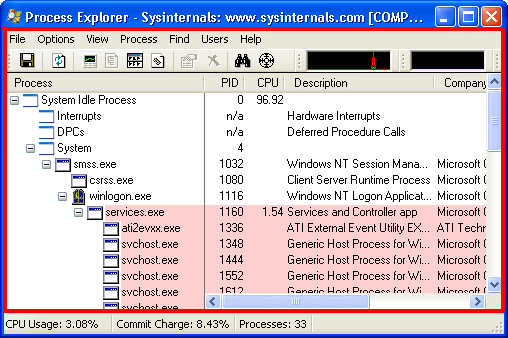
- Task Manager is very important because that is where you get to see all the running processes and also the amount of memory and CPU usage. If you find anything suspicious there, you can try terminating it. If you cannot run Task Manager and get the error message “Task Manager has been disabled by your administrator”, you can try using Process Explorer. It is portable and you can save it in your USB flash drive.
[ Download Process Explorer, a task manager alternative ]
2. Registry Editor regedit.exe Replacement :

- Without the ability to access Windows registry, you cannot manually make any changes at all. You can however, import registry REG files. When a virus has disabled regedit, you should see the message “Registry editing has been disabled by your administrator” when you try to run it. A good regedit alternative is RegAlyzer, developed by the author of the famous SpyBot. RegAlyzer requires installation but you can copy the whole RegAlyzer folder to your USB flash drive and run it as portable application.
[Download RegAlyzer, a regedit alternative ]
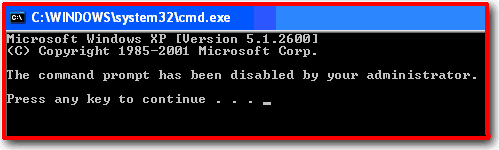
3. Command Prompt cmd.exe Replacement :
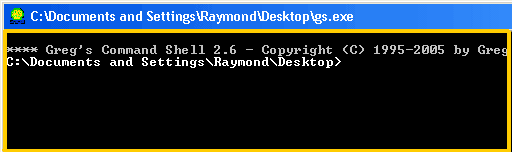
- Command Prompt is a very powerful command line tool which supports a lot of commands when you find it impossible to do it in Windows. If you try to run cmd and get the following message “The command prompt has been disabled by your administrator. Press any key to continue”, you can try using GS. GS is a cmd replacement but it is a little old, dated back in year 2005. We’re not looking for a permanent replacement, so it is good enough as long as it can support some important command lines. Do take note that “Console2″, is an EXTENSION for command prompt. If cmd is disabled, Console2 won’t work. GS is small, free and portable.
[Download GS, a command prompt alternative]
4. Run Dialog Box Replacement :
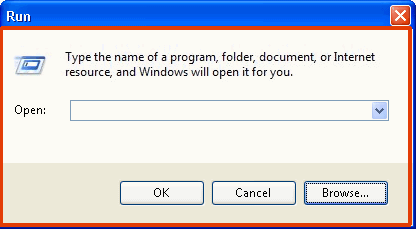
- Some virus will also remove the run command from your Start Menu and it is not easy to restore it back. Although this is not really important, but it could easily allow you to run important commands. Run dialog replacement v1.0 is small, only 48KB in size and portable. If you have Process Explorer, you can also access the run command from File > Run, or just hit CTRL+R.
[Download Run Dialog Replacement 1.0 ]
5. System Configuration Utility msconfig.exe Replacement :
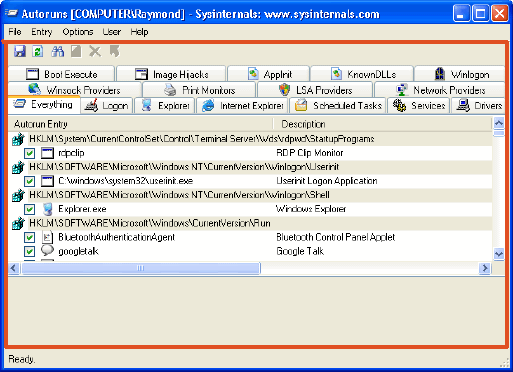
- MSCONFIG is the first place that I will go to check if a computer has a virus. If you run msconfig and go to the Startup tab, it will list all programs that will start when Windows is booted up using the common startup method. Virus makers are aware of this and usually they will either delete your original msconfig.exe file or change the reference location in registry. You should get this message “Windows cannot find ‘msconfig’. Make sure you typed the name correctly, and then try again. To search for a file, click the Start button, and then click Search.” when type msconfig at the run dialog box. One very good msconfig alternative is definitely Autoruns, which is from the same author as Process Explorer. Autoruns has the most comprehensive knowledge of auto-starting locations of any startup monitor, shows you what programs are configured to run during system bootup or login.
[Download Autoruns, a msconfig alternative]
6. Enable Show hidden files and protected operating system files :
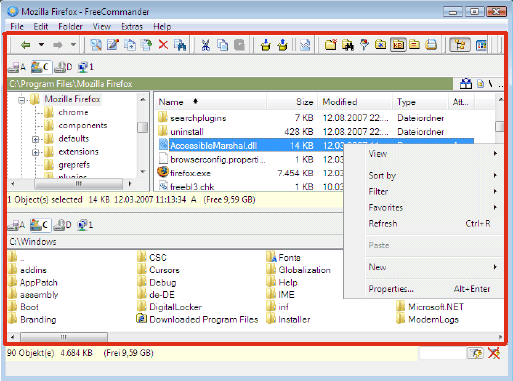
- I’ve tried many File Managers and most of them inherits the Show Hidden Files and Folders or Hide protected operating system files from Folder Options settings in Windows. If a virus is still active in memory, it will keep on changing the settings to disable you from viewing hidden and system files. I found one free file manager called FreeCommander which is able to show you all hidden files and folders as well as protected operating system files no matter what is the settings in Folder Options. It actually ignores the permission in Folder Options! It is portable, so you can also copy the whole extracted folder to your USB flash drive.
[Download FreeCommander, a file manager replacement ]
There you go, I’ve shared with you the 6 MUST have replacement or alternative tools when fixing a computer that has many restrictions caused by the virus.
When a good and powerful virus infects a computer, most likely it will disable you from running Task Manager (taskmgr.exe), Registry Editor (regedit.exe), Command Prompt (cmd.exe), System Configuration Utility (msconfig.exe), configuring Folder Options and hide the Run from Start Menu. Reason the virus does that is because most of the time it is “possible” for computer experts to remove the virus by using the built-in Windows programs without any third party tools.

But if you can’t run Task Manager, you cannot end the suspicious process. You could use the taskkill command in command prompt to kill the process but again you won’t be able to do that if CMD has been disabled. Perhaps you can run msconfig to stop the virus from auto startup but also cannot because of the virus. For advance computer users who has knowledge in registry and thought that they could manually remove the virus auto startup entries there, they too can’t do anything about it if regedit has been disabled. Disabling of Folder Options is to stop you from setting your computer to display hidden and system files. This way you can’t see the virus file and hence you won’t be able to delete them.
It is easy to re-enable all those tools back by modifying some values in your registry but if the is still virus active in your computer, the restrictions will be restored back. So for emergency cases, here are some replacement tools you can use to replace the disabled Windows tools.
1. Task Manager taskmgr.exe Replacement :

- Task Manager is very important because that is where you get to see all the running processes and also the amount of memory and CPU usage. If you find anything suspicious there, you can try terminating it. If you cannot run Task Manager and get the error message “Task Manager has been disabled by your administrator”, you can try using Process Explorer. It is portable and you can save it in your USB flash drive.
[ Download Process Explorer, a task manager alternative ]
2. Registry Editor regedit.exe Replacement :

- Without the ability to access Windows registry, you cannot manually make any changes at all. You can however, import registry REG files. When a virus has disabled regedit, you should see the message “Registry editing has been disabled by your administrator” when you try to run it. A good regedit alternative is RegAlyzer, developed by the author of the famous SpyBot. RegAlyzer requires installation but you can copy the whole RegAlyzer folder to your USB flash drive and run it as portable application.
[Download RegAlyzer, a regedit alternative ]
3. Command Prompt cmd.exe Replacement :

- Command Prompt is a very powerful command line tool which supports a lot of commands when you find it impossible to do it in Windows. If you try to run cmd and get the following message “The command prompt has been disabled by your administrator. Press any key to continue”, you can try using GS. GS is a cmd replacement but it is a little old, dated back in year 2005. We’re not looking for a permanent replacement, so it is good enough as long as it can support some important command lines. Do take note that “Console2″, is an EXTENSION for command prompt. If cmd is disabled, Console2 won’t work. GS is small, free and portable.
[Download GS, a command prompt alternative]
4. Run Dialog Box Replacement :

- Some virus will also remove the run command from your Start Menu and it is not easy to restore it back. Although this is not really important, but it could easily allow you to run important commands. Run dialog replacement v1.0 is small, only 48KB in size and portable. If you have Process Explorer, you can also access the run command from File > Run, or just hit CTRL+R.
[Download Run Dialog Replacement 1.0 ]
5. System Configuration Utility msconfig.exe Replacement :

- MSCONFIG is the first place that I will go to check if a computer has a virus. If you run msconfig and go to the Startup tab, it will list all programs that will start when Windows is booted up using the common startup method. Virus makers are aware of this and usually they will either delete your original msconfig.exe file or change the reference location in registry. You should get this message “Windows cannot find ‘msconfig’. Make sure you typed the name correctly, and then try again. To search for a file, click the Start button, and then click Search.” when type msconfig at the run dialog box. One very good msconfig alternative is definitely Autoruns, which is from the same author as Process Explorer. Autoruns has the most comprehensive knowledge of auto-starting locations of any startup monitor, shows you what programs are configured to run during system bootup or login.
[Download Autoruns, a msconfig alternative]
6. Enable Show hidden files and protected operating system files :

- I’ve tried many File Managers and most of them inherits the Show Hidden Files and Folders or Hide protected operating system files from Folder Options settings in Windows. If a virus is still active in memory, it will keep on changing the settings to disable you from viewing hidden and system files. I found one free file manager called FreeCommander which is able to show you all hidden files and folders as well as protected operating system files no matter what is the settings in Folder Options. It actually ignores the permission in Folder Options! It is portable, so you can also copy the whole extracted folder to your USB flash drive.
[Download FreeCommander, a file manager replacement ]
There you go, I’ve shared with you the 6 MUST have replacement or alternative tools when fixing a computer that has many restrictions caused by the virus.
How To: "Extract Movies w/WinRar, Burn & Play Movies/Videos" For The Complete Newb
How To: "Extract Movies w/WinRar, Burn & Play Movies/Videos" For The Complete Newb
This is written for help using winrar in the purpose of being able to get movies from .rar files. ,playing them on the computer and burning them to disc for the complete Newb/Beginner.
So you got yourself a copy of Winrar and you don't really know how to use it. Well, if this is your case then read on if not this isn't for you. Unless you would like to know how to play the extracted movie if so skip on to "Playing A Movie After Extraction". or if you want to learn how to burn the movie to disc skip to "Burning To Disc".
Extract Movies w/Winrar
I'm assuming you have a copy of Winrar installed and working on your computer. If not then get yourself a copy and come back. You can find a full working version of Winrar on many of my threads.
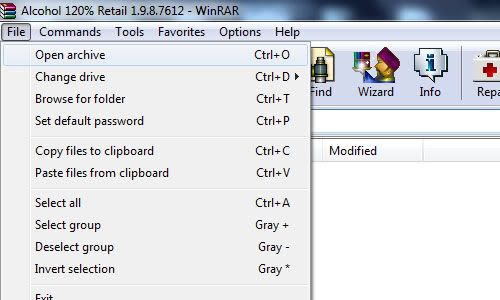
First things first open up WinRar (double click on it). It should look something simular to the below image.

Well, locate "File" Click on it and select "open archive" double click on it.
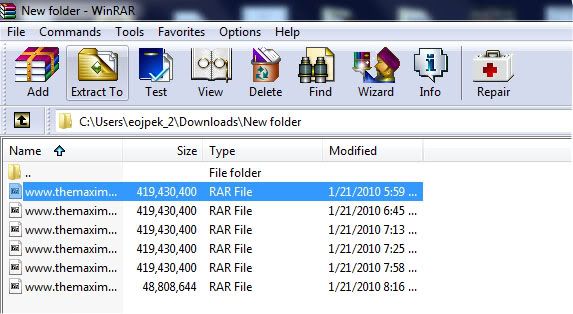
Now browse to where all parts of the movie were saved in the same folder. Open it.
Find the first part of all the .rar files. Click on it in the list to highlight it, then locate "Extract To" Click on it.
A new window will open.
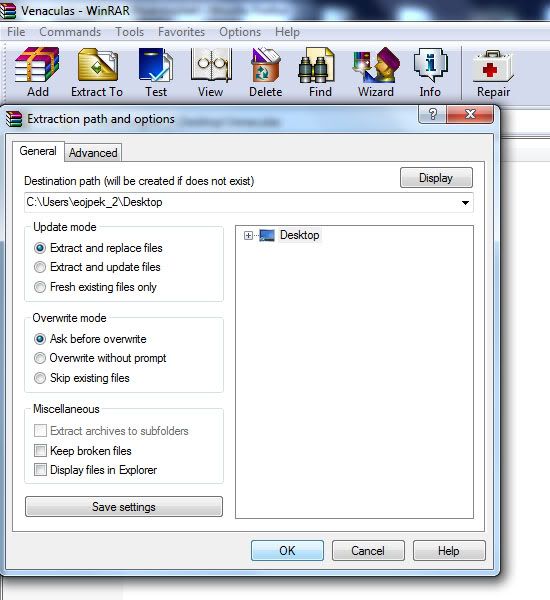
select where you would wanna save it. By default it will save it to the folder in which the .rar files were located.
Now click "OK". Your movie/video or whatever will begin the extraction process and put whatever it was that was compressed in the .rar files into the folder that you specified.
A box like below will show up,
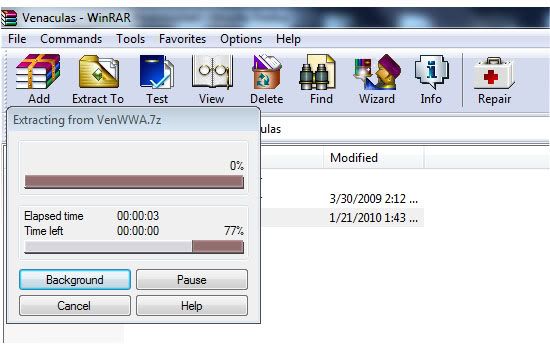
When this is finished check the folder you extracted to. There should be either a folder, a media file, iso, ect.. But I'm just gonna be talking about movies.
So you would have a movie/media file in a certain format. : avi, mpg, wmv, ect.. What to do with these?
Note: If you wanna extract the files quicker, locate the first part to the movie. Right click on it and select "open with" then "default program" Locate WinRar click on it to highlight it then make sure there is a click in the box that says "Always use the selected program to open this kind of file". Click "ok".
Now whenever you doubleclick on the first rar part of a movie, it will open up winrar.
or
Just right click the first part and select extract here. And it will extract to the same folder as all of the parts.
Playing A Movie After Extraction.
Well, what you would do to view these on a computer would be a "media player". If you have windows you most likely have windows media player already installed on your computer. You could right click on the movie file and select play and see if it will play like that or you could get yourself "VLC Media Player"or "GOM Player". Either one will do but I'm gonna talk about VLC.
VLC Media Player is one of the best media players out there as it can play just about any video/media file format. On a very rare occassion it won't.
You can download it here:
If you do the first option read on. otherwise skip on to 3rd Package.
You will get a .exe file named "vlc-1.0.3-win32.exe" Locate it and double click on it.
The Installer Wizard will start and guide you through in how to save vlc on your computer. First select the lanquage in which you would like to use from the drop down box and then click ok. Ok, so a new window.
Click Next to Continue, Read the License Agreement and Agree. Select "Recommended" as Type of install or whatever you prefer, click next, select where you wanna save. Now VLC media player will start the install. When finished you can open up vlc right away.
Now that you have vlc media player installed open it up. Go to "Media" and click on it. From the list select "open file" locate the folder that you saved the extracted movie to. Find the media file of the movie and open it up. There you go you can watch movies now.
3rd Package
This is the download where everything is already extracted into a folder.
Open up the folder, There should be another folder open that up as well. Now, just look through the list for "vlc" Application. Double click on it to open up vlc media player.
Select, "Media" and click on it. From the list select "open file" locate the folder that you saved the extracted movie to. Find the media file of the movie and open it up. There you go you can watch movies now.
NOTE: after having vlc media player installed the next time you extract a movie and get a media file, just right click on the file, select "open with" then "choose default program". Unclick the box that says "Always use the selected program to open this kind of file" unless you always wanna use vlc media player to play that certain type of file. Locate VLC media Player, Click on it to highlight it and select ok. This will open up movies in a quicker manor.
Now that you have done that, right click on another movie and select "open with" again, now in that box should be a choice of vlc media player for quick access. You will need to set this up with other media files. But, once set up for all video/media file formats, it is a simple thing to watch movies/videos.
Codecs:
Now some movies are coded a certain way, in order to play some of these files after extraction you will need a specific codec to play the specified video file. Yeah, you could find the exact one you need and just install that one, but a codec pack is a better choice.
There are many codec packs out there. I myself like to use "ffdshow". Another one is "K-Lite". Just do a simple search and download and install one of the codec packs or one of your choice whatever suites you.
Now you will be able to play just about any movie/video without a hickup.
Burning To Disc
If you would like to burn the extracted movie to a DVD-R and watch on a DVD player, PS2 or whatever...read on
In order to be able to play the movie you got after extraction on a DVD player, there are several things in which you will need to do.
First you need to change the format so that it will be readable, Second you need to be able to burn these new formats to a disc. Well, figuring out how to do all this stuff would be quite the task, but thanks
to software all this can be done for us.
The Software Application I'm talking about is "Convertxtodvd". This will convert the movie to a format that can be read on a dvd player and will burn it for you as well. All you need to do is follow what I am
about to say below.
First get yourself a full working version of "Convertxtodvd" Install it. Do not use demo or you will get watermarks in your dvd.
After installed open it up. It should look something like this.
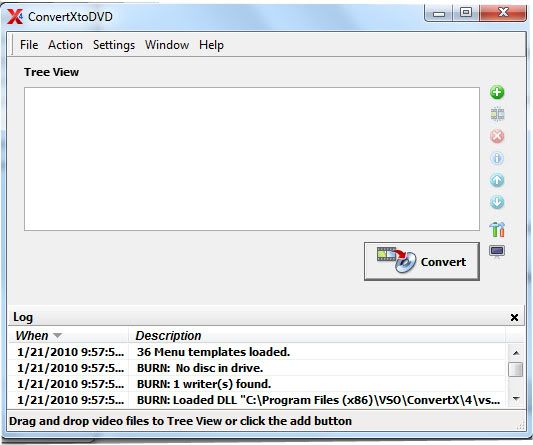
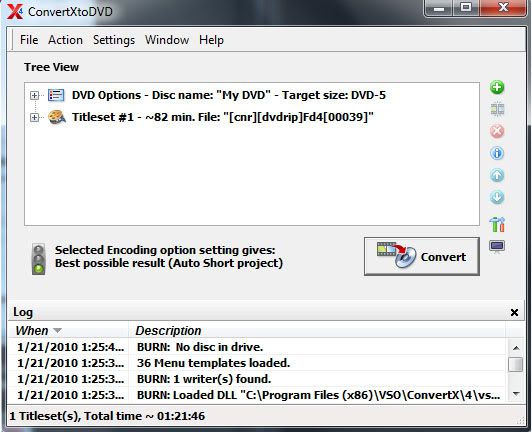
Now locate "File" click on it. Select "Add Video Files". Locate the folder that has the movie you want to convert and burn. Open up the movie and you will see it added to the list in convertx.
Now what you wanna do is locate "settings" click on it, and click on "DVD Specification". It will look like this.
Set your "Format (Video Standard)" to what region the DVD-player uses that you will be playing the burnt disc on. Set "DVD Resolution" to "automatic". Unless you like fullscreen like me go with "Full D1". And set "Aspect Ratio" to Automatic. Unless you want full screen like me or have a 16/9 screen tv.
Now click on "Video Processing". It will look something like this.
Set "De-Interlacing" to Automatic. Set "Video Resize Methed" to Automatic or Stretch: Video resized to TV screen size if you want full screen. Set "Resize filter" to "Fast Linear (VSO). For "Multicore Processor: Max number of used cores" set to one if you have one CPU or if you have two and want to do other stuff while converting the movie. or two if you have a dual-core/quad-core processor. I stick with one myself.
Now locate "Encoding" click on it. It will look something like this.
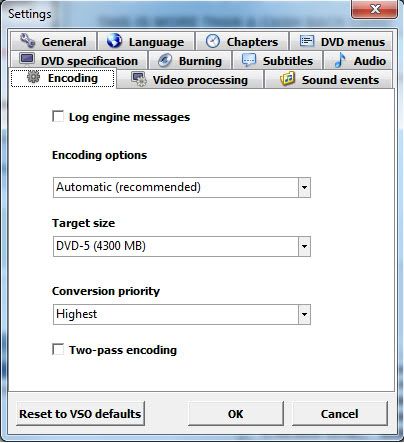
Set "Encoding options" to Automatic. Set "Target size" to DVD-5, Set "Conversion priority" to Normal or whatever you choose. I go with higher myself, the higher you set this the more resources convertxtodvd will use making it harder to do anything while running it.
This of course depends on your ram,cpu and such. If you have a single cpu on your computer it's best to let convertxtodvd do it's job without doing anything else on the computer. This will help ensure everything to go well. Even a two-pass encoding for the more older computer users may be best.
Now locate "Burning" It will look something like this.
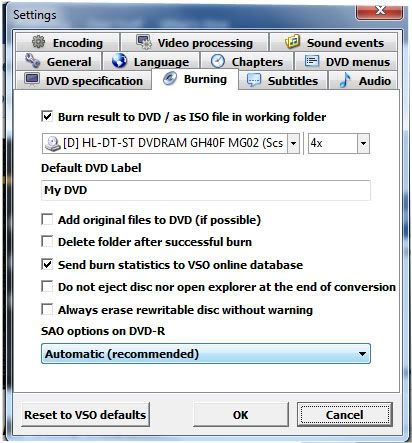
Check the box "Burn result to DVD/ as ISO file in working folder" Then select the drive of your DVD-Rom from the dropdown list and set the speed to 4x. To help ensure a proper burn to a disc, setting any higher
most likely will cause several issues when playing the burnt disc.
Set the "Default DVD Label" to whatever you want and this will show in the menu(you can change this manually if you want). With all the boxes leave them all unchecked unless you would like one of those things to happen everytime. Set "SAO options on DVD-R" to Automatic.
Now locate "DVD Menus". It will look something like this.

Select a "Default template" from the dropdown box or browse computer for one's you downloaded. I myself like the Black Mirror with video.
Set "If a text label is too large in the menu,then" to Reduce the text.
NOTE:
If you wanna do this manually to change the name that will show up on the menu. Just go to movie in convertx click on the little box with the plus sign next to the movie on the list. This will drop down a list. click on the plus(+) sign for "In Title Menu" Now double click on the T. In the box type the name of the movie and click the checkmark to apply the changes.
Next, check the last three boxes or select something you prefer then click "OK". Everything done thus far will be your default for Convertxtodvd.
What I just provided above for convertxtodvd is a basic setup to burn a movie to disc.
Now since all of that is outa the way. You will be back to the main convertxtodvd window with your movie added in the list. Insert a DVD-R or DVD+R disc into your dvd-rom drive. (I like DVD+Rs myself for burning movies.) Now you can click "Convert" and start the converting process. This will take a extended amount of time depending on your RAM, CPU power and whatnot.
or
You could add another movie to the list so you have two movies on one disc. I tend to on occasions put two movies on one DVD+R, so I don't use as many of my discs. Depending on the size of the movies you may want to just put two hour 1/2 movies when doing this. If you have bigger movies, the quality may shun from what you may be looking for. Try to go to 3:15 max for total time of both movies together as the quality will still be great and will save you DVD discs.
NOTE: The quality will change depending on how many video files you add to the list. SP (Short Projects) Up to 110min, MP (Medium Projects) Up to 148min, LP (Long Play) 148 minutes or more. What this means is the more files you add the poorer the quality will be.
Now after conversion is done a window will show up to burn to disc. If left alone and you put or had dvd-/+ disc in your drive it will count down from a timer and start automaticly to burn to disc.
Once finished burning DVD, put it into a DVD player and see if it works. If so congrats!!! If not then you did something wrong.
Troubleshooting:
Why won't the DVD play on my dvd-player?
Because you may have not set the region/format right in settings under "DVD specification", Format. Make sure this is set right for the dvd-player you are gonna wanna watch the dvd with.
If you buy cheap DVD+/- discs in those 50packs at a cheap price, expect cheap results. What you expect? You get what you pay for, right? lol Many of these cheap discs in these 50packs are duds. Meaning you can't burn to them, they're shitty discs.
I bought a cheap 50 pack at office depot and I was only able to burn on 10 of the discs.
Go for better discs, pay the price needed to get results you expect.
Because you may have used a cheap brand of dvd-/+rs. I tend to use sony discs myself, on a rare occasion I will get some crappy discs in the 50 pack.
Maybe because your dvd-player doesn't like the type of disc used. Try a different disc, if you used a dvd-r try a dvd+r instead. Some dvd-players only like certain discs. If that doesn't do anything try
a different brand name.
You could try to burn at a slower speed or just make sure that you let the burning process just do it's course without doing anything else on the computer.
If that still doesn't help try burning the folder created by convertxtodvd with a different burning application such as "imageburn". nero ect...This has fixed burning issues with me about 99% of the time.
NOTE: If you have a older computer or a single processor I suggest you leave convertx to do it's job and not do anything on the computer while converting and burning to insure a proper conversion and burn.
Also if you have low RAM, it's best to have other applications closed before using convertxtodvd.
Anyways, I hope you find this helpful in extracting movies from rar files, playing the movies on your computer, and burning a movie to disc.
This is written for help using winrar in the purpose of being able to get movies from .rar files. ,playing them on the computer and burning them to disc for the complete Newb/Beginner.
So you got yourself a copy of Winrar and you don't really know how to use it. Well, if this is your case then read on if not this isn't for you. Unless you would like to know how to play the extracted movie if so skip on to "Playing A Movie After Extraction". or if you want to learn how to burn the movie to disc skip to "Burning To Disc".
Extract Movies w/Winrar
I'm assuming you have a copy of Winrar installed and working on your computer. If not then get yourself a copy and come back. You can find a full working version of Winrar on many of my threads.
First things first open up WinRar (double click on it). It should look something simular to the below image.

Well, locate "File" Click on it and select "open archive" double click on it.

Now browse to where all parts of the movie were saved in the same folder. Open it.
Find the first part of all the .rar files. Click on it in the list to highlight it, then locate "Extract To" Click on it.

A new window will open.

select where you would wanna save it. By default it will save it to the folder in which the .rar files were located.
Now click "OK". Your movie/video or whatever will begin the extraction process and put whatever it was that was compressed in the .rar files into the folder that you specified.
A box like below will show up,

When this is finished check the folder you extracted to. There should be either a folder, a media file, iso, ect.. But I'm just gonna be talking about movies.
So you would have a movie/media file in a certain format. : avi, mpg, wmv, ect.. What to do with these?
Note: If you wanna extract the files quicker, locate the first part to the movie. Right click on it and select "open with" then "default program" Locate WinRar click on it to highlight it then make sure there is a click in the box that says "Always use the selected program to open this kind of file". Click "ok".
Now whenever you doubleclick on the first rar part of a movie, it will open up winrar.
or
Just right click the first part and select extract here. And it will extract to the same folder as all of the parts.
Playing A Movie After Extraction.
Well, what you would do to view these on a computer would be a "media player". If you have windows you most likely have windows media player already installed on your computer. You could right click on the movie file and select play and see if it will play like that or you could get yourself "VLC Media Player"or "GOM Player". Either one will do but I'm gonna talk about VLC.
VLC Media Player is one of the best media players out there as it can play just about any video/media file format. On a very rare occassion it won't.
You can download it here:
On that download page you will be presented 3 different packages. I myself like the last option as everything is extracted already in a folder. But, many would go with the first option "Windows Self Extracting".
If you do the first option read on. otherwise skip on to 3rd Package.
You will get a .exe file named "vlc-1.0.3-win32.exe" Locate it and double click on it.
The Installer Wizard will start and guide you through in how to save vlc on your computer. First select the lanquage in which you would like to use from the drop down box and then click ok. Ok, so a new window.
Click Next to Continue, Read the License Agreement and Agree. Select "Recommended" as Type of install or whatever you prefer, click next, select where you wanna save. Now VLC media player will start the install. When finished you can open up vlc right away.
Now that you have vlc media player installed open it up. Go to "Media" and click on it. From the list select "open file" locate the folder that you saved the extracted movie to. Find the media file of the movie and open it up. There you go you can watch movies now.
3rd Package
This is the download where everything is already extracted into a folder.
Open up the folder, There should be another folder open that up as well. Now, just look through the list for "vlc" Application. Double click on it to open up vlc media player.
Select, "Media" and click on it. From the list select "open file" locate the folder that you saved the extracted movie to. Find the media file of the movie and open it up. There you go you can watch movies now.
NOTE: after having vlc media player installed the next time you extract a movie and get a media file, just right click on the file, select "open with" then "choose default program". Unclick the box that says "Always use the selected program to open this kind of file" unless you always wanna use vlc media player to play that certain type of file. Locate VLC media Player, Click on it to highlight it and select ok. This will open up movies in a quicker manor.
Now that you have done that, right click on another movie and select "open with" again, now in that box should be a choice of vlc media player for quick access. You will need to set this up with other media files. But, once set up for all video/media file formats, it is a simple thing to watch movies/videos.
Codecs:
Now some movies are coded a certain way, in order to play some of these files after extraction you will need a specific codec to play the specified video file. Yeah, you could find the exact one you need and just install that one, but a codec pack is a better choice.
There are many codec packs out there. I myself like to use "ffdshow". Another one is "K-Lite". Just do a simple search and download and install one of the codec packs or one of your choice whatever suites you.
Now you will be able to play just about any movie/video without a hickup.
Burning To Disc
If you would like to burn the extracted movie to a DVD-R and watch on a DVD player, PS2 or whatever...read on
In order to be able to play the movie you got after extraction on a DVD player, there are several things in which you will need to do.
First you need to change the format so that it will be readable, Second you need to be able to burn these new formats to a disc. Well, figuring out how to do all this stuff would be quite the task, but thanks
to software all this can be done for us.
The Software Application I'm talking about is "Convertxtodvd". This will convert the movie to a format that can be read on a dvd player and will burn it for you as well. All you need to do is follow what I am
about to say below.
First get yourself a full working version of "Convertxtodvd" Install it. Do not use demo or you will get watermarks in your dvd.
After installed open it up. It should look something like this.

Now locate "File" click on it. Select "Add Video Files". Locate the folder that has the movie you want to convert and burn. Open up the movie and you will see it added to the list in convertx.

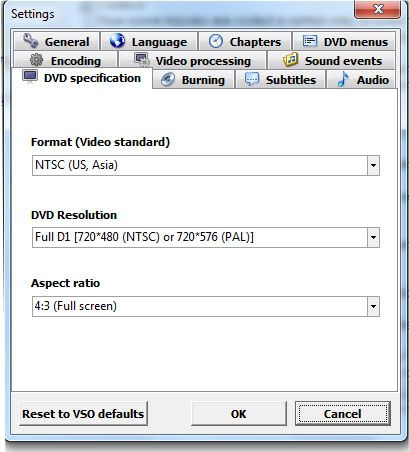
Now what you wanna do is locate "settings" click on it, and click on "DVD Specification". It will look like this.

Set your "Format (Video Standard)" to what region the DVD-player uses that you will be playing the burnt disc on. Set "DVD Resolution" to "automatic". Unless you like fullscreen like me go with "Full D1". And set "Aspect Ratio" to Automatic. Unless you want full screen like me or have a 16/9 screen tv.
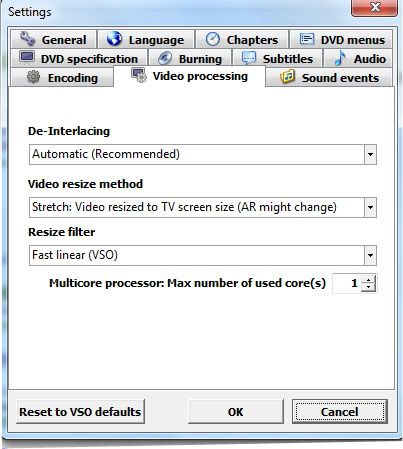
Now click on "Video Processing". It will look something like this.

Set "De-Interlacing" to Automatic. Set "Video Resize Methed" to Automatic or Stretch: Video resized to TV screen size if you want full screen. Set "Resize filter" to "Fast Linear (VSO). For "Multicore Processor: Max number of used cores" set to one if you have one CPU or if you have two and want to do other stuff while converting the movie. or two if you have a dual-core/quad-core processor. I stick with one myself.
Now locate "Encoding" click on it. It will look something like this.

Set "Encoding options" to Automatic. Set "Target size" to DVD-5, Set "Conversion priority" to Normal or whatever you choose. I go with higher myself, the higher you set this the more resources convertxtodvd will use making it harder to do anything while running it.
This of course depends on your ram,cpu and such. If you have a single cpu on your computer it's best to let convertxtodvd do it's job without doing anything else on the computer. This will help ensure everything to go well. Even a two-pass encoding for the more older computer users may be best.
Now locate "Burning" It will look something like this.

Check the box "Burn result to DVD/ as ISO file in working folder" Then select the drive of your DVD-Rom from the dropdown list and set the speed to 4x. To help ensure a proper burn to a disc, setting any higher
most likely will cause several issues when playing the burnt disc.
Set the "Default DVD Label" to whatever you want and this will show in the menu(you can change this manually if you want). With all the boxes leave them all unchecked unless you would like one of those things to happen everytime. Set "SAO options on DVD-R" to Automatic.
Now locate "DVD Menus". It will look something like this.

Select a "Default template" from the dropdown box or browse computer for one's you downloaded. I myself like the Black Mirror with video.
Set "If a text label is too large in the menu,then" to Reduce the text.
NOTE:
If you wanna do this manually to change the name that will show up on the menu. Just go to movie in convertx click on the little box with the plus sign next to the movie on the list. This will drop down a list. click on the plus(+) sign for "In Title Menu" Now double click on the T. In the box type the name of the movie and click the checkmark to apply the changes.
Next, check the last three boxes or select something you prefer then click "OK". Everything done thus far will be your default for Convertxtodvd.
What I just provided above for convertxtodvd is a basic setup to burn a movie to disc.
Now since all of that is outa the way. You will be back to the main convertxtodvd window with your movie added in the list. Insert a DVD-R or DVD+R disc into your dvd-rom drive. (I like DVD+Rs myself for burning movies.) Now you can click "Convert" and start the converting process. This will take a extended amount of time depending on your RAM, CPU power and whatnot.
or
You could add another movie to the list so you have two movies on one disc. I tend to on occasions put two movies on one DVD+R, so I don't use as many of my discs. Depending on the size of the movies you may want to just put two hour 1/2 movies when doing this. If you have bigger movies, the quality may shun from what you may be looking for. Try to go to 3:15 max for total time of both movies together as the quality will still be great and will save you DVD discs.
NOTE: The quality will change depending on how many video files you add to the list. SP (Short Projects) Up to 110min, MP (Medium Projects) Up to 148min, LP (Long Play) 148 minutes or more. What this means is the more files you add the poorer the quality will be.
Now after conversion is done a window will show up to burn to disc. If left alone and you put or had dvd-/+ disc in your drive it will count down from a timer and start automaticly to burn to disc.
Once finished burning DVD, put it into a DVD player and see if it works. If so congrats!!! If not then you did something wrong.
Troubleshooting:
Why won't the DVD play on my dvd-player?
Because you may have not set the region/format right in settings under "DVD specification", Format. Make sure this is set right for the dvd-player you are gonna wanna watch the dvd with.
If you buy cheap DVD+/- discs in those 50packs at a cheap price, expect cheap results. What you expect? You get what you pay for, right? lol Many of these cheap discs in these 50packs are duds. Meaning you can't burn to them, they're shitty discs.
I bought a cheap 50 pack at office depot and I was only able to burn on 10 of the discs.
Go for better discs, pay the price needed to get results you expect.
Because you may have used a cheap brand of dvd-/+rs. I tend to use sony discs myself, on a rare occasion I will get some crappy discs in the 50 pack.
Maybe because your dvd-player doesn't like the type of disc used. Try a different disc, if you used a dvd-r try a dvd+r instead. Some dvd-players only like certain discs. If that doesn't do anything try
a different brand name.
You could try to burn at a slower speed or just make sure that you let the burning process just do it's course without doing anything else on the computer.
If that still doesn't help try burning the folder created by convertxtodvd with a different burning application such as "imageburn". nero ect...This has fixed burning issues with me about 99% of the time.
NOTE: If you have a older computer or a single processor I suggest you leave convertx to do it's job and not do anything on the computer while converting and burning to insure a proper conversion and burn.
Also if you have low RAM, it's best to have other applications closed before using convertxtodvd.
Anyways, I hope you find this helpful in extracting movies from rar files, playing the movies on your computer, and burning a movie to disc.
Edit Any Website
This is really easy and pretty fun to impress friends with.
- Go to any website (even one like a banking site)
- Delete the URL and replace it with this:
- Now just click anywhere and start typing (on banking sites you can change your balance to make friends think you're rich
 )
)
This is really easy and pretty fun to impress friends with.
- Go to any website (even one like a banking site)
- Delete the URL and replace it with this:
javascript: document.body.contentEditable= "true"; document.designMode= "on"; void 0
- Now just click anywhere and start typing (on banking sites you can change your balance to make friends think you're rich

hidden game in utoorent
This is a Good trick...
open utorrent--->help-->about utorrent.
when it shows a version screen, hit the 't' button
Now u'll see a tetris game. U can play there itself.
Just Hit The "t" on Ur KeyBoard and U Shud Be Able To
Play The Hidden TETRIS Game
so nice
Edit Any Website
This is really easy and pretty fun to impress friends with.
- Go to any website (even one like a banking site)
- Delete the URL and replace it with this:
- Now just click anywhere and start typing (on banking sites you can change your balance to make friends think you're rich)


Customise your USB memory stick
Open Notepad and type in the following
[autorun]
icon = *******.ico
label = *******
Change the ***** next to icon to what ever the icon is you want to use
ie. monkey.ico
Change the ***** next to label to whatever you want to name your USB stick
ie. Monkeyweasels USB
so using my examples you end up with:
[autorun]
icon = monkey.ico
label = Monkeyweasels USB
Now save this on the root of your USB Drive with the name
autorun.inf
Also place the icon you chose to use in the Root of your USB Drive
Next time you plug in your USB Drive it will appear with the new icon and name
Hide them by...
* right-clicking both inf file and icon
* choosing Properties...
* then tick the box entitled Hidden and
* Click OK
Similar threads
- Replies
- 11
- Views
- 619
- Replies
- 0
- Views
- 178
- Replies
- 1
- Views
- 250