Latest ads
-
 Pure VPN - Up to 27 Months
- vgp
- Updated:
-
 Gemini AI PRO 18 months Offer
- Hawaka
- Updated:
-
koko account
- DasunEranga
- Updated:
You are using an out of date browser. It may not display this or other websites correctly.
You should upgrade or use an alternative browser.
You should upgrade or use an alternative browser.
Macho eka weda ne. Invalid format kiyala enawa. mama try kare zip file ekak tamai!!!
Sowwie machan! Meka try karala balala kiyananna!
ZIP Password Recovery Magic v6.1.1.131

ZIP Password Recovery Magic is an easy-to-use program that can help you to recover lost passwords for zip archives. ZIP Password Recovery Magic provides brute-force and dictionary recovery methods, you can pause and resume recovery job easily. ZIP Password Recovery Magic has an easy to use interface. All you need to recover your password is just to add your file to the operation window.
Key Features
• Recover passwords for ZIP archives and self•extracting ZIP archives.
• Supports brute-force and dictionary recovery methods.
• You can select character from a range of character options including: Letters, Numbers, symbol...
• Pause and resume recovery job easily.
• Work in the background.
• Features a user-friendly interface.
Home Page -

Machang same thing... not working!!!
Monitor to Strobe Light
This isn't so much a tutorial as just something that is cool, I found out about it and would like to share the experience =].
It's simply a website that will flash lights on your monitor causing a strobe light effect, not perfect but it's still pretty cool to turn your monitor into a strobe light on demand =]. It helps if you press F11 to get the full screen web browser when you do this, just make sure you won't get seizures and stuff like that, I would hate to be responsible for that.
Anyway, here is the website. Very simple to follow.
Oh, something I forgot, in case you can't find out how to start it, move your mouse to the upper left corner of the screen once you hit "Start Strobe" and a control panel will show up.
This isn't so much a tutorial as just something that is cool, I found out about it and would like to share the experience =].
It's simply a website that will flash lights on your monitor causing a strobe light effect, not perfect but it's still pretty cool to turn your monitor into a strobe light on demand =]. It helps if you press F11 to get the full screen web browser when you do this, just make sure you won't get seizures and stuff like that, I would hate to be responsible for that.
Anyway, here is the website. Very simple to follow.
---
Oh, something I forgot, in case you can't find out how to start it, move your mouse to the upper left corner of the screen once you hit "Start Strobe" and a control panel will show up.
fatta fatta banZ
keep It up.................THXxxxxxxxxxxxxxxx
 thank you bro!
Mousekeys
What if your mouse/touchpad stops working and you only have your keyboard left?
If you can remeber the windows shortcuts great! but an easier way is to use mousekeys
Hold down ALT and SHIFT and press the NUM LOCK KEY.
The computer will ask you if you want to switch on Mousekeys.
Use the outside numbers on your numberpad (12346789) to control the cursor and press the 5 key to select.
A mouse icon will appear in your taskbar Click this to change the settings for pointer speed etc.
How to set up Internet Connection Sharing (Windows XP Computers)
Before you begin:
First, ensure that your LAN is setup properly for ICS:
On the HOST PC, please run the Network Setup Wizard:
On the CLIENT PC(s), please run the Network Setup Wizard:
Your LAN should now be configured properly; it is now time to setup ICS.
On the HOST PC, please do the following:
Before you begin:
- The 'Host' computer is the system that will be connecting to the Internet; 'Client' refers to any computer that is sharing the Internet connection, and is connecting to the Host computer.
- You may need to disable or configure any firewall(s) to ensure that they are not interfering with your Network.
- This Tutorial assumes that your Networks Physical Setup is already in place and fully operational.
- You should be aware that for every concurrent Internet Connection, your Internet Speed will be markedly decreased -- therefore if you are using 56k Dial-up, your Internet will become very slow with too many Client computers connected.
First, ensure that your LAN is setup properly for ICS:
On the HOST PC, please run the Network Setup Wizard:
- Goto Start --> Programs --> Accessories --> CommunicationsNetwork Setup Wizard. -->
- The first thing to do when the wizard appears is read the welcome message, and then click Next.
- Read the 'Before you continue....' message, and then click Next.
- Select the option This computer connects directly to the Internet. The other computers on my network connect through this computer, and then press Next.
- Now, type in a Description for your computer; ie: Host Computer.
- Enter a Computer Name (or leave it as it's Default), and then press Next.
- Enter a Workgroup Name -- or leave it as it's default, and then press Next.
- If you want to share files and/or your printer with other computers on the network, select the option Turn on file and printer sharing and press Next.
- Check the information; if it is all fine, press Next.
On the CLIENT PC(s), please run the Network Setup Wizard:
- Goto Start --> Programs --> Accessories --> CommunicationsNetwork Setup Wizard. -->
- The first thing to do when the wizard appears is read the welcome message, and then click Next.
- Read the 'Before you continue....' message, and then click Next.
- Select the option This computer connects to the Internet through a residential gateway or another computer on my network, and then press Next.
- Now, type in a Description for your computer; ie: Client1 Computer.
- Enter a Computer Name (or leave it as it's Default), and then press Next.
- Enter the same Workgroup Name that you used on the HOST Next. computer, and then press
- If you want to share files and/or your printer with other computers on the network, select the option Turn on file and printer sharing and press Next.
- Check the information; if it is all fine, press Next.
- Now, if possible, you should Create a Network Setup Disk -- once you have created a Network Setup Disk, insert it into any other computer on your network that you intend to use as a Client and run it; follow all prompts. If you cannot create a Network Setup Disk, then repeat the above steps on all Client PC's, however ensure that you give each Client computer a unique name; ie: Client1, Client2, Client3 etc..
Your LAN should now be configured properly; it is now time to setup ICS.
On the HOST PC, please do the following:
- Open the Network Connections window (Start --> Programs --> Accessories --> Communications --> Network Connections).Internet Connection Here, you should have at least two connections listed: one for your , and one for the Ethernet adapter connected to your Local Area Network (LAN).
- Choose the Advanced tab, and turn on the Allow other network users to connect through this computers Internet connection option when you're done. option. Click OK
- Verify that Internet Connection Sharing is enabled; it should say Enabled, Shared in the Network Connections window.
- You should now be able to access the Internet by connecting the Host computer to your Service Provider -- Client computers do not need to connect; simply open up Internet Explorer and you should be able to browse. If you are unable to connect to Internet Explorer on the Client computers, ensure that the Host computer has an active connection to the Internet.
Wowwwww
Macho mama me Thread aka mula idanma Baluwa ,,
There had a So valuable things in your Thread ..
So keep it up .....
We are keeping Touch ....
Macho mama me Thread aka mula idanma Baluwa ,,
There had a So valuable things in your Thread ..
So keep it up .....
We are keeping Touch ....
Elazzzzzzzzzzzzzzzzzzzzzz
")
Enabling right click on sites that disable it
Lots of web sites have disabled the right click function of the mouse button... it's really, really annoying. This is done so that you don't steal (via right-click->save picture) their photos or images or any other goodies. Unfortunately, it disables ALL right-click functionality: copy, paste, open in new window.
Click "Tools"->"Internet Options"
Click the "Security" tab
Click "Custom Level"
Scroll down to the "Scripting" section
Set "Active Scripting" to "disable"
Click "Ok" a couple of times.
You'll probably want to turn this back to "enable" when your done... 'cause generally the javascript enhances a website.
2. You would see that Enable Javascript is checked by default. Uncheck it and click OK.
3. Right Clicking should now be enabled on websites that do not allow it.
4. If this does not work, you could disable java altogether from the check box in the same window.
2. From the left panel, select "Content"
3. You would see that Enable Javascript is checked by default. Uncheck it and click OK.
4. Right Clicking should now be enabled on websites that do not allow it.
5. If this does not work, you could disable java altogether.
Lots of web sites have disabled the right click function of the mouse button... it's really, really annoying. This is done so that you don't steal (via right-click->save picture) their photos or images or any other goodies. Unfortunately, it disables ALL right-click functionality: copy, paste, open in new window.
- INTERNET EXPLORER
Click "Tools"->"Internet Options"
Click the "Security" tab
Click "Custom Level"
Scroll down to the "Scripting" section
Set "Active Scripting" to "disable"
Click "Ok" a couple of times.
You'll probably want to turn this back to "enable" when your done... 'cause generally the javascript enhances a website.
- Mozilla Firefox
2. You would see that Enable Javascript is checked by default. Uncheck it and click OK.
3. Right Clicking should now be enabled on websites that do not allow it.
4. If this does not work, you could disable java altogether from the check box in the same window.
- Opera
2. From the left panel, select "Content"
3. You would see that Enable Javascript is checked by default. Uncheck it and click OK.
4. Right Clicking should now be enabled on websites that do not allow it.
5. If this does not work, you could disable java altogether.
15 Top Windows XP Secrets
1. Useful key shortcuts available:
- Windows key + D - shows the desktop
- Windows key + M - minimizes all open windows
- Windows key + Shift + M - maximizes all open windows
- Windows key + E - Runs Windows Explorer
- Windows key + R - shows the RUN dialog
- Windows key + F - shows Search window
- Windows key + Break - shows System Properties box
- Windows key + TAB - Go through taskbar applications
- Windows key + PAUSE Display the System Properties dialog box
- Windows key + U Open Utility Manager
- ALT + TAB - Cycle through opened applications
- Hold down CTRL while dragging an item to Copy it
- CTRL + ESC Display the Start menu
- ALT + ENTER View the properties for the selected item
- F4 key Display the Address bar list in My Computer or
- NUM LOCK + Asterisk (*) Display all of the subfolders that are under the selected folder
2. Lock Windows to protect computer
You can lock Windows to protect the computer when leaving the station easily by creating a shortcut with the path rundll32.exeuser32.dll, LockWorkStation. The Windows key + L is also a shortcut to this feature.
3. Edit sysoc.inf to list all software
To show all software that can be removed from your computer (including protected Windows services), you can manually edit (using notepad for example) the sysoc.inf file located in Windows\inf\. Just remove the word hide next to the software pack.
*Note* - use this at your own risk. Removing critical components of the system will make Windows instable.
4. Windows XP comes with IPv4 and IPv6
Windows XP comes both IPv4 and IPv6 support. To enable IPv6, you can install the protocols needed with the command "ipv6 install" in the command-prompt. Then type ipv6 /? to see the options. The installation will not remove the IPv4 protocols so your current configuration will still work.
5. Access Task Manager with shortcut
To access the Task Manager easier, you can make a shortcut that points to %windir%\system32\taskmgr.exe.
6. Stop treating ZIP files like Folders
If you don't want your Windows XP to treat ZIP files like folders, you can disable this component by running regsvr32 /u zipfldr.dll at the command prompt or Run dialog. If you start missing it, you can enable it by typing regsvr32 zipfldr.dll.
7. Run program as diffrent user
You can run a program as a different user. Right click an application and select Run As command.
8. Switch users leaving applications opened
You can switch users leaving the applications opened too (*NOTE* use this only when needed since it could lead to system instability).
Go to Task Manager - processes and end the process explorer.exe. This will end only your session and not all applications. Then go to Applications tab, click New task and type runas /user
 omainname\username explorer.exe. A password prompt will appear to login to the desired username. The user's session will start, with all your previously applications running.
I recommend to open first a command-line prompt and type runas /? to see all the options available.
9. Rename multiple files in Windows at once
Rename multiple files in Windows at once. Select them all, right click and select Rename. Enter the desired name. They will be renamed using what you specified, with a number in brackets to distinguish them.
10. Task kill feature in Windows
Windows has a task kill feature similar to Linux. Go to a command prompt and run the command tasklist to see running processes with PID numbers. Then type tskill
to end the specific task. This forces an instant closing of the task.
11. Edit features with GPEDIT.MSC
You can edit many features by running gpedit.msc. You can add log on/log off scripts here and many features.
12. Edit accounts in the command prompt
You can edit accounts by running "control userpasswords2" at the command prompt.
13. Use systeminfo.exe to see System Information
You can use the systeminfo.exe command in the command prompt to see System Information, including all Windows updates and hotfixes.
14. Disable system services for maximum performance
There are system services that you can disable to free up the system's load. To access the interface that permits you to make changes to system's services, type services.msc and the command prompt.
This is a list of services that are *usually* useless and can be safely disabled.
Alerter
Application Layer Gateway Service,
Application Management
Automatic Updates
Background Intelligent Transfer
Clipbook
Distributed Link Tracking Client
Distributed Transaction Coordinater
Error Reporting Service
Fast User Switching Compatibility
IMAPI CD-Burning
Indexing Service
IPSEC Services
Messenger
Net Logon
Net Meeting
Remote Desktop Sharing
Network DDE
Network DDE DSDM
Portable Media Serial Number
Remote Desktop Help Session Manager
Remote Registry
Secondary Logon
Smartcard
SSDP Discovery Service
Uninterruptible Power Supply
Universal Plug and Play Device Host
Upload Manager
Webclient
Wireless Zero Configuration
WMI Performance Adaptor
*NOTE*: Make sure you don't need them since some applications you're using could depend on them. If you make any application to fail by disabling any of the services, go back and enable it again.
15. Repair Windows XP by using the XP installation CD
If your system failes to start due to an error related to missing HAL.DLL, invalid Boot.ini or any other critical system boot files you can repair this by using the XP installation CD. Simply boot from your XP Setup CD and enter the Recovery Console. Then run "attrib -H -R -S" on the C:\Boot.ini file and delete it. Run "Bootcfg /Rebuild" and then Fixboot.
1. Useful key shortcuts available:
- Windows key + D - shows the desktop
- Windows key + M - minimizes all open windows
- Windows key + Shift + M - maximizes all open windows
- Windows key + E - Runs Windows Explorer
- Windows key + R - shows the RUN dialog
- Windows key + F - shows Search window
- Windows key + Break - shows System Properties box
- Windows key + TAB - Go through taskbar applications
- Windows key + PAUSE Display the System Properties dialog box
- Windows key + U Open Utility Manager
- ALT + TAB - Cycle through opened applications
- Hold down CTRL while dragging an item to Copy it
- CTRL + ESC Display the Start menu
- ALT + ENTER View the properties for the selected item
- F4 key Display the Address bar list in My Computer or
- NUM LOCK + Asterisk (*) Display all of the subfolders that are under the selected folder
2. Lock Windows to protect computer
You can lock Windows to protect the computer when leaving the station easily by creating a shortcut with the path rundll32.exeuser32.dll, LockWorkStation. The Windows key + L is also a shortcut to this feature.
3. Edit sysoc.inf to list all software
To show all software that can be removed from your computer (including protected Windows services), you can manually edit (using notepad for example) the sysoc.inf file located in Windows\inf\. Just remove the word hide next to the software pack.
*Note* - use this at your own risk. Removing critical components of the system will make Windows instable.
4. Windows XP comes with IPv4 and IPv6
Windows XP comes both IPv4 and IPv6 support. To enable IPv6, you can install the protocols needed with the command "ipv6 install" in the command-prompt. Then type ipv6 /? to see the options. The installation will not remove the IPv4 protocols so your current configuration will still work.
5. Access Task Manager with shortcut
To access the Task Manager easier, you can make a shortcut that points to %windir%\system32\taskmgr.exe.
6. Stop treating ZIP files like Folders
If you don't want your Windows XP to treat ZIP files like folders, you can disable this component by running regsvr32 /u zipfldr.dll at the command prompt or Run dialog. If you start missing it, you can enable it by typing regsvr32 zipfldr.dll.
7. Run program as diffrent user
You can run a program as a different user. Right click an application and select Run As command.
8. Switch users leaving applications opened
You can switch users leaving the applications opened too (*NOTE* use this only when needed since it could lead to system instability).
Go to Task Manager - processes and end the process explorer.exe. This will end only your session and not all applications. Then go to Applications tab, click New task and type runas /user

I recommend to open first a command-line prompt and type runas /? to see all the options available.
9. Rename multiple files in Windows at once
Rename multiple files in Windows at once. Select them all, right click and select Rename. Enter the desired name. They will be renamed using what you specified, with a number in brackets to distinguish them.
10. Task kill feature in Windows
Windows has a task kill feature similar to Linux. Go to a command prompt and run the command tasklist to see running processes with PID numbers. Then type tskill
to end the specific task. This forces an instant closing of the task.
11. Edit features with GPEDIT.MSC
You can edit many features by running gpedit.msc. You can add log on/log off scripts here and many features.
12. Edit accounts in the command prompt
You can edit accounts by running "control userpasswords2" at the command prompt.
13. Use systeminfo.exe to see System Information
You can use the systeminfo.exe command in the command prompt to see System Information, including all Windows updates and hotfixes.
14. Disable system services for maximum performance
There are system services that you can disable to free up the system's load. To access the interface that permits you to make changes to system's services, type services.msc and the command prompt.
This is a list of services that are *usually* useless and can be safely disabled.
Alerter
Application Layer Gateway Service,
Application Management
Automatic Updates
Background Intelligent Transfer
Clipbook
Distributed Link Tracking Client
Distributed Transaction Coordinater
Error Reporting Service
Fast User Switching Compatibility
IMAPI CD-Burning
Indexing Service
IPSEC Services
Messenger
Net Logon
Net Meeting
Remote Desktop Sharing
Network DDE
Network DDE DSDM
Portable Media Serial Number
Remote Desktop Help Session Manager
Remote Registry
Secondary Logon
Smartcard
SSDP Discovery Service
Uninterruptible Power Supply
Universal Plug and Play Device Host
Upload Manager
Webclient
Wireless Zero Configuration
WMI Performance Adaptor
*NOTE*: Make sure you don't need them since some applications you're using could depend on them. If you make any application to fail by disabling any of the services, go back and enable it again.
15. Repair Windows XP by using the XP installation CD
If your system failes to start due to an error related to missing HAL.DLL, invalid Boot.ini or any other critical system boot files you can repair this by using the XP installation CD. Simply boot from your XP Setup CD and enter the Recovery Console. Then run "attrib -H -R -S" on the C:\Boot.ini file and delete it. Run "Bootcfg /Rebuild" and then Fixboot.
How To Create Full Windows Backup by Imaging Without Using Norton Ghost
Macrium Reflect is a backup and disk imaging software program for Microsoft Windows developed by Paramount Software UK Ltd in 2006. It creates disk images and file backup archives using Microsoft Volume Shadow Copy Service to ensure ‘point in time’ data accuracy. This means that you can create a full backup of your hard drive through imaging even when you’re logged on in Windows.
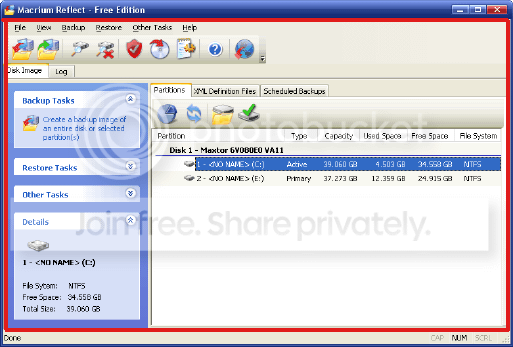
There are 2 versions of Macrium Reflect. The free and full version. The free version can only be used on Windows XP and Vista. You’re able to create disk or partition images and access them from Windows Explorer. It has a scheduler where you can create backup from the defined time. Finally it can also create Linux Rescue CD or BartPE Rescue CD, which has network support so you can save the created image to another computer. You can directly burn the Live CD from the software.
As for the full version, it has all the features in free version plus the following: Windows Server 2003 compatibility, File and Folder backup and restore, Differential disk images and backups, Incremental disk images and backups, VBScript Generator, Email notifications, Run programs before or after backup, Shut down PC after backup, Windows system event log support, Windows PE 2.0 Rescue CD with RAID support, Windows boot menu, Technical support by email and forum access.
Although it’d be nice to have all the features in the full version, the free version is good enough to help me easily restore Windows within minutes.
Let me take you through a simple step-by-step disk imaging with Macrium Reflect FREE Edition. Let’s say Windows is installed at C: drive and D: would be your CD/DVD drive. I’d advice you to create another partition (E: drive) to save the backup image.
1. Run Macrium Reflect
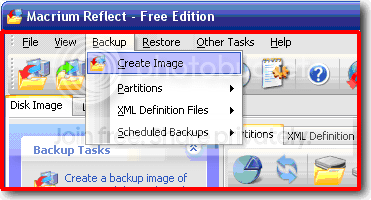
2. Click Backup from the menu bar and select Create Image.
3. Create Backup Wizard will appear. Click Next, and select the partition that you want to backup. Select C: drive and click Next.
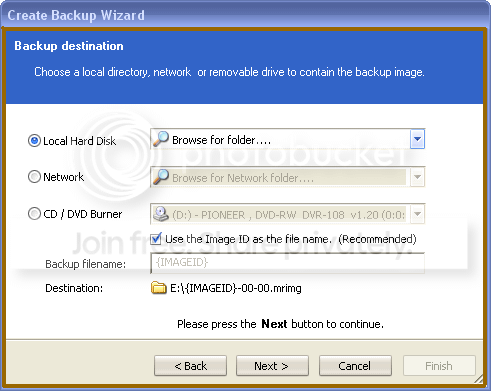
4. Now select Local Hard Disk and browse to E: drive. Click Next
5. Click Finish to begin imaging.
When the imaging completes, you should have a file with random letters and numbers with the extension .mrimg at your E: drive. That’s the image of your C: drive.
Next, you’ll have to create a Rescue CD.
1. Run Macrium Reflect
2. Click Other Tasks from menu bar and select Create Rescue CD.
I’d prefer to use Linux, so select Linux and click Next.
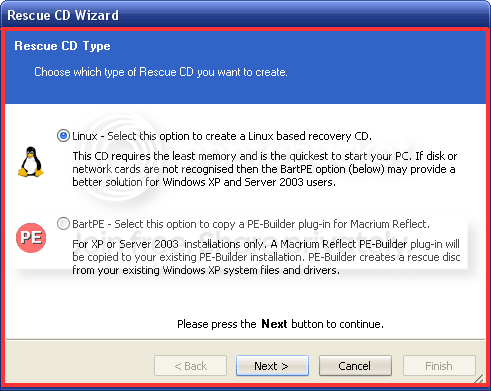
3. Put in a blank CDR disc into your CD/DVD drive and click Finish.
When your Windows system goes haywire or refuse to boot up, then you will have to start your PC using a rescue CD. Just boot up your computer with the Linux Rescue CD that you just created. Follow the on-screen instructions from Restore Wizard to recover partitions from your saved image file.
When your computer has a system or software that is hard to configure and get it right, it’d be best to create an image of your partition as a precaution. Whenever the system or software doesn’t work and you can’t get people to help you to fix it, the easiest way to fix it yourself is by restoring from the image that you created while it is still working. There you go, no need to use Norton Ghost because Macrium Reflect can do the job.
Macrium Reflect is a backup and disk imaging software program for Microsoft Windows developed by Paramount Software UK Ltd in 2006. It creates disk images and file backup archives using Microsoft Volume Shadow Copy Service to ensure ‘point in time’ data accuracy. This means that you can create a full backup of your hard drive through imaging even when you’re logged on in Windows.

There are 2 versions of Macrium Reflect. The free and full version. The free version can only be used on Windows XP and Vista. You’re able to create disk or partition images and access them from Windows Explorer. It has a scheduler where you can create backup from the defined time. Finally it can also create Linux Rescue CD or BartPE Rescue CD, which has network support so you can save the created image to another computer. You can directly burn the Live CD from the software.
As for the full version, it has all the features in free version plus the following: Windows Server 2003 compatibility, File and Folder backup and restore, Differential disk images and backups, Incremental disk images and backups, VBScript Generator, Email notifications, Run programs before or after backup, Shut down PC after backup, Windows system event log support, Windows PE 2.0 Rescue CD with RAID support, Windows boot menu, Technical support by email and forum access.
Although it’d be nice to have all the features in the full version, the free version is good enough to help me easily restore Windows within minutes.
Let me take you through a simple step-by-step disk imaging with Macrium Reflect FREE Edition. Let’s say Windows is installed at C: drive and D: would be your CD/DVD drive. I’d advice you to create another partition (E: drive) to save the backup image.
1. Run Macrium Reflect
2. Click Backup from the menu bar and select Create Image.

3. Create Backup Wizard will appear. Click Next, and select the partition that you want to backup. Select C: drive and click Next.

4. Now select Local Hard Disk and browse to E: drive. Click Next
5. Click Finish to begin imaging.
When the imaging completes, you should have a file with random letters and numbers with the extension .mrimg at your E: drive. That’s the image of your C: drive.
Next, you’ll have to create a Rescue CD.
1. Run Macrium Reflect
2. Click Other Tasks from menu bar and select Create Rescue CD.
I’d prefer to use Linux, so select Linux and click Next.

3. Put in a blank CDR disc into your CD/DVD drive and click Finish.
When your Windows system goes haywire or refuse to boot up, then you will have to start your PC using a rescue CD. Just boot up your computer with the Linux Rescue CD that you just created. Follow the on-screen instructions from Restore Wizard to recover partitions from your saved image file.
When your computer has a system or software that is hard to configure and get it right, it’d be best to create an image of your partition as a precaution. Whenever the system or software doesn’t work and you can’t get people to help you to fix it, the easiest way to fix it yourself is by restoring from the image that you created while it is still working. There you go, no need to use Norton Ghost because Macrium Reflect can do the job.

Internet Download Manager (Cracked+Tutorial for RS Premium Users)
Internet Download Manager Tutorial.
I have done another IDM tutorial as the other that is on here no longer has the screengrabs.
But before starting the install, make sure you have logged into Rapidshare,and clicked on Settings in the toolbar and then tick the box next to Direct Downloads as seen here.

Installing IDM
Download IDM from here:
http://rapidshare.com/files/378422846/IDM_5.18.8_Precracked.rar
Install and follow these instructions to patch the program.
IDM will install into your Start menu and place an icon into the Tasktray.
Right Click the Taskbar and bring up Task Manager.
Turn off IDMan.exe and IEMon.exe by right clicking on them and End Process.
Overwrite the IDM.exe file that is located at C\Program Files\IDM\ with the other IDM.exe file that is in the crack folder.
Then double click the .reg file that is also in the crack folder.
DO NOT ACCEPT UPDATES IF THEY ARE OFFERED, THE CRACK WILL NO LONGER WORK IF YOU DO.YOU WILL ALSO HAVE TO UNINSTALL IT AND CLEAN THE REGISTRY BEFORE ATTEMPTING A REINSTALL OF THE PROGRAM.
This is the Tool Bar which consists if shortcut buttons to the various options.

You will notice too that there is a Category list that once expanded shows you the various information concerning your Queues,and Finished & Unfinished Downloads along with their sub folders.

To set up IDM click on Downloads and scroll to Options as seen below

You will then get this Window here, click the General tab and select the options to suit.

The File Types tab allows you to specify what files and sites you want to add or remove by either adding them to the Edit List or removing the file extensions from the box

The Save To tab has a drop down box for each sub folder such as General,Video,Music,etc and also allows you to change the default download location and to remember those settings.You can also change the Temporary Directory setting.


The Downloads tab is pretty self explanaory so just select what you prefer.You can also set your installed Anti Virus program to automatically scan each file as its being downloaded although this will slow your downloads down a bit.

The Connection tab allows you to set your ISP speed and to set a limit on the number of files to download and at what speeds.

The Site Logins tab is a very important one to set correctly as if not your downloads may not work.
Enter your Rapidshare or other host login details by clicking on New and entering your username and password.Remember though that if once you have entered the details your downloads still do not work or show as dead files even after you have confirmed that they are indeed live,you have either not set the Rapidshare premium account to "direct" downloads, or you have put the general LOGIN page address and not your actual LOGGED in page address into the IDM settings, or the Rapidshare cookie needs resetting.
To do this clear your Internet Cache by opening your browser,then go to Tools/Internet Options/ Browsing History/Delete/Cookies then re log into Rapidshare with your username and password.This will reset the cookie so that Rapidshare recognizes your IDM program from your computer.
Its been brought to my attention that it is not necessary to input your Rapidshare login details into IDM when using IE8, I have tried this by removing my login details from IDM, I then logged out and back in again to Rapidshare via IE8 (to reset the cookie) and I successfully downloaded without any trouble.Its obvious that the login info contained in the cookie is being applied by IE8 to IDM,something that IE7 would not do.

You can also limit your download speeds by turning on a Speed Limiter,just choose by how much you want to reduce the speed by typing it in the box and applying.This is useful if you still want to use the internet whilst downloading.


You can Import or Export your download files list by choosing this,handy if you want to transfer the downloads to another computer or laptop.

The Scheduler is a fantastic option, especially since Rapidshare has the Happy Hours function.Rapidshare allows you to download between 2am and 10 am Central European Time (CET) every day and just be charged 10% of the actual download size.At the time of writing this tutorial it was still in effect but can change at any time.By setting up the scheduler, you can take advantage of this but remember to work out when CET is as it will differ to your local time depending on where in the world you are.

The Files in Queue tab show all the files due to be downloaded.You can change how many to allow at the same time by using the drop down box

and also the position in the Queue by highlighting the ones you want to move up or down and pressing the arrows accordingly.

IDM installs into the context menu,the "right click" menu of a mouse.
To download some files, highlight the ones you want,right click on them and select Download with IDM.

A window will appear with the files in a queue,showing the name,size,from location and save to directory.Click Check All toplace a tick into the corresponding box and then OK,the files will then be added to the Download Queue.
You then just start the Queues whenever you want to, either immediately or using the scheduler.

If you highlight only 1 file though, the download will start immediately unless you chose Download Later as shown below

Similar threads
- Replies
- 11
- Views
- 619
- Replies
- 0
- Views
- 178
- Replies
- 1
- Views
- 250