Latest ads
-
 Pure VPN - Up to 27 Months
- vgp
- Updated:
-
 Gemini AI PRO 18 months Offer
- Hawaka
- Updated:
-
koko account
- DasunEranga
- Updated:
You are using an out of date browser. It may not display this or other websites correctly.
You should upgrade or use an alternative browser.
You should upgrade or use an alternative browser.
Sowwie machan! Meka try karala balala kiyananna!
ZIP Password Recovery Magic v6.1.1.131

ZIP Password Recovery Magic is an easy-to-use program that can help you to recover lost passwords for zip archives. ZIP Password Recovery Magic provides brute-force and dictionary recovery methods, you can pause and resume recovery job easily. ZIP Password Recovery Magic has an easy to use interface. All you need to recover your password is just to add your file to the operation window.
Key Features
• Recover passwords for ZIP archives and self•extracting ZIP archives.
• Supports brute-force and dictionary recovery methods.
• You can select character from a range of character options including: Letters, Numbers, symbol...
• Pause and resume recovery job easily.
• Work in the background.
• Features a user-friendly interface.
Home Page -


okata godak wela yanawane eka thami epa wenne.

Change the Registered User Information
I have found this article posted on the internet being really useful:
I have found this article posted on the internet being really useful:
Once you've installed Windows, you can change the Registered Owner, Registered Organization, or Product ID to anything you want. Here's how you do it:
Windows 95/98/Me
Run the Registry Editor (REGEDIT.EXE).
Open HKEY_LOCAL_MACHINE\ SOFTWARE\ Microsoft\ Windows\ CurrentVersion.
To change the values of the RegisteredOrganization, RegisteredOwner, or ProductId, simply double-click on them.
Note: This will only change the registered user information for Windows, not for the applications on your system.
Windows 2000/2003/XP/Vista
Run the Registry Editor (REGEDIT.EXE).
Open HKEY_LOCAL_MACHINE\ SOFTWARE\ Microsoft\ Windows NT\ CurrentVersion.
To change the values of the RegisteredOrganization, RegisteredOwner, or ProductId, simply double-click on them.
Note: This will only change the registered user information for Windows, not for the applications on your system.
")
How to Create Custom Icons
This is a little tutorial that will show you how to create custom icons, I like using it for movie files so it shows the cover of the movie instead of whatever it will open with (like windows media player, quicktime, etc.)
ex.

Obviously not all the icons are customized, I just haven't gotten around to all of them yet. But you get the picture from the ones that are =].
There really is only one thing you will need, a freeware program called pixel toolbox. You can google this and download it easily, otherwise i uploaded the set-up to rs: http://rapidshare.com/files/263511722/Setup.exe
The way I do it may not be the easiest way, but as with anything out there a better and easier way will always exist, this is simply the way I do it. It is somewhat a pain in the ass, but it still only takes a few minutes.
Find the image you want, for my examples I am using movie covers for movie files, but it can be anything you want. Once you get the image, chances are you will have to resize it. The icon will work best if it's perfectly square, otherwise there will be white stuff where more icon image could be.
Open the image with paint, and play around with the image to resize it and get it as close to a perfect square as you can, and once you save the file once it has been edited, open up pixel toolbox and check the windows icon box. You can play with the settings, they are just colors and pixel width, personally I always go with 64x64 and the color option farthest to the right that you can select.

Once you have your options selected, go up in the upper right corner and click start. This will open up the actual area where you will make the icon. There are a lot of fun things to play around with, but to my knowledge no way to resize the image (if anyone knows how, please tell me). This is why I resize it in paint to make it a square image, so it will fit properly. Click on import to get the image that you want in it, and it will pop up in the box. You can move it around if you didnt get it perfectly square to fit better, and even color in the white to make it different colors if it would fit better. At this point, it looks like shit...very pixely, not detailed, but you have to remember that it is an icon, and the icon will not be that zoomed in. It will look a lot smoother once it's actually applied. Anyway, this is where you should be at at this point...

From here, very easy, just click save, choose name and where you want to save it, it automatically saves it as a .ico, don't change that.
Now that you have the icon image, we can change your file. I make a shortcut of the video, but this is only because I have my computer set to always show the file type extension, and with movies I like having it look cleaner by simply having the name of the movie, and using shortcuts allow you to take off the .avi or .mov or whatever.
With the regular file, right click it and go to properties. Then go to the icon tab, and check the "Change the icon for this file only" box, then click on change icon. From here, go to browse and then to wherever you saved your .ico and set it as that. If you wish to set all .avi or whatever other file type as a certain icon, leave the "Change the icon for this file only" box unchecked. After this do all the ok things and it will be saved.
Using a shortcut is a bit different, but not a whole lot. Right-click the short cut and go to properties, and click on the "Change icon" button. From here, it's the same as the above.
If anyone has questions or something to add to make it easier, feel free to ask or help out more =].
This is a little tutorial that will show you how to create custom icons, I like using it for movie files so it shows the cover of the movie instead of whatever it will open with (like windows media player, quicktime, etc.)
ex.

Obviously not all the icons are customized, I just haven't gotten around to all of them yet. But you get the picture from the ones that are =].
There really is only one thing you will need, a freeware program called pixel toolbox. You can google this and download it easily, otherwise i uploaded the set-up to rs: http://rapidshare.com/files/263511722/Setup.exe
The way I do it may not be the easiest way, but as with anything out there a better and easier way will always exist, this is simply the way I do it. It is somewhat a pain in the ass, but it still only takes a few minutes.
Find the image you want, for my examples I am using movie covers for movie files, but it can be anything you want. Once you get the image, chances are you will have to resize it. The icon will work best if it's perfectly square, otherwise there will be white stuff where more icon image could be.
Open the image with paint, and play around with the image to resize it and get it as close to a perfect square as you can, and once you save the file once it has been edited, open up pixel toolbox and check the windows icon box. You can play with the settings, they are just colors and pixel width, personally I always go with 64x64 and the color option farthest to the right that you can select.
Once you have your options selected, go up in the upper right corner and click start. This will open up the actual area where you will make the icon. There are a lot of fun things to play around with, but to my knowledge no way to resize the image (if anyone knows how, please tell me). This is why I resize it in paint to make it a square image, so it will fit properly. Click on import to get the image that you want in it, and it will pop up in the box. You can move it around if you didnt get it perfectly square to fit better, and even color in the white to make it different colors if it would fit better. At this point, it looks like shit...very pixely, not detailed, but you have to remember that it is an icon, and the icon will not be that zoomed in. It will look a lot smoother once it's actually applied. Anyway, this is where you should be at at this point...
From here, very easy, just click save, choose name and where you want to save it, it automatically saves it as a .ico, don't change that.
Now that you have the icon image, we can change your file. I make a shortcut of the video, but this is only because I have my computer set to always show the file type extension, and with movies I like having it look cleaner by simply having the name of the movie, and using shortcuts allow you to take off the .avi or .mov or whatever.
With the regular file, right click it and go to properties. Then go to the icon tab, and check the "Change the icon for this file only" box, then click on change icon. From here, go to browse and then to wherever you saved your .ico and set it as that. If you wish to set all .avi or whatever other file type as a certain icon, leave the "Change the icon for this file only" box unchecked. After this do all the ok things and it will be saved.
Using a shortcut is a bit different, but not a whole lot. Right-click the short cut and go to properties, and click on the "Change icon" button. From here, it's the same as the above.
If anyone has questions or something to add to make it easier, feel free to ask or help out more =].
GTAIV - ServicePack2 to ServicePack3
GTAIV is known that runs only on SP3
But no...it runs on every XP
The key is that you must make GTAIV think that you have SP3
Here's the solution:
"START/RUN/REGEDIT/
HKEY_LOCAL_MACHINE/SYSTEM/CURRENTCONTROLSET/CONTROL/WINDOWS"
and modify the CSDVersion from 200 to 300 and then Restart the PC
At "MY COMPUTER/PROPERTIES" will ServicePack3 not ServicePack2
-And GTAIV will work!
Reinstall Windows Not Losing Anything
How To Reinstall Windows Without Losing Anything
-------------------------------------------------------
You can use this method as often as you like when you need to repair something that had gotten corrupted and you don't want to do a clean install.
This is better than doing a windows repair install from the cd because doing that can cause changes to settings and even make it so you can't get updates anymore from microsoft update site because of the 'silent install' they did a year or so ago (unless you rereg some dll files).
1- Start WindowsXP
2- Go to the location of your source files
3- Run WINNT32 /unattend
For example, D:\I386\winnt32 /unattend ( copy & paste this command into the RUN box, then press ENTER ) Your computer will do the rest.
OR
Start > All Programs > Accessories > Command Prompt.
Copy & paste > D:\I386\winnt32 /unattend (notice the space between 32 and / )
Press Enter.
If you have i386 on your drive, you can replace D: ( if D: is your cd drive ) with the location of it. (be sure it's the full i386 though)
D: is the driver letter where your windows XP Cd is
if D:\I386\winnt32 /unattend doesn't work then try : d:\winnt32 /unattend.
ai macho?
නියමයි මචන් ගොඩක් වැදගත් උඹ හෙන වැඩකාරයෙක්නේ කියන එක කෙටි කරලා කිව්වේ

Unlock Windows 7 GodMode
Windows 7 GodMode basically lets users access all of the operating system's control panels from within a single folder like one huge control panel for all the OS settings.

This is very simple to unlock, all you have to do is create a folder in a directory of your choice and name it with the following string:
GodMode.{ED7BA470-8E54-465E-825C-99712043E01C}
Cracking WinRAR Tutorial
Author: Jakash3
Typed December 05, 2009
This tutorial will show you how to remove the 40 days
trial timer for WinRAR 3.71 (using the method shown in
this tutorial, you may also try to crack newer versions
of winrar, but for now I will just use version 3.71) and
create a patch for it.
Download this which includes the following for what you need:
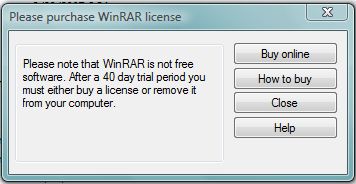
First open the wrar371 setup file to install WinRAR. Now open WinRAR, and
as you can see, there is the notice that comes up that says that you have
40 days to evaluate WinRAR then you have to buy it.
First before doing anything, make a copy/backup of WinRAR.exe
"C:\Program Files\WinRAR\WinRAR.exe".
Now we will disassemble WinRAR. So open HDASM and through here, load
the copy of WinRAR.exe that you created, don't worry about the settings
for disassembling; just stick with the default and click Disassemble. Once
loaded, we will look at the dialog box references of this program; the one
that we will try to find is called (by window title) "Please purchase WinRAR
license" (the dialog we see when we open WinRAR). To see this list of
dialogs, click 'D' on the toolbar. Now search for the dialog by typing in the
search bar "Please purchase WinRAR license". Of course, you don't have to
type the whole thing: once you have typed 'Please pur' it will index to the
only possible item for what we are searching for. When indexed you will see
the ID keyword next to it which in this case is "REMINDER". Now we can
take this ID and search for it in the disassembly. Exit the dialog references
box and click 'S' (for search string references) on the toolbar and search for
"REMINDER" w/out the quote. Double click on the result and it will bring to
the offset address 0043FF47, please make a note of this address.

At this address the instruction is 'push 004A8AA0', if you go to the
004A8AA0 address in the file (with a hex editor) you will see that all the hex
bytes [up until the hex 00 (null termination)] spell out 'REMINDER' in ascii.
And remember that this is an ID for the trial reminder dialog box. on the
second to next instruction you will see a call to USER32.DialogBoxParamA
external library to show and execute the functions of the trial reminder box
that was pushed to the stack for one of the arguments.
Now that we know the address of where this dialog comes in we can modify
it to take it out by replacing the instruction 'push 004A8AA0' with 'nop''s so
when the library call is executed it will return nothing since the ID of the
dialog template is not specified. A hex editor is required for the raw
modification of files. So we shall exit HDASM and drag and drop WinRAR.exe
into HIEW to load the hex dump and disassembly of WinRAR into HIEW
(HIEW32.exe). Now after you have loaded WinRAR into HIEW press F4
(mode) and select decode, press F5 (goto address) and enter '.0043FF47'
to go to the address of the REMINDER dialog setup. Once at this address,
press F3 to edit, and type 90 five times to replace 'push 0004A8AA0' with
'nop {newline} nop {newline} nop {newline} nop {newline} nop', nop means
No Operation it will perform no instruction; it's just a byte to take up file
space.

Press F9 to update.
Finally we have a cracked version copy of WinRAR! Optionally we can make
a patcher for this so when you re-install the trial of winrar 3.71 again, you
can just open the patcher in the same directory and winrar will be modified
again for the crack, instead of going through what we just did all over
again. This patch will be made with dUP.
Before starting, we should have our patched cracked version of WinRAR.exe
(which we just made) and the original WinRAR.exe file that is not cracked.
First to make a winrar crack patch open dUP and select New Project.
From here just enter patch info to show to the user before they execute
the patch. After saving, click Add and select [offset patch]. Edit the offset
patch data by double-clicking [Offset Patch] in the listbox. The file that we
want this program to patch is WinRAR.exe, so browse and select the original
WinRAR.exe file for the Target File. And instead of entering the offset, the
original byte, and the patched byte, we will just compare the orignal
WinRAR.exe file to the cracked WinRAR.exe. Do this by going to the
Compare Files groupbox and enter the orignal winrar and our patched winrar
for the appropriate fields and click Compare. Now that the file knows what
to patch we can save this, click save.

Finally, click Create Patch.
The patcher file will be created in your specified directory, after refreshing
that directory you should see it. Congrats on creating your WinRAR 3.71
Patch Crack! As said earlier, after you install the trial of winrar 3.71 just
open the patch within the same folder as WinRAR.exe and patch it.
Well that is my tutorial on cracking winrar, if you follow this example nicely, you can find that you can crack (or patch) newer versions of winrar using the same method. Good luck!
Author: Jakash3
Typed December 05, 2009
This tutorial will show you how to remove the 40 days
trial timer for WinRAR 3.71 (using the method shown in
this tutorial, you may also try to crack newer versions
of winrar, but for now I will just use version 3.71) and
create a patch for it.
Download this which includes the following for what you need:
- WinRAR 3.71 Trial Version
- Disassembler: HDASM (Hacker's Disassembler)
- Hex Editor: HIEW (Hacker's View)
- Patch Creator: dUP (diablo2oo2's Universal Patcher)
First open the wrar371 setup file to install WinRAR. Now open WinRAR, and
as you can see, there is the notice that comes up that says that you have
40 days to evaluate WinRAR then you have to buy it.

First before doing anything, make a copy/backup of WinRAR.exe
"C:\Program Files\WinRAR\WinRAR.exe".
Now we will disassemble WinRAR. So open HDASM and through here, load
the copy of WinRAR.exe that you created, don't worry about the settings
for disassembling; just stick with the default and click Disassemble. Once
loaded, we will look at the dialog box references of this program; the one
that we will try to find is called (by window title) "Please purchase WinRAR
license" (the dialog we see when we open WinRAR). To see this list of
dialogs, click 'D' on the toolbar. Now search for the dialog by typing in the
search bar "Please purchase WinRAR license". Of course, you don't have to
type the whole thing: once you have typed 'Please pur' it will index to the
only possible item for what we are searching for. When indexed you will see
the ID keyword next to it which in this case is "REMINDER". Now we can
take this ID and search for it in the disassembly. Exit the dialog references
box and click 'S' (for search string references) on the toolbar and search for
"REMINDER" w/out the quote. Double click on the result and it will bring to
the offset address 0043FF47, please make a note of this address.

At this address the instruction is 'push 004A8AA0', if you go to the
004A8AA0 address in the file (with a hex editor) you will see that all the hex
bytes [up until the hex 00 (null termination)] spell out 'REMINDER' in ascii.
And remember that this is an ID for the trial reminder dialog box. on the
second to next instruction you will see a call to USER32.DialogBoxParamA
external library to show and execute the functions of the trial reminder box
that was pushed to the stack for one of the arguments.
Now that we know the address of where this dialog comes in we can modify
it to take it out by replacing the instruction 'push 004A8AA0' with 'nop''s so
when the library call is executed it will return nothing since the ID of the
dialog template is not specified. A hex editor is required for the raw
modification of files. So we shall exit HDASM and drag and drop WinRAR.exe
into HIEW to load the hex dump and disassembly of WinRAR into HIEW
(HIEW32.exe). Now after you have loaded WinRAR into HIEW press F4
(mode) and select decode, press F5 (goto address) and enter '.0043FF47'
to go to the address of the REMINDER dialog setup. Once at this address,
press F3 to edit, and type 90 five times to replace 'push 0004A8AA0' with
'nop {newline} nop {newline} nop {newline} nop {newline} nop', nop means
No Operation it will perform no instruction; it's just a byte to take up file
space.

Press F9 to update.
Finally we have a cracked version copy of WinRAR! Optionally we can make
a patcher for this so when you re-install the trial of winrar 3.71 again, you
can just open the patcher in the same directory and winrar will be modified
again for the crack, instead of going through what we just did all over
again. This patch will be made with dUP.
Before starting, we should have our patched cracked version of WinRAR.exe
(which we just made) and the original WinRAR.exe file that is not cracked.
First to make a winrar crack patch open dUP and select New Project.
From here just enter patch info to show to the user before they execute
the patch. After saving, click Add and select [offset patch]. Edit the offset
patch data by double-clicking [Offset Patch] in the listbox. The file that we
want this program to patch is WinRAR.exe, so browse and select the original
WinRAR.exe file for the Target File. And instead of entering the offset, the
original byte, and the patched byte, we will just compare the orignal
WinRAR.exe file to the cracked WinRAR.exe. Do this by going to the
Compare Files groupbox and enter the orignal winrar and our patched winrar
for the appropriate fields and click Compare. Now that the file knows what
to patch we can save this, click save.

Finally, click Create Patch.
The patcher file will be created in your specified directory, after refreshing
that directory you should see it. Congrats on creating your WinRAR 3.71
Patch Crack! As said earlier, after you install the trial of winrar 3.71 just
open the patch within the same folder as WinRAR.exe and patch it.
Well that is my tutorial on cracking winrar, if you follow this example nicely, you can find that you can crack (or patch) newer versions of winrar using the same method. Good luck!
Similar threads
- Replies
- 11
- Views
- 618
- Replies
- 0
- Views
- 178
- Replies
- 1
- Views
- 250